Rug for a round stool. Crochet rug for a chair: learning to knit using simple patterns. Knitting seats for stools: patterns with descriptions


1.
2.
3.
4.
5.


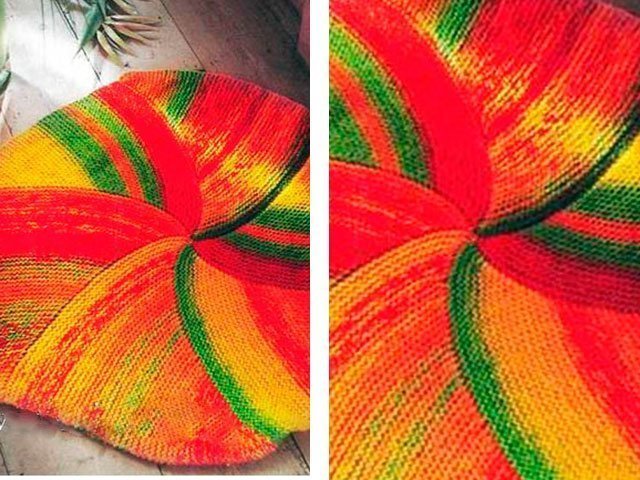
Not long ago on the Internet I saw bright photos crocheted rugs of stunning beauty, apparently from Japanese magazines. I tried to figure out knitting patterns and technology. These new ideas turned out to be very simple to implement and I want to talk about them, and of course show off what kind of rugs I made.


The materials you will need are a little bit of wool or synthetic yarn. different colors, but of the same thickness and hook No. 2 -2.5. The threads must be of the same thickness in order to obtain a high-quality, even product.
To make such rugs, you need to knit four strips of different colors separately according to the pattern:

First, we knit a chain of 60 loops (the result is a rug measuring approximately 30x30 cm, but this also depends on the thickness of the threads), we tie the chain with non-woven stitches.
- 2nd row: 4 stitches for lifting, 1 double crochet from the first stitch of the previous row, 14 double crochets, 4 double crochets from one loop of the previous row, 14 double crochets, 4 double crochets from one loop of the previous row, 28 double crochets, 2 double crochets from one loop of the previous row. You already get a strip with 4 rounded corners.
From the 3rd to the 6th row, knit with double crochets; in the corners for rounding we make increases as follows:
Upper and lower right corners (at the ends of the strip)
At the beginning of each row, instead of the first stitch, we knit 4 loops for lifting.
- 3rd row: 2 double crochets in each of the 2 corner stitches of the previous row,
- 4th row: *2 double crochets from one double crochet from one corner of the previous row, one double crochet*, repeat one more time,
- 5th row: *two double crochets, 2 double crochets from one double crochet corner of the previous row*, repeat once,
- 6th row: *2 double crochets from one double crochet stitch from the corner of the previous row, three double crochets*, repeat once.
Upper left corner
- 3rd row: 2 double crochets in each of the 4 corner stitches of the previous row,
- 4th row: 4 groups of 2 double crochets from one double crochet from one corner of the previous row, between them one double crochet,
- 5th row: 4 groups of 2 double crochets from one column of the corner of the previous row, between them there are two double crochets,
- 6th row: 4 groups of 2 double crochets from one column of the corner of the previous row, between them there are three double crochets.
We knit the lower left corner in a special way, which gives an additional effect to the rug:
- 3rd row: 2 unfinished double crochets, knitted together, in each of the 4 corner stitches of the previous row and 1 chain stitch (CH) between them,
- 4th row: 2 unfinished double crochets, knitted together, 1 ch, 2 unfinished double crochets, knitted together, from one group of double crochets, knitted together, 2 more such groups, 1 ch between them,
- 5th row: we knit 3 groups similarly to the 4th row, between them there are 2 unfinished double crochets, knitted together,
- 6th row: we knit 3 groups similarly to the 5th row, between them there are two times 2 unfinished double crochets, knitted together.
- 7th row: we tie all the loops with non-woven stitches.
The finished strips need to be sequentially sewn together: to the long side of one strip we sew the short side of the second and so on.
Now the resulting long colored knitted ribbon needs to be intertwined as follows, as shown in the diagram:

I knitted small colored strips for a sample and will show you how to weave them. I sewed the stripes in the following order: gray, turquoise, burgundy, pink.

Place one strip of the resulting colored tape ( gray) on the table, bring the entire tape up under the gray stripe.

Since the stripes have rounded corners, they themselves turn where they need to. We wind the tape to the left, then down and to the right under the gray and turquoise stripes.

Then we turn up to the gray stripe, to the left and down under the turquoise one, and bring it out in the middle part of the receiving rug above the gray stripe.

We bring the ribbon down under the burgundy stripe, over the gray stripe and then turn it to the right over the turquoise stripe and up under the burgundy stripe.

If, perhaps, it is not immediately clear from the drawing how to weave a ribbon from strips, then during the manufacturing process this will become more obvious.
We connect the ends of the strips (in my case, gray with pink) and for strength, so that the strips retain their shape and do not move, with wrong side we grab it with threads.
It turns out to be a wonderful, original, bright rug that can be used for stools, for example.

To make a floor mat, you can knit according to the pattern and sew on the base.

We start knitting from the center and knit a square with double crochets, making increases in the four corners first with two VPs, and then in the same way as when knitting stripes.
Every housewife has dozens of unnecessary things in her house. Don’t rush to throw away old textiles, because you can give them a second life by knitting new interior elements from pieces. Such products are made using a crochet hook. They are used both as soft chair seats and as rugs. After reading our article, you will learn about several ways to crochet rugs for beginners. It will also offer more complex circuit making a decorative rug from yarn.
Crochet pattern for home rugs

Most often, the rug has a square or rectangular shape. Even a beginner can tie it. To create such a model, the housewife will need burlap and several old things.
A rectangle should be cut out of a piece of burlap, which will become the basis of the future rug. Now prepare the unnecessary things. It is best if they are knitted. This material holds its shape well, and fringes do not form along its edges when cut.

Knitwear should be cut into strips of equal thickness. Then you need to thread the ends of the fabric through the burlap cell. Now you can tie them in a knot. It is necessary to thread the fabric through equal intervals of the burlap. On the back side you will see neat weaves, and on the front side you will get a kind of pile.

You can make a round rug in the same way, but it is better to make it on a special plastic base of the desired shape. The fact is that burlap doesn't take well oval shape, crumbling at the cut points.
Knitting is an ancient craft. Initially, it was carried out exclusively by men. Now it is considered a typical female activity.
How to crochet a round rug?
There are other ways to create rugs and elements for chair seats. In the process of making products, you can use both strips from old things and regular dense yarn. To create a round rug for a chair according to the proposed pattern, you will need a No. 10 hook and scraps. Tie the strips of fabric into a ball, first connecting their ends.

Cast on three air loops and connect them together to form a circle. Then you need to knit six single crochets. Each new row involves a double increase in the number of loops.

The model can have any convenient size. However, it is better to try to ensure that its dimensions match the seat of the chair. The color scheme of the product depends on the combination of cuts of fabric used. You can make a model from material from one item or use complex combinations. Most often, housewives connect multi-colored strips of fabric in a chaotic manner. The result is a colorful rug that can create a cozy feel in any room.
In 2006, a Guinness record for knitting was set in the UK. A certain Julia Hopson made a pattern of 10 loops and rows on knitting needles with a diameter of 6.5 cm and a length of 3.5 m.
Crochet rug for beginners: video
Crocheting rugs for chairs or floors is a fun process. It will take a novice craftswoman no more than one day. Experienced housewives can knit such a product in just 2-3 hours. Much depends on the complexity of the pattern. As a rule, the simplest schemes are used in the manufacture of such models.
To knit a round model, use the recommendations from the previous section. If something seems unclear to you, watch the video. The video shows how to crochet for beginners beautiful element to decorate a chair from unnecessary things:
How to crochet a chair rug from yarn?
In this section you will find a pattern for knitting a rug from leftover yarn. The product will consist of several round elements connected to form a rectangle. This knitting technique can be mastered by experienced craftsmen. For beginners it will be difficult.
You will need four shades of yarn and a No. 4 hook. To create one element, you must first knit 12 chain stitches and connect them into a circle. After this, you should raise the knitting. To do this, you need to make five more loops. Now you need to knit 24 double crochets into the center of the element.

The next row consists of the same number of stitches, but with two crochets. Then you can finish knitting and put away working thread. You will need at least 60 such elements. Connect them in series into a decorative light rug using a thread and a needle.

The circles are connected in a chaotic manner. It is best to use contrasting shades of yarn. In this case, the product will have a bright and elegant look. Using only one shade of material will not give the expected result. To make such a rug it is proposed simple circuit. If you want to make a model in one color, then it is better to use a complex multi-component pattern.
If you are familiar with knitting, then you can practice your skills in chair covers. Crocheting here is more relevant than knitting, since the patterns created will not be so original.
A crocheted chair seat can not only significantly decorate the interior, but also protect the surface of the furniture from dirt and preserve its original appearance longer.
Crocheting for beginners is very interesting. This can quickly become a good hobby for many mothers who want to update their home decor.
Before you start crocheting rugs for chairs, you need to select suitable threads.
Here are some tips:
- Experts advise choosing a yarn called “Iris” for the rug. They have a rich mass of colors, are easy to hook and are not too thick.
- If you decide to knit a cape with your own hands to insulate the surface of a chair, then it is better to turn your attention to wool yarn.
- Will your crochet chair seats consist of several shades? Choose the same type of yarn so that they are the same size both in appearance and feel, this will simplify the work.
These simple lessons will help you decide the right yarn. Fortunately, now you can find anything on store shelves and the selection process will not take much time.
Knitting methods
Knitting pattern for a square of cones Pattern for a square cape Another pattern for a square cape
A crocheted chair cover will look original if you use several ways to make it. There are many videos and various schemes that will help you make your choice. The main ones are the following types of loops:
- single crochet;
- double crochet, double crochet, stirrup, and so on;
- double crochet artesanal;
- pico;
- brushes;
- ring.
Chain loop (v.p.) Single crochet (dc. b/n) Half double crochet (half crochet. s/n)
Double crochet (art. s/n) Artesanal double crochet (art. s/n) Pico
Connecting post(connection art.) Brushes Ring
Round cape

Cover on a round chair
Standard knitted capes are made round, because this greatly simplifies the work. The crocheted chair seat should be small in size, and therefore one product can be made within a day. The mats for the stools will look more beautiful if you use several shades to make them. To crochet, you need to remember a simple procedure:
- It all starts with picking up air loops, which are finally connected into a ring.
- It is advisable to make the first column with single crochet loops wrapped around the ring.
- Next, the chair cover can be crocheted using any pattern, the main thing is to carefully monitor the number of stitches.
Circle one, two and three Circle four and five Circle six
Circle seventh Circle eighth Circle nine
Circle tenth Circle eleventh Circle twelfth
Circle thirteen Other options for round covers
Knitted chair rugs are ready for use immediately after completing the last round of stitches. Knowing how to knit can create stunning patterns and uniquely decorate any space.
Square cape

Knitting a square cape
Crocheting chair covers is not limited to round options. Square ones can also surprise with their attractiveness, and their production can be carried out in an economical mode. A square crocheted chair rug is made in the form of knitting strips on which you can use the remains of any yarn. The order of operations can be as follows:
- Before knitting the rug, measure the seat of the chair, because the length of the strips should be equal to it.
- Knit as many strips as are expected for the same stool size.
- After this, they are folded into one sheet and tied to the edge with cap loops.
- A knitted chair cover can be decorated with a border, which in turn will prevent it from sliding across the surface.
- You can also diversify the napkin with small tassels running along the edge.
We will weave our cover from multi-colored stripes. The stripes are knitted like a double crochet (dc). This cape required 22 strips.
We collect 11 strips into a single canvas. We tie them along the narrow edge. We knit RLS (single crochet). This is what the tied edge of the work should look like. We also tie the other 11 strips.
Then we intertwine the strips in a checkerboard pattern so that we get squares. We tie these squares along the contour and connect them into one fabric. We tie the resulting fabric along the edge with a sc (single crochet). Next, we knit 2 VP (chain loops) lifting, knit the next row with a dc.
We tie the edge and finish the work with a series of arches from 3 VPs, repeat after 4 columns. We make a fringe like this
Knitted seats last a long time and do not require special care. They are erased into washing machine only when low temperatures- the only condition for their use. A crocheted chair cover would be a good gift for a resident of any country.
What are they for?
We knit blankets more for personal enjoyment or design updates than for practicality. Descriptions of each bedspread can be viewed online, so there are no obstacles to starting work. Every Russian person should have such beauty in their home.
Crochet rugs in lately have gained great popularity: square (as in the photo below), rectangular carpet, round, oval, made of thread (yarn), twine or leftover rags, on a chair or on the floor in the bathroom. All options are good. The most important thing is that such a magnificent carpet can be crocheted yourself, using the diagram and description, step by step instructions, or relying on a video tutorial on YouTube or MK (master class: How to crochet a rug, diagram and description).
In addition to decorating your home and creating a cozy atmosphere in it, this is also a good way for any needlewoman to practice and develop her skills. creativity. Everyone remembers grandma's knitted products all over the house, I would really like to make these myself: on bedside tables, a stool, in the hallway, in the kitchen. Lace motifs are very airy and immediately attract a lot of attention.
Crocheted rug: patterns and description
As we wrote above, the carpet can be tied completely from any materials, be it a model from old things (T-shirts), from plastic bags(from cellophane and garbage) or from regular yarn . Any option will look beautiful in your home on the floor or on a chair. Often, in addition to rugs, they create beautiful blankets made from scraps of fabric, covers for a stool, multi-colored pillows made from knitted or crocheted squares, original napkins for furniture or under vases made from knitted circles for comfort . There is a lot of excitement around products made from knitted yarn - the models turn out to be very “homemade” and unusual.
In order for you to be able to knit a beautiful carpet with your own hands, you can use any material , any mating (semicircle, fillet stitch) and pattern (star, cat, owl, tiger cub, sun, turtle,). You can do it the same way in different ways, then decorate as desired. Look at the photo selection below and choose the option for yourself and your home.
How to crochet a rug using yarn?
First you need to select necessary And correct materials . If you are knitting for the first time, you may need help from someone already experienced needlewomen(such as mother or grandmother). You can knit products following step-by-step instructions for beginners from a master class, for example.
Popular articles:
Everyone knows what are the most beautiful rugs , crocheted– Japanese. The secret here is right choice colors of the future product. It doesn’t matter whether the carpet is large or small - it should be beautifully knitted and harmoniously combined with the furniture in the room. Also, no need to use a light color - beige (avoid milky shades), it will get dirty quickly . And also - thin threads so that your creation lasts longer.
So now we will provide detailed diagram and a description of how to crochet a rug with your own hands step by step. Openwork option"Sun"
- it’s better to choose for him yellow thread
. Do not use acrylic or wool - only cotton
! Also, you may need one hook No. 7
, and such an amount of yarn that would be enough for the entire carpet. We recommend knitting with yarn in two folds. 


Crocheted rugs with patterns and descriptions
How to do crochet rug - the diagram is shown below
. We knit with a popcorn pattern using multi-colored threads. Products of this shape are very popular with young children: they are comfortable and cozy to sit on,play
. little child will be delighted with the tactile sensations. Animals will also be happy with the new “inhabitant” of the house - they can sharpen their claws or sleep on him.
Take several colors of thread, a hook and follow the diagram below: 

Oval crochet rug
Making a beautiful oval masterpiece is very simple. We knit it with simple loops according to the pattern. This children's rug will fit well into any room.

How to crochet a round rug for beginners: video
There are many video lessons about that how to learn to crochet it for free. This can be made from thick thread, woven with elongated loops, sewn from several motifs, stripes, making it shaggy, terry and voluminous. Such handicrafts can be sold or given as a birthday or housewarming gift.
How to knit square and rectangular rugs?
In order to succeed nice even square – in each row, make increases in 4 corners: 2 S.T., 2 V.P.. 2 S.T. In the following R. The hook is inserted under V.P. This is a more rustic option, but will also be suitable for the city if you change the knitting style.
The easiest way to crochet a square rug:
- Take yarn from knitwear. Color - optional.
- Chain from V.P. the required length.
- 1 R.: all loops S.S.N. Turn over the canvas.
- 2 R.: all loops S.B.N. into the anterior wall of P. Turn the knitting over again.
- 3 R.: S.B.N.
- 4R. = 2 R.
- 5 R.: for rear wall S.S.N.
- 6R.: all rows. Starting from the sixth knit a pattern from 2 to 5 R.
- In the video you can see an example of such a product.
A rectangular rug is knitted in the same way.
DIY knitted floor mats
Look interesting selection with ideas for inspiration . There are carpets here too modern style, consisting of roses and flowers, from rags, rags, two or more flowers - they are all good in the interior.
How to crochet a rug from threads for beginners: video
Crochet rug made from old things: step-by-step instructions
Very often we are left large number knitted clothing that we we're going to throw it away . But what if we tell you that you don't have to do this? You can make her beautiful knitted yarn and weave many unique designer items . Before we start weaving, let's learn how to create the yarn itself. For this you will need a rag, a T-shirt, and so on. From such material it is possible make a variety of patterns .
Crochet rugs: master class
We will attach below video for beginners : how to crochet rag rugs. In the meantime, for more experienced needlewomen, our master class.
To begin with cutting old T-shirts into threads . It is better to do this in one continuous spiral so that you have to tie fewer knots. After this, you need to take a large and thick hook and start casting on loops. It's as if you were threading them with regular thread. Close V.P. into a chain and sew the junction for strength. The knitting pattern is attached below. Using this and simple yarn you can knit a round rug.
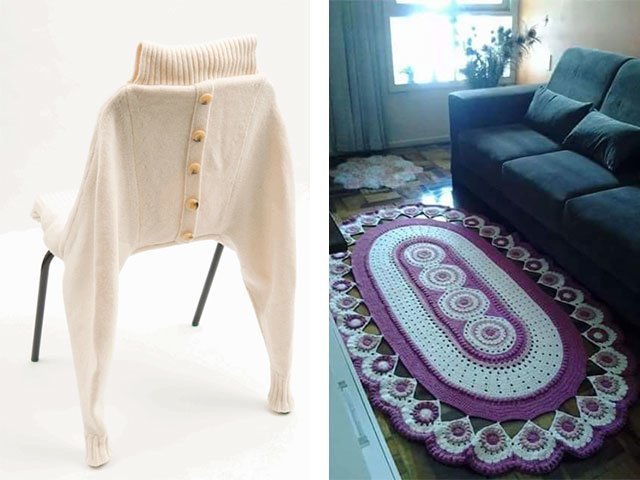
Rug made from old T-shirts
Materials: knitting yarn lilac and purple flowers, hook number 15, scissors, needle and thread.
- A piece of yarn, folded in half, tie 10 S.S.N. and close the ring.


- 2 S.S.N. in each P. of the previous R.


- From each P. 2 S.S.N.


- S.S.N., 2 V.P., S.S.N. after 1 P. Repeat this pattern until the end of R.

- S.S.N. all around the circle.
- The lilac thread should be secured after the previous row. Now we knit in purple. Make 1 p. on the hook. S.S.N all around the circle.


- S.S.N., 2 V.P., S.S.N after 1 P.

- 1 S.T. in P., 2 S.T. into the hole below, then again into P.
- Change the threads. The entire series of S.S.N.


- Repeat the pattern above with holes in this row.
- S.S.N. all around the circle.
An original and inexpensive way to easily transform your room and interior is to create a rug with your own hands. A fluffy, beautiful carpet will help quickly transform your home. But the most important thing is that you can create it yourself: choose the size, color, pattern, technique, so that the product has a unique character. Knitted rugs You can buy knitting needles in a store, but you must agree that creating it yourself is much more enjoyable!
How to knit a rug for beginners
Knitting rugs for beginners – the activity is very simple, but very interesting. Today we propose to familiarize yourself with the technique of knitting a carpet from white yarn with a beautiful central “braid” pattern and fringe on the sides of the product. This - a wonderful option for a knitted bedside rug . Its design is very simple, but in the end it will look very creative. Why model white, because it is intended for the floor? Since this rug is knitted as a bedside rug, and not for a hallway or bathroom, it will not get dirty as much and will last a very long time.
You will need:
- 400 grams of white yarn (we chose this shade, but it can be replaced with any other if desired)
- Knitting needles 4 mm
- And a hook with the same number. We will need it for tying, but it is quite possible to do without a hook.
Knitting density:
A 10*10 centimeter square should contain 28R. 17 P. 
Process description:
- Necessary dial 58 P. + 2 K.P.
- 2 rapports with a “tangle” (see C/X 1).
- Scythe on Agricultural 2 + 2 rapports on Agricultural 1.
- Knit like this for 42 cm.
- You can, if desired, tie the product around the perimeter using a S.B.N. hook.
- Fringe: brush in every second P.
Everything is ready! As you can see, the product is not very difficult to knit, does not require much time, it can even be used as a blanket, laid on a bed or sofa - this will add coziness. You can also leave this little thing for your pet - it will be very comfortable for a cat or dog to lie on it.
Popular articles:
Do-it-yourself rugs
Do you want to make your home more comfortable? Our next master class: knitting a rug with knitting needles from leftover yarn. This decorative element is knitted from small balls that the needlewoman has left over from previous projects, so it is very easy to adjust its future size: more threads than we have in the pattern with the description, or less so that it fits on a chair, for example. So, let's take a step-by-step look at what we might need for this work. 

Materials:

Job description:
- Let's start by crocheting a chain from V.P. Here, of course, try to choose threads that are similar in thickness. You should end up with a fairly large ball of V.P. chain, as in the photo below.
- All the chains you make should be sewn together into balls.
We continue to knit with knitting needles, using the resulting ball like regular thread. We chose 8/10mm knitting needles. - You need to dial the loops to the width you want to make the future product and continue L.G. (L.R. - L.P., I.R. - I.P.).
- If you want a more durable option that will better hold its shape, do each row of L.P. garter stitch.
- It will turn out to be very heavy and dense, it can be used as a rug in the hallway.
- In the same way, you can do a long path to the corridor or children's room. Or, using all the colors of the rainbow, a rainbow rug with knitting needles. This will turn out great children's version. Another advantage of such a product is that it can be square or rectangular.
Knitted round rug
How to knit a round rug for a chair with knitting needles for beginners - with our description and knitting pattern it’s very easy to do! The short row technique will be used here.
Materials:
- 12 skeins of yarn (50 grams each)
- Knitting needles 8 mm
Job description:
We knit in garter stitch, the thread is folded in half, make six parts. 1 shot L.P. (S.L.P.) = remove P. as L.P., knit behind the product. 
- We dial 53 P.1 R.: S.L.P., 52 L.P.,
- 2 R.: 51 L.P., 1 S.L.P.,
- 3 R.: 52 L.P.,
- 4 R.: 50 L.P., 1 S.L.P., thread in front of the canvas, turn it over.
- 5 R.: 51 L.P.
- 6 R.: 49 L.P., 1 S.L.P., thread in front of the canvas, turn it over.
- 7 R.: 50 L.P.
- 8 R.: 48 L.P., 1 S.L.P., thread in front of the canvas, turn it over.
- 9 R.:
49 L.P.
Follow all the steps below: before removing P. – turn the product over – U.B. 1 P. at the end of the next R., then every 2 R. Continue in this way until we reach the next R. - 100 R.: 2 L.P., 1 S.L.P., thread in front of the canvas, turn it over.
- 101 R.: 3 L.P.,
- 102 R.: 2 L.P. All 102 rows are one part of the carpet. There will be six of them in total. We connect the motifs with a knitted seam. Tighten the loops and secure.
Various knitted rugs
Very beautiful models carpets for inspiration you will find in photo selection
below. They can be knitted using absolutely any technique and from any material: from thick yarn, from scary things, rainbow or educational for a child, from bags. Moreover, the shape can also be any: unusual - a star, round, containing a pattern. 


How to knit a rug by hand without knitting needles or a hook
How to knit a rug video
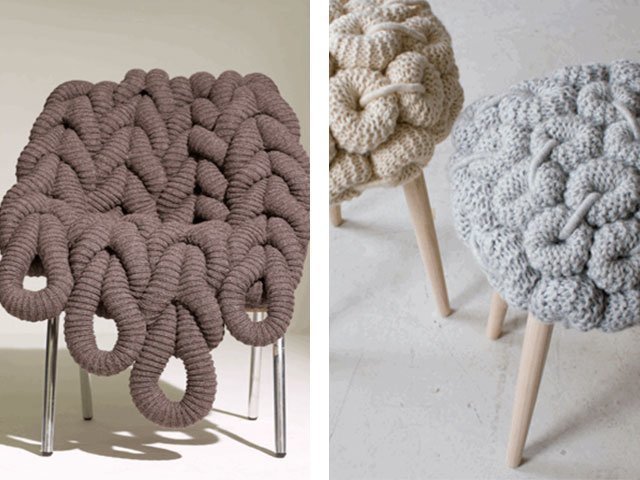
Rug knitted from thick yarn
A beautiful rug made of thick yarn will look very good on the floor of a bedroom or living room
. You can put a coffee table on top of it, lay it next to the bed - it will decorate any floor! It's easy to do. 

For it you will need:

Process description:

Knitting educational mat
How to knit a star rug with knitting needles?
Here it comes again garter stitch , we knit each “piece” in turn, in the process we tie them all together.
- The process begins with a yellow thread: 5 P., garter stitch, in each P. after 1 P. and before the last one. P. – P.R. 1 P. Each R. + 2 P.
- Next, a dark shade of yellow U.B. from one side – 2 P. together (first). On the other side - P.R.
- Next comes the blue color , from the side of the first shade. On one side - U.B., on the other - cloves.
- Then the color blue. Again on one side - U.B., on the other - cloves. Repeat steps four times.
If it’s difficult for you to knit all the details with one fabric at once - they can be sewn together at the end
.
 Another version of such a product, where different colors alternate and 3 R. - L.P., 1 R. - I.P.
We knit a plaid rug knitted in different directions with knitting needles
A beautiful rug with a diameter of 124 centimeters.
Because it will be rainbow accessory
– take 8 skeins of thread of different colors. 3 mm circular needles, you can use stocking needles first. But this option is only for convenience.
We crochet 8 stitches and begin knitting in two directions using garter stitch knitting needles. The first P. in each R. is removed. Each 2 R. – P.R. To change the shade, we intertwine the threads. To attach one motif to another, we make a P.R., pulling out the P. from the first wedge. After 24 R. – we move the drawing. In half all P. We weave the thread of the previous R. with the working one. Knit to the desired size. The last R. can be tied using a hook for beauty and the finished look of the canvas: V.P., S.S. Either cut off all ends of the threads or hide them. Our beautiful rainbow is ready!
As you can see, this technique can be used to knit not only a bedding for a chair, but also a small rug for children or a hot stand. But in this case, do not use wool threads, only cotton ones! 


