We make beautiful and festive garlands ourselves. How to make a beautiful New Year's garland with your own hands How to make a garland from improvised materials
A paper garland is quite simple to make; it can be made for a child’s birthday or simply to decorate a room for any holiday. Making the brightest and most spectacular paper garlands is not at all difficult - the instructions will help you do it in literally a matter of minutes.
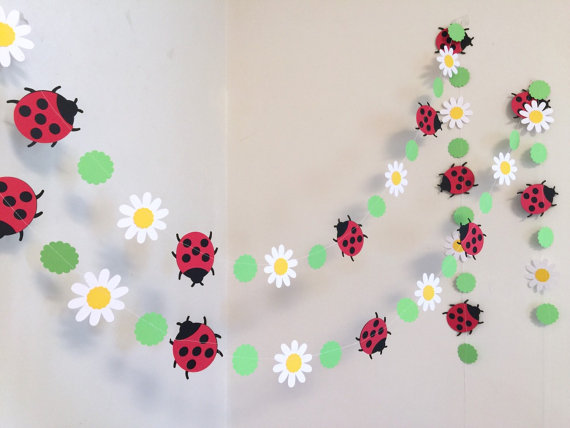
We make a garland of flowers with our own hands.

Stylized flowers
We cut out blanks for future flowers from colored paper - a semicircle with markings for the petals. It's better to take bright colors and double-sided colored paper.

We collect flowers - we glue the cones and collect the buds. Three blanks should form one flower.

We cut out a spiral from green paper - it will be the basis for our garland. We straighten the base and glue the flowers at approximately the same distance.

From felt
It is very easy to make a garland with your own hands from felt.

For this we need:
- colored felt (it is better to take pure shades);
- lace, ribbon or braid;
- sharp scissors;
- sewing machine (or thread and needle).
A DIY felt garland is made like this:
We cut out the elements of the future garland - these could be geometric figures and simple symbols.

We sew a garland of flags with our own hands or using sewing machine.

We sew a ribbon on both sides - the birthday garland is ready!

If you already have a flat garland, and now you want to make voluminous New Year's garlands, then you will like the butterfly garland.
Making this original Christmas tree garland is very, very simple:
- we cut the blanks (you can use diagrams - you can download them for free, you can cut them by eye);
- we collect bow ties - we sew a large rectangle with thread across it, pull it together, tighten the knot and close it with a small jumper;
- we string the butterflies on a thread or a beautiful cord; you can also use twine or ribbon for the garland;
- straighten the butterflies - your DIY wedding garland is ready!
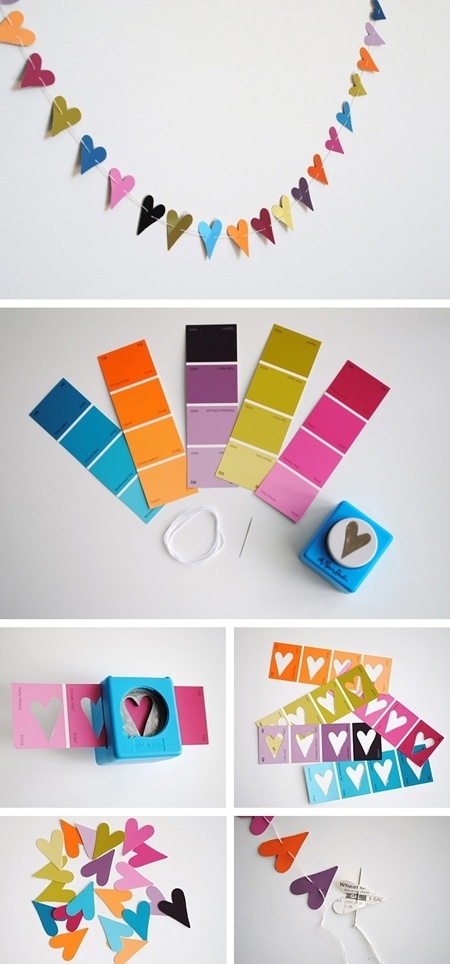
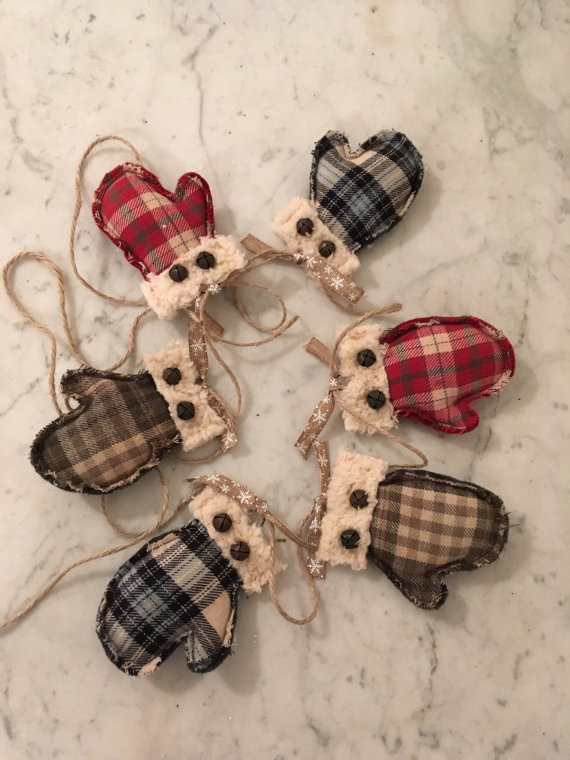
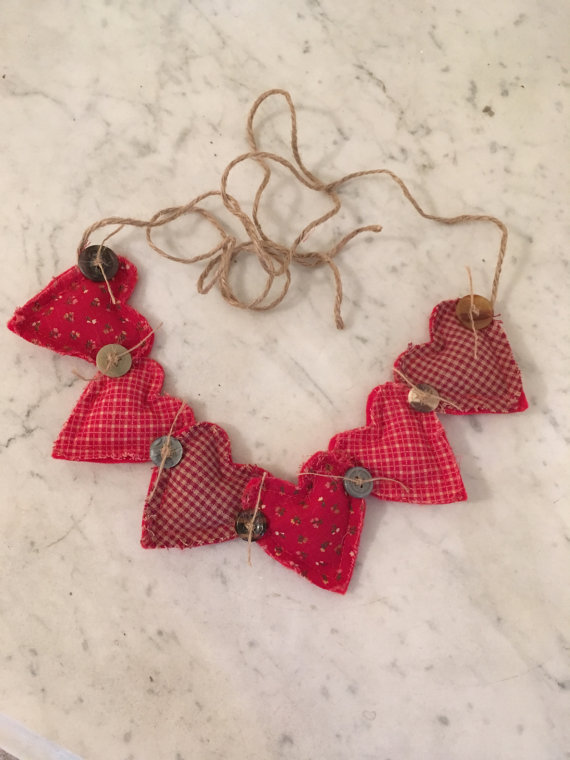
From hearts
Garlands made of hearts look very impressive - they can be used for any holiday, you can make your own decoration for a wedding or simply decorate an apartment or office for Valentine's Day.

How to make a garland of hearts using colored paper and a stapler:
Step 1: cut the paper into medium-sized strips; Using a stapler, we make a heart from two strips of paper (we fasten the ends of the paper strips in pairs as in the photo).

Step 2: We attach two more strips of paper to the bottom of the heart and use them to make the next heart.

Step 3: We continue this way until the length of the decor is sufficient.

You can make a one-color garland - for example, in red or pink tones, or you can use paper of several shades (by the way, double-sided colored paper good for printer).


There is another option for a garland of hearts made from paper yourself. We will need colored paper, a cutting template (you can download and print), a pencil (to transfer the template onto paper), scissors and a sewing machine.

This DIY heart garland is made like this:
Step 1: cut out a lot of hearts, the more the better.

Step 2: fold in pairs and stitch using a sewing machine.

Step 3: leave some distance if desired and sew the next pair without cutting the thread; sew all the hearts.

Step 4: straighten the hearts in each pair so that you get three-dimensional figures; our decor is ready.

By the way, a garland of paper circles is made using the same principle - circles of colored paper are folded in pairs and stitched. You can stack three or four blanks, then you will get multi-colored paper balls.


From checkboxes
A flag garland looks very elegant - it can have an inscription happy birthday, or welcome, and a garland of flags can be used at any party or children's party.

How to make a garland of flags for a children's birthday with your own hands? Three simple steps:

Simple, isn't it?
For those who want a little more complexity, a garland of flags and fabric. So, we have already understood how to make a garland of flags with our own hands, but at what stage should we add fabric and what kind? Again, it's simple.

From colored paper we cut out the shape of our flag - for example, a triangle.

Cut out a smaller triangle from fabric and glue it onto paper.

We sew or glue buttons and sequins on top.

We sew flags onto the future garland with our own hands or using a sewing machine. It is best to use braid or bias tape and place flags on it.

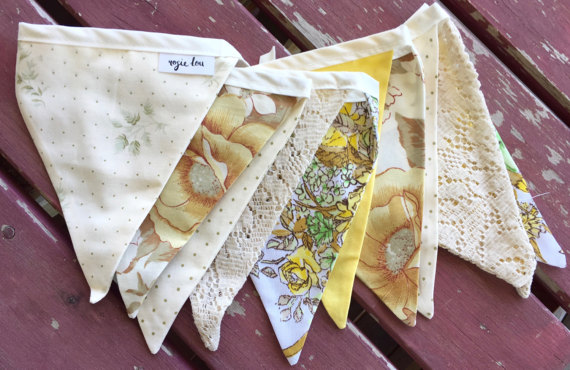
It is clear that paper garlands are not very durable - they will last a maximum of one or two uses, but what if you want to make something more durable? For example, for kindergarten You can make a flag garland from fabric.

How to sew a garland of flags step by step:
- We will prepare several colors of fabric;

- make a pattern in the shape of a triangle (you can use triangles of different sizes);

- transfer the pattern to the fabric (it is best to take two or three shades of fabric - a three-color garland looks very beautiful);

- cut out the pattern and fold the triangles in pairs front side inside;

- we pin it with tailor's pins or quickly baste it and then sew on two sides of each triangle on a machine (I also overlaid the edges) - leave a very small seam allowance, this will make the triangle sharper and more beautiful;

- we turn out the triangles and make rough seams around the perimeter;

- we baste the flags to the tape (in my case, a narrow strip of fabric); sew on a machine;

- remove the basting; wash and iron the product.

Decorative braid with flags made in this way can be used at home and in the kindergarten, you can make special decor for the street (kids especially like this for the New Year).
for the new year
Making Christmas garlands is fun and exciting! To make a beautiful and original garland you will need small candle lamps, narrow tinsel and a couple of jars of paint - special for glass or regular acrylic. The light bulbs are dipped one at a time in paint and dried on a cardboard stand (the bases can be wrapped in cling film to prevent them from getting dirty). Then the light bulbs are glued to the tinsel in a chaotic manner, and the unusual Christmas tree garland is ready!

Making another Christmas tree garland is also not too difficult - the main thing is to stock up on a template. For printing, you can use colored paper at once, or you can make one general template and copy it onto paper of any color. Printed or redrawn templates must be cut as shown in the diagram and strung on bright twine.
Printable template (click on image to enlarge):
A garland made of felt balls looks very cozy and very Christmas-like. You can do it together with your child - you just need help. In order to make this interior decoration, you will need felt balls. No, not even that - A LOT of felt balls.

Making them is quite simple - take some wool for felting in your palm, wet it under the tap, and then lightly roll it into a ball. Add foam or soap and continue rolling. When the ball starts to form, you need to apply a little effort.

If the wool is acting up, try changing the water temperature several times - after a couple of changes from cold to hot water and back again, the fibers begin to fall off. The future ball must be thoroughly rinsed from soap. The ball is ready when it becomes hard.

Make a lot of these balls - they can be the same color (then it is better to take a contrasting thread for stringing) or different shades, and then just string them on a thread and a needle, and your cozy winter decor is ready. By the way, you can decorate a Christmas wreath on a door or a New Year tree with these balls.


Well, I’ve infected you with my handicraft enthusiasm and you already want to make all kinds of garlands from flowers, felt balls, flags and other things? Then it's time to see what other decors are available.
A DIY festive garland for a wedding can be not only solemn, but also very cute - like this country-style flower garland.
Use your imagination - use the materials you have at hand. These can be scraps of colored paper and sheets for scrap, rags beautiful fabric and thick film, beads and buttons, sequins and feathers, old light bulbs and even small wooden clothespins - holiday decor can be made from literally anything!
When decorating their own home, many try to decorate the house with their own hands. This has already become a generally accepted fashion trend in interior design. In this case, the choice often falls on handmade paper, which is explained by the elegance of the finished result, as well as the relative ease of execution.
Considering the proximity of the New Year, more and more home craftswomen are beginning to make paper garlands with their own hands, which allow them not only to save some money, but also to laconically, easily and elegantly transform their home interior for the New Year holidays.

Garlands made of paper can bring a touch of warmth and comfort to any room, making your home more individual and original.
Paper garlands in the interior
When decorating an interior, many professional designers recommend taking a closer look at paper decor. Agree, not everyone has enough time to make any significant changes to their home interior, for example, re-painting wallpaper on the walls or changing furniture. At the same time, anyone can make quick cosmetic changes with a little paper decor, thus changing the mood of the room! This approach will save money and allow creative people to show their imagination.

So, to update the interior of a room or an entire apartment, it will be quite enough to do it yourself.

With the right approach, a paper garland can become not only a successful decorative addition to the interior of a room, but also serve as zoning in the room, and also play the role of an accent, attracting the attention of guests.

The first step in creating a paper garland is to decide on the size of the New Year's decorations, because for each specific shape you will have to use a different material:
- More suitable for creating light and quick garlands thin paper. The finished products will turn out to be almost weightless, adding a feeling of airiness and spaciousness to the room;
- As for thick paper, it will naturally be more reliable, and the garland from it will be heavier and larger. And thick cardboard will be a more difficult material to work with.


Compared to crepe paper, crafts made from cardboard weigh more - this should be taken into account when choosing a method of mounting on walls and surfaces!
In addition to the usual colored paper, you can also use various materials at hand, for example, advertising brochures, newspapers, old postcards, napkins, candy wrappers, pages of old glossy magazines, etc., or designer samples.
If you are planning to do New Year a “collapsible” garland made of paper, that is, it makes sense to use paper clips or a stapler to attach the links. In other cases, it is more advisable to use glue.

Paper allows you to make products of any complexity, from simpler garlands of cards, circles and butterflies, to more complex versions in the form of angels, paper stars and cranes.
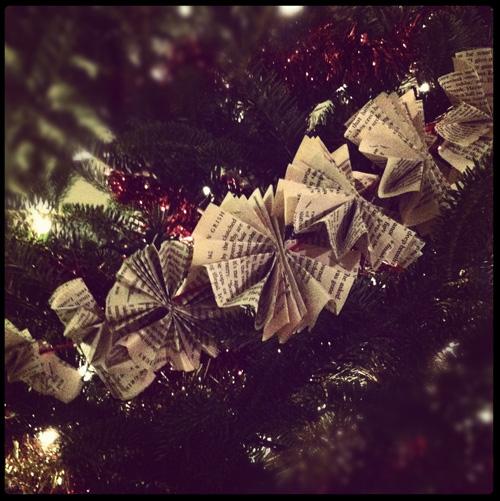
Using old books, you can make an interesting garland, spending a minimum of time on it.


How to make a paper garland with your own hands? Instructions
Garland of snowmen and snowflakes: diagrams
What does everyone imagine when they think about a traditional paper New Year's garland - of course, a chain of paper rings! And although such a product smacks of a certain childishness, it remains the simplest to make. In addition, when good approach Christmas decoration can become a colorful decor for a room. To make such a garland with your own hands, you should adhere to the following scheme:
- Prepare the material. To work, you will need pieces of paper no more than 15 centimeters long and 0.5-4 centimeters wide. To make your craft more unique, you can use paper with designs or multi-colored ones;
- It is important to adhere to stages when assembling the garland - slowly thread one ring through the other, carefully gluing the joints.


You can achieve a lighter and more airy garland, reminiscent of a frosty pattern on glass, if you use colored paper instead openwork.
And if this option seems too simple to you, then, if desired, you can complicate it a little by cutting the paper into chain links of various shapes. To do this, instead of simple strips, cut rectangles folded in half. By making a large number of links, you will get a long and colorful chain!

You will get an original New Year's decoration if, in addition to color, you alternate the links in size and shape. The finished product will become a kind of accent in the room, attracting attention.
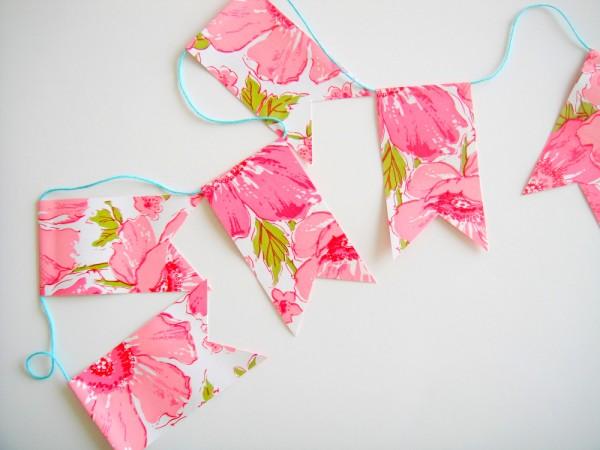
Garland of paper flags and flowers
A garland made of colored paper is the most affordable and in a simple way decorate your house for the New Year or any other holiday. Such decoration will transform the interior, make it more original and interesting!


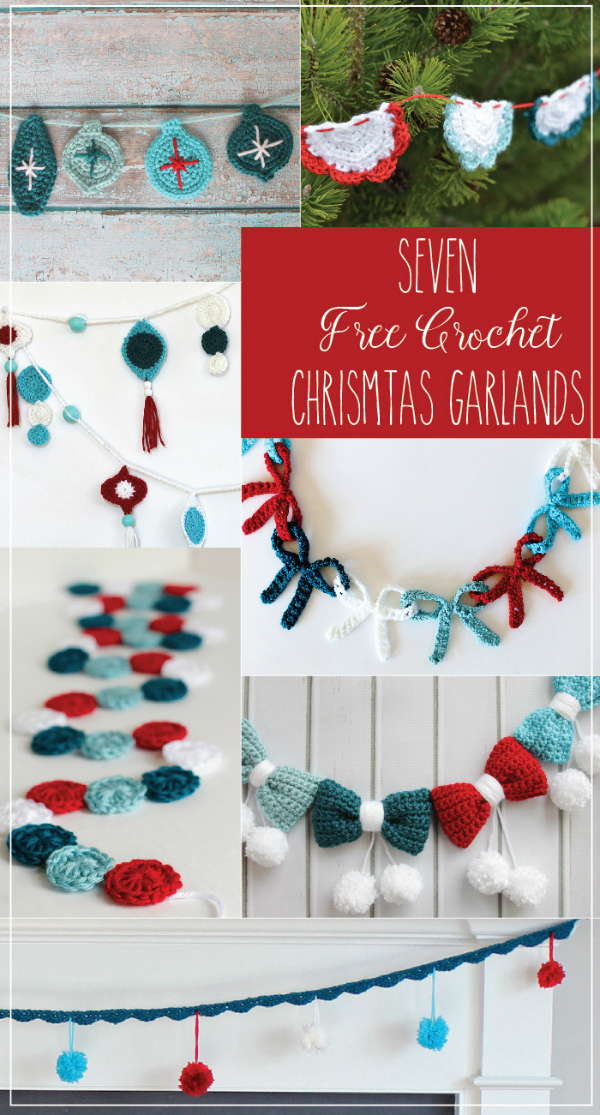
Below in the photo you can see some of the simplest and most beautiful paper garlands.


To this day, paper flags are considered the main attribute in decorating a classroom, remaining one of the main methods in decorating an office. And if the solution is good, then why not use it when decorating your apartment?
- First of all, make paper blanks - rectangles. It is important to note that they will later be bent in half, which should definitely be taken into account when deciding on the size of the rectangles;
- We string the resulting flags onto a rope or thread, securing the pieces with double-sided tape or glue.


For greater aesthetics finished decoration It is worth considering the distance between the flags. You can add more brightness and creativity if you alternate flags with different patterns and colors.
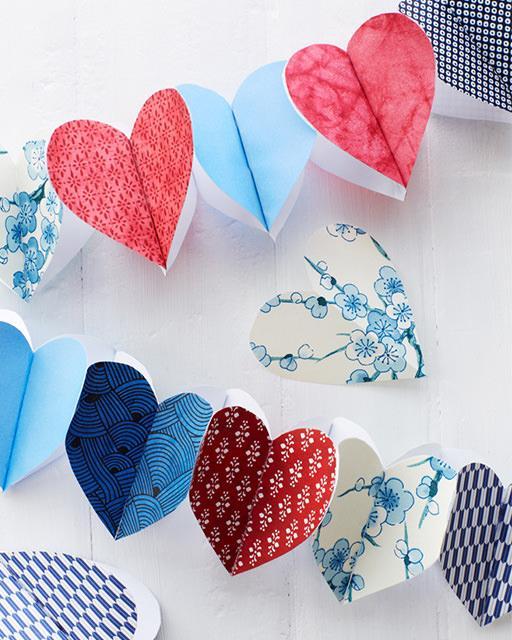
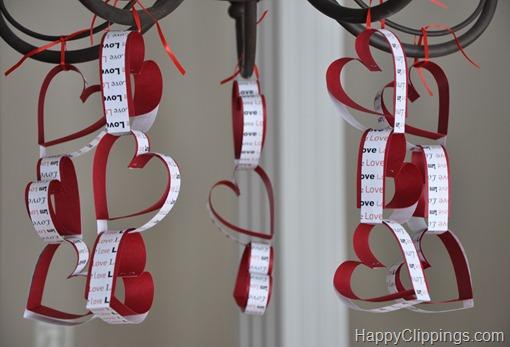
A garland of paper hearts is perfect for a romantic dinner. The elegant appearance and shape of the decoration allow it to be used in preparation for Valentine's Day.

You can create a “heart” garland using several schemes:
- A simpler option. We prepare paper hearts. Using a sewing machine, the hearts are combined into a single chain. By changing the color and size of the hearts, you can create a unique decoration with your own hands;

- For the second option, you will need blanks in the form of paper strips. The size of the workpieces is not very important; for example, you can use strips with dimensions of 10 by 2 centimeters. It is important to note that the number of stripes must remain even, since each heart requires a pair of elements. You will also need a stapler or glue and patience.

Sew two hearts at once so that after stitching, they can be straightened out like the petals of a flower. This way you will get a voluminous garland of hearts. It looks very beautiful!
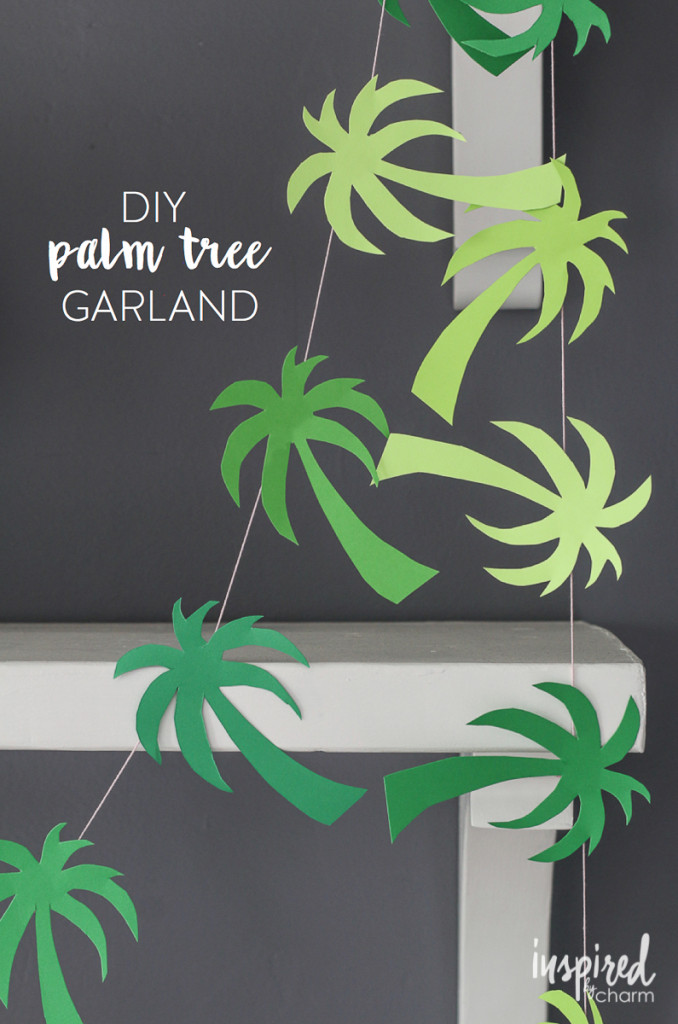
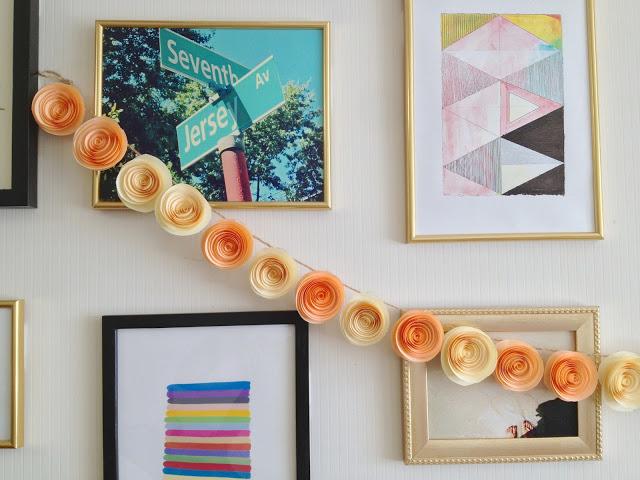
Paper flower garlands
Floral decorations, even if made from paper, are more suitable for the wedding theme. Below you will find tips and recommendations from the main handmade masters that can be used to create decorations for any occasion:
- In the case of an ordinary garland, you can choose any shape, from original umbrellas to classic flags. Nobody limits your imagination - use various shapes and ideas (animals, stars, snowflakes, dolls, balls, handbags, fruits, etc.). Of course, a lot depends on what event the garland is intended for, be it Halloween, Birthday, wedding, New Year, and also for whom exactly it is being prepared - for a boy, an adult, a girl or a child. Everything you need for work, namely stencils, detailed instructions, photos and videos can be easily found on the Internet, all you need is desire and a little time. Dare and create!


If you have no idea how to make a paper birthday garland yourself, this video will tell you:
- A wedding paper garland created by the hands of the bride and groom will not only be a worthy decoration for the holiday, but also the first common project, an important step into family life;
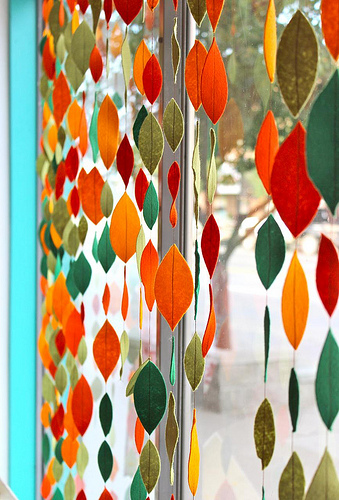
- With the help of paper garlands you can successfully. This solution can be an excellent solution to replace the usual curtains, especially if you choose the right decoration to match the interior. In addition, decorating windows will allow you to achieve a more joyful and festive mood in the house;

- Making a paper garland together will allow you to have fun with your children, giving yourself and them warm memories, which in itself is priceless!
- A garland made of corrugated paper. Remaining elegant and subtle, it will perfectly decorate any room in the house.
In this article you will learn how to make several different types paper garlands yourself. Making a garland can be quite fun and easy task. Perhaps the simplest tool in a craftsman's arsenal, paper is full of possibilities and purposes. You can turn it into anything. I use it for Christmas home decor, this year the focus is on the round ones with stitched stitches. You can use them as decorations for a party, event or just. Everything will be discussed in more detail later in the article.
Making a garland
First of all, prepare lots and lots of paper circles for work. I cut my circles using a scrapbooking punch (in our opinion, a hole punch). But you can also find more fancy gadgets for these purposes, of which there are many on the Internet. I chose several shades of pink to create a romantic appearance. I also added some gold medallions, which provide an interesting contrast and make the decoration more interesting.
First, I laid all my circles one by one in a row in the order in which I saw them, and my goal was to achieve an ombre effect. Then I started sewing.
Sew down the center of your first circle, then take the next circle, placing it in front of the presser foot and sew immediately after the first. Continue until you have a chain of circles of the desired length. I used a fine stitch on my sewing machine.
Make as many rows for the round garland as you need. To design mine, I needed about 15 sheets of double-sided thick colored paper measuring 20x30 cm. I installed the finished product on regular double-sided adhesive tape, adding a couple of strings of decorative light bulbs for a festive mood, which were held on a nail, and placed the battery packs right there - at the top of the window sill, also using double-sided tape.
Consumables
- double-sided thick paper in several colors;
- metallic paper;
- ponch with a diameter of 5 cm;
- sewing machine
- double sided tape;
- decorative light bulbs.
Once you hang it all up, all you have to do is enjoy it, since paper itself is inherently festive. Place it near other holiday decorations, such as Christmas decorations, for a festive touch.
You will also need a garland for special occasions. If you have children, they will appreciate this approach and be grateful to you.
Light elements add a special atmosphere that is typical for the winter holidays. I really love everything shiny, glowing and shimmering, especially during the holidays.
Some may find the round option boring, or you may not have all the tools at hand. Therefore, I have prepared for you several more ways to decorate with paper garlands. So let's get started.
Method 1
Geometric
Fold each sheet into a triangle. Start by folding the sheet in half. Then fold the triangle in half to make an even smaller triangle.
Consider making small cuts along the edges to make your garland more interesting. Do not make any cuts along the folded edges.
Staple the two triangles together in the middle. Do the same for the remaining triangles so that you have six triangle shapes held together.
Fasten two triangular shape together in the corners. Take two triangles and overlap the dots 1/2 inch (1.27 cm). Sew the corners down.
Pin the molds together to hold them in place. If you don't want the staples to show, you can only staple the inner layers and leave the top layers free.
To make a garland from individual triangles, connect the parts together by the edges.
When finished, secure the garland to the wall using thumbtacks.
Method 2
And again the round garland (they are so funny). This time it's a method that doesn't require sewing machine. A scrapbooking hole punch works the same as regular hole punches, except that the first one is different forms and sizes. It can cut circles, hearts, squares, stars and even snowflakes. You can buy a shaped hole punch for scrapbooking at any office or art supply store. You can also find it on the Internet.
If you don't have a figured hole punch, you can use a regular compass. It will take a little longer, but your persistence, I am sure, will overcome the routine.
Step by step guide
- Take colored paper. The best option There will be a choice of a special one for scrapbooking or cardboard. Craft or origami paper will also work, but in this case the finished garland will not be durable.
- Try using two to three different colors or shades. For example, try light blue, blue and navy blue.
- Make circles different color using an accessible method.
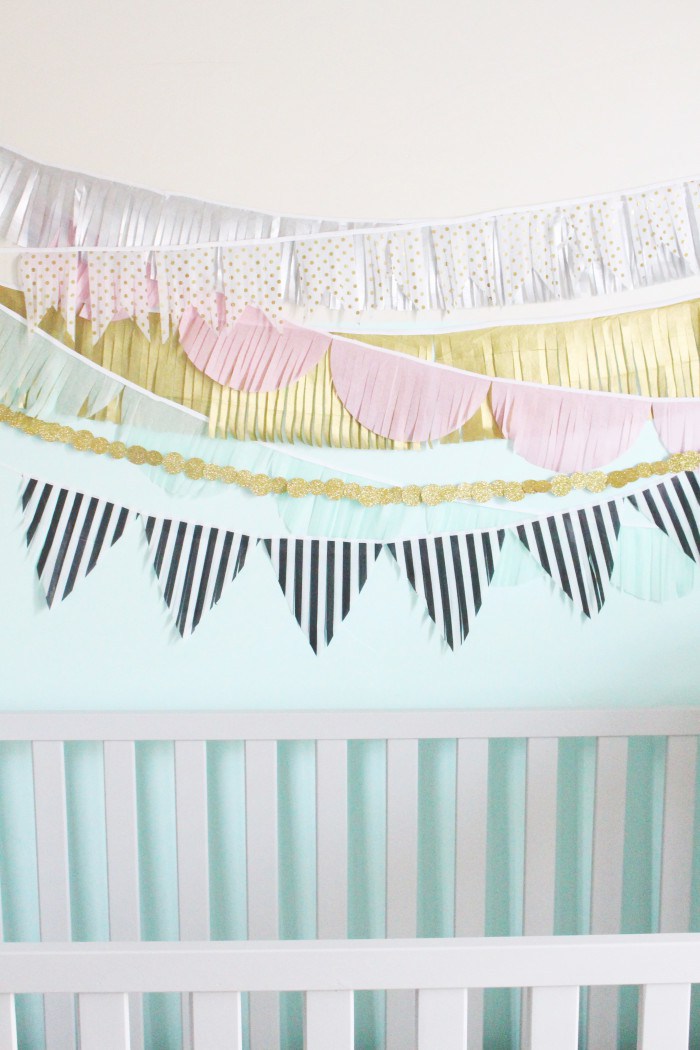
- If you are making a garland for a nursery, use patterned and bright colors. For example, half of your pieces could be bright blue and the other half of your pieces could be white with bright green polka dots or stripes.
- You can use one punch and thus get figures of the same size.
- Or follow my path - I made two versions of a round shape in different sizes. One is 5 cm and the other is 8.8 cm in diameter. This trick gave my garland some variety.
If you can't find the punch, draw circles using a compass!
- Cut out your shapes. If your paper is thin enough, you can cut two or three sheets at a time. The cardboard, however, must be punched or cut one sheet at a time. If you try to pierce too many at once, you will end up with fuzzy edges on the shapes and may damage the blade.
- Align the shapes in a straight line. If you are using different sizes, try alternating them. You can alternate them randomly or in a specific pattern.
- Draw a line of glue down the middle. Make sure it flows continuously through all forms.
- Apply the ribbon over the glue. Make sure that the braid has a tail 30-50 cm long at the end. This way you can hang your garland.
- Lay similar circles with glue on top of the figure with the braid, making a “sandwich” out of each shape with twine in the middle. Now our garland becomes like the real thing, acquiring the features of a double-sided design.
- Repeat the process with the remaining forms. They can be either at a distance from each other or close to each other. Make sure you have about 30-50cm of rope left at the end of the garland, otherwise you won't be able to hang it later.
Let the glue dry before hanging the garland. Depending on how much glue you used, this could take anywhere from two hours to a day.
Method 3
How to make a garland of flags
Step 1
Prepare 20/30 cm scrapbooking paper. You can use any color or pattern you want. To make your flags more interesting, consider using multiple colors, shades, or patterns. For example:
- If the garland is intended for a children's room, use pink and blue white paper with pink/blue polka dots.
- If the garland is for an ocean-themed party, consider using blue and blue color schemes.
Step 2
Fold in half lengthwise. If the paper has a pattern or is single-sided, make sure the design is on the outside of the fold. The empty/white part should be inside.
Step 3
Cut in half down the middle along the fold line. You should get two copies of the folded sheet of the same size.
Step 4
Cut a triangle out of each sheet. To do this, fold the rectangle with the colored side up twice at right angles. Then cut the corner to create a diamond shape on the spread. The middle of the triangle should be at the angle of two folds:
Step 5
Measure the cord on which the flags will hang; in addition to the space for the garland, it should have a margin of at least 30 cm at each end for ties, so that you can easily hang the finished product where required.
Step 6
Open one triangle and cover it with glue along the edges and in the center. You can also add glue in the middle of the triangle.
Step 7
Place the rope along the fold and close the triangle. Run the heel of your palm over the flag to smooth it and seal it.
Step 8
Repeat the gluing process for the remaining triangles. You can arrange them as possible closer friend towards each other or at a distance from each other. However, be sure to leave at least a few centimeters of space between the triangles so that the garland looks beautiful when hung.
Step 9
Consider leaving a message on your banner by placing a letter on each triangle. You can cut out colorful letters and glue them to one side of each flag. You can also draw the letters using a stencil or acrylic paints.

Any handmade product is now at the peak of popularity. Creating creative decorative elements for your home with your own hands is not only profitable, but also stylish, modern, in the spirit of the latest trends. At the same time, it is not necessary to have special skills, rare materials or special tools - most decor ideas are easy to implement and do not require large expenses. To implement some ideas, you can also get rid of unnecessary things or recycle household items that only take up space on the shelves. One of the simplest, fastest, but at the same time effective ways Home decoration is making garlands. Here are 100 ideas for creating a wide variety of garlands for different occasions - get inspired!
Paper garlands
Paper garlands are the easiest to make, cheapest and quick way transform the space. A paper garland can act as an accent element of the interior, zone a room into functional segments or highlight a particular place, indicate a certain theme or style of room design, and simply serve as a decorative element.


The simplest option for creating a paper garland is flat. Paper blanks (of the shape you need) are simply sewn on a machine or glued to twine, thick thread or ribbon. If you handle this garland carefully, you can use it more than once.


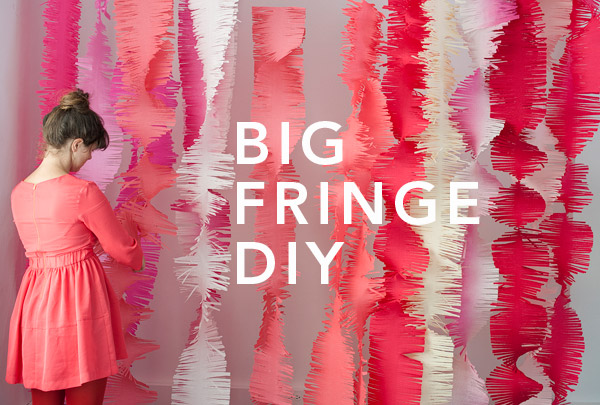
Paper fringe is easy to make, but looks very elegant and festive. Simply use double-sided fringe for more fullness.


Thin paper is perfect for simple and light decor options. Such garlands are literally weightless; they sway with any breath of air, creating an atmosphere of spaciousness, airiness, and lightness in the room. Thick paper is suitable for more complex products with a durable base.


Volumetric garlands with paper elements always have a very festive and even solemn look. To give the paper volume, of course, you will have to work hard, but the result will be worth the effort. You can use regular colored paper (most often double-sided), as well as corrugated, crepe, cardboard, and foil. You can string three-dimensional elements onto a thin ribbon, twine, or any twine. The thicker the paper and the larger the decorative elements, the stronger the base for stringing should be.


The garland becomes voluminous if ordinary paper blanks are folded or bent.


For paper garland You can also use family photos. Such a decorative element can become an exclusive gift and a wonderful decoration for a room (not only for a holiday).

Garlands made of fabric and threads
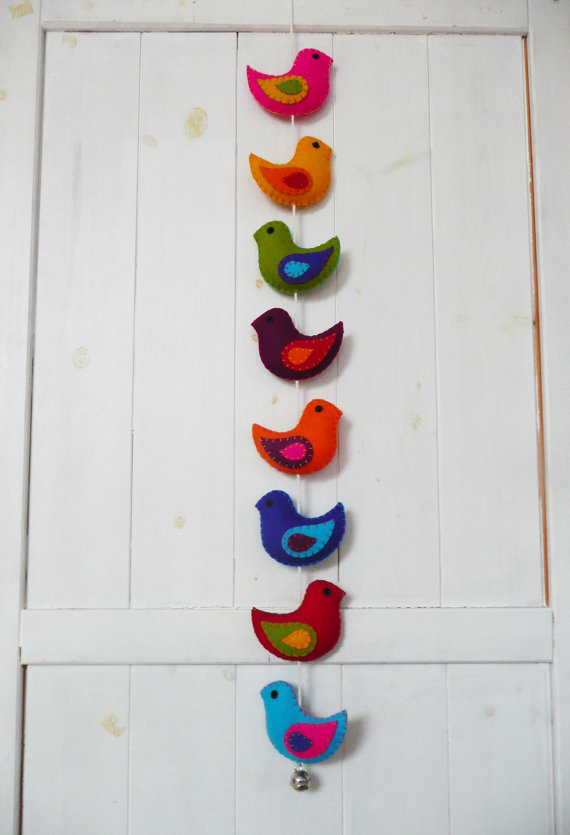
Garlands from various types textiles are certainly more durable than paper products. If you have scraps of unnecessary fabric of different colors at home, then with some skills, patience and free time, you can create real masterpieces of decorative handmade.


For example, in Lately It is very popular to make any decorative elements from colored felt. The advantage of this material is that it does not require processing, it is dense and holds its shape well, and is sold in all handicraft stores and even in stationery departments.


Tulle is no less popular. It holds its shape perfectly and is ideal for making voluminous decorative elements. The garlands turn out to be large-scale and even “fluffy”.


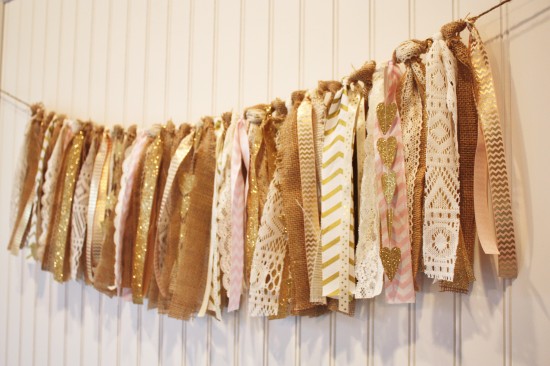
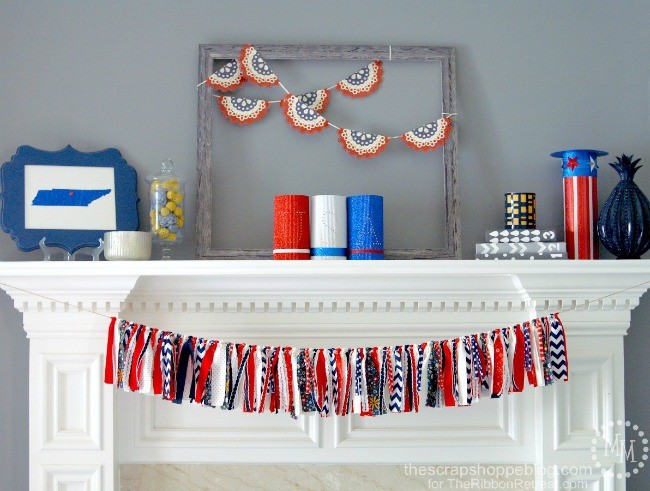
Tapes – separate species a material that is very often used to make a wide variety of garlands. The easiest way is to tie small pieces of ribbons of different colors on a rope or any other base.


If you know how to knit and you have threads of different colors left, then The best way disposal of such residues - making a durable garland. Not only the reusable use of durable garlands with knitted elements becomes an advantage of such handmade, but also the originality of the design and the variety of execution options.


Multi-colored pom-poms, which are easy to make even for children, can be an excellent basis for creating a garland for those who have accumulated a lot of leftover knitting threads.


We create from improvised means
Who said that handmade classes require a lot of money? You can create beautiful decorative elements for your home using available materials. There will still be some costs - for accompanying materials and, of course, your time. But the minutes and hours spent on an activity that brings pleasure may not be considered expenses. So, what can you make original paper garlands from:
- old newspapers;
- magazines;
- advertising posters;
- booklets;
- unnecessary maps and atlases;
- playing cards that have reached the end of their service life;
- books that are only suitable for recycling;
- buttons, beads, beads.


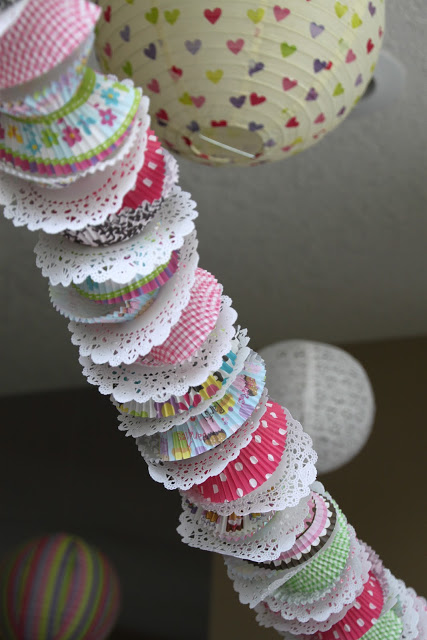
It’s easy to turn plastic eggs from Kindersurprises into birds or little animals. You only need colored paper and twine to make original garland. It's easy to make garlands from paper cupcake or cupcake stands. They are sold in sets large quantity, are inexpensive, but can be bright and have an original design.


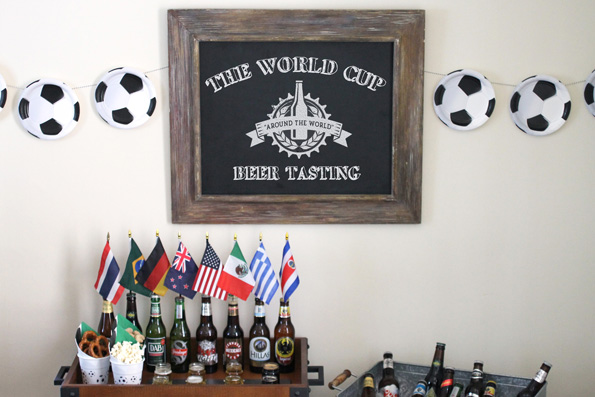
And the plastic ones disposable plates easy to turn into imitation soccer balls.
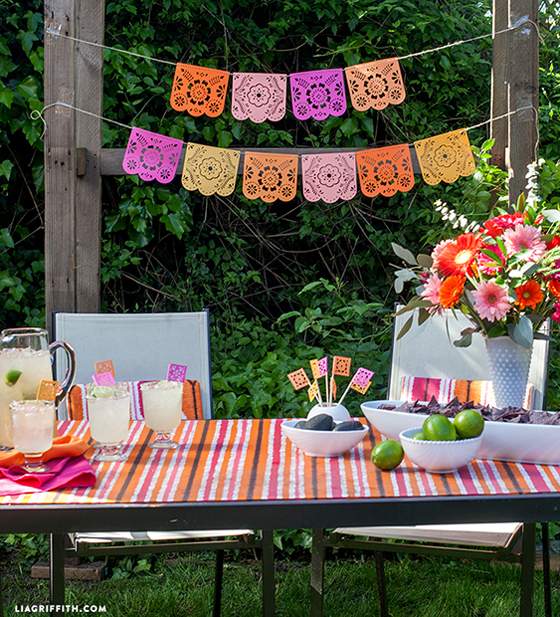
Themed decorations
The easiest way to decorate any room for any holiday is with the help of garlands. They can be made quite quickly, used more than once and changed location depending on the desired effect. A garland takes up a lot of space, so any space is instantly transformed if you decorate it like this in a simple way. Holiday mood, a hint at a certain theme of the celebration or the features of a particular event can be most easily organized with the help of garlands. Well, why buy something that you can do with your own hands, and even from improvised means.


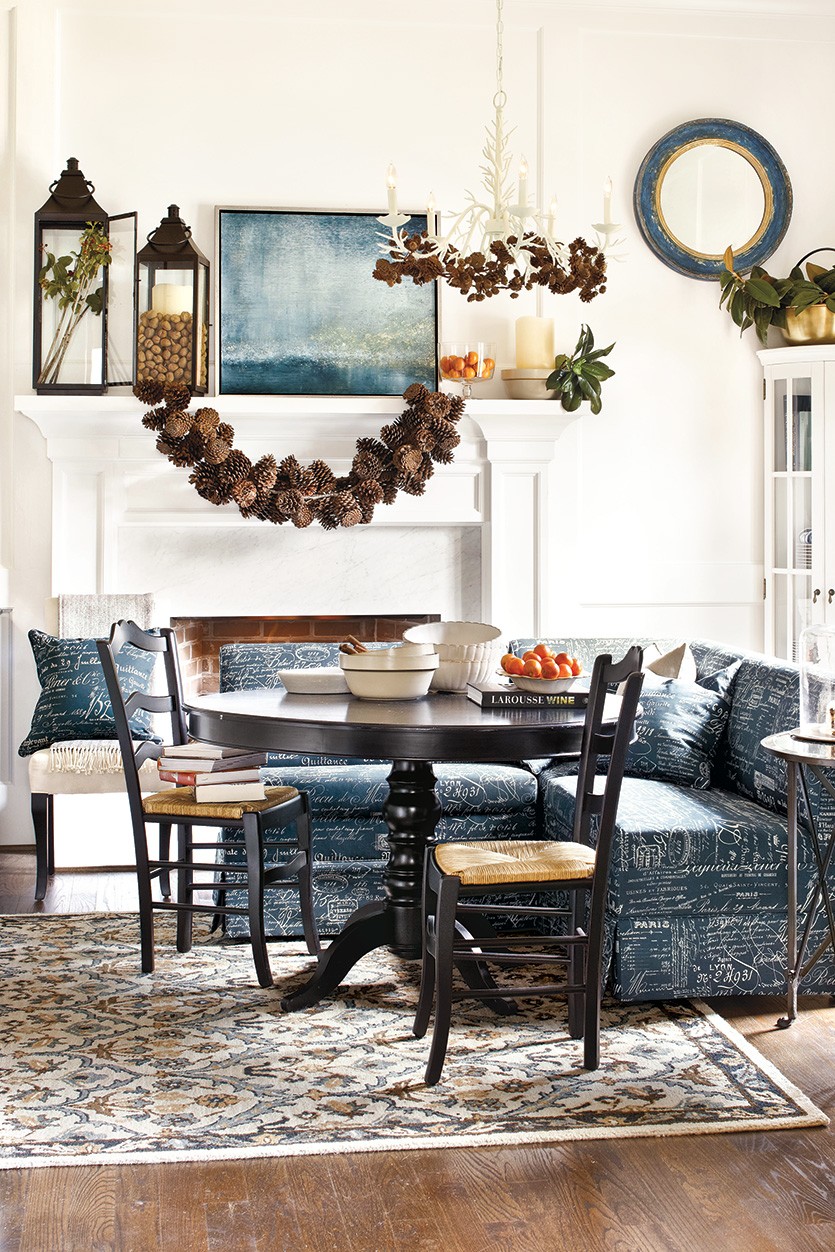
New Year's and Christmas
New Year's garlands are a decoration familiar from childhood, which many people made as soon as they learned how to use scissors. Paper and fabric flags, chains made of cardboard or shiny foil, cut out snowflakes and Christmas trees - any paraphernalia of the winter holidays will be used.


Cones collected in summer can be used in winter to make garlands. It is enough to clean your blanks (cones) or paint the tips of the “branches” of future Christmas trees with white or silver paint (you can use gouache, acrylic paints and even white glue).


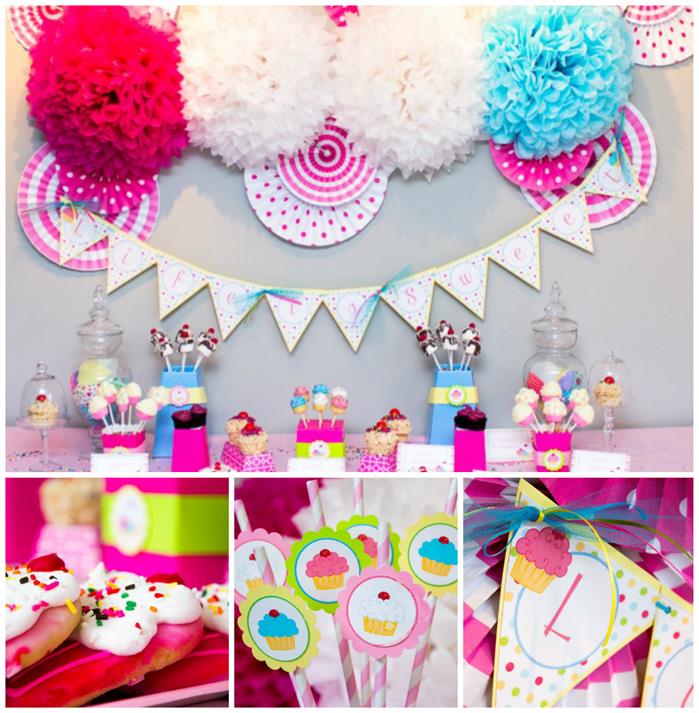
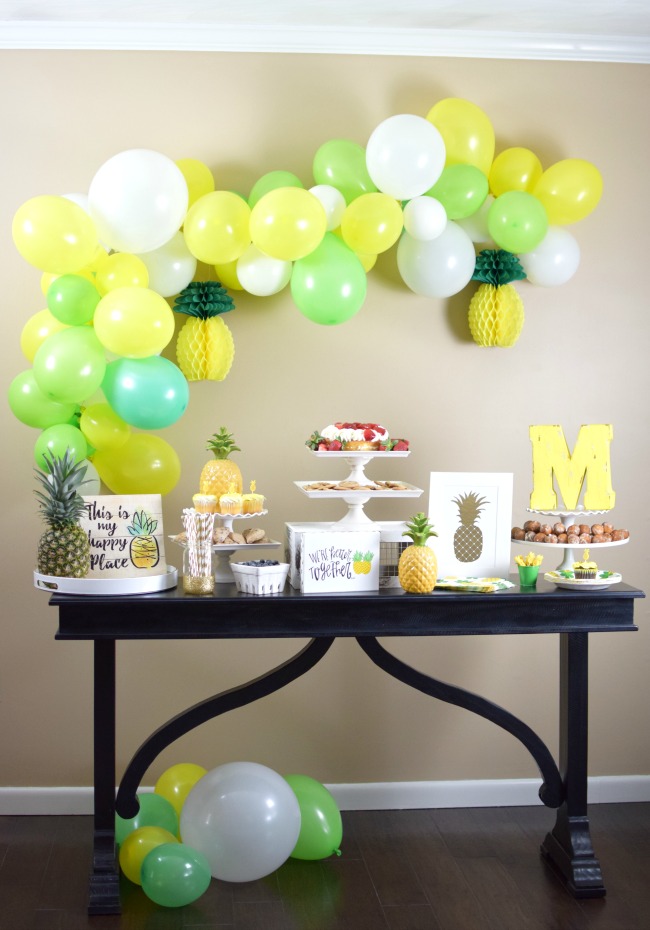
For a children's party
Perhaps the most common case of using garlands to decorate a room is children's party. It doesn’t have to be a birthday; any celebration where children are present, you want to decorate it in a particularly elegant, festive, and varied manner. You can decorate with garlands the area of the so-called candy bar (a table with treats and drinks), the space above the table where children will sit, or the place where gifts will be stacked. And simply stringing garlands across the room or decorating the walls with your own hands will be an excellent reason for a festive mood.


From small colored cylinders (thick colored paper or colored cardboard) you can make dynamite (a hint at the explosive nature of the party) or candles - this is already an association with cake candles.
 By combining paper with fabric or thread products, you can create original options decor. For example, paper rabbits with tails in the form of pompoms, which are easy to make even for a child. Ponytails can be made from cotton wool by simply rolling it into lumps.

On Valentine's Day, it is customary to give homemade valentines. But you can go further and decorate a whole area for celebration, decorate a place near the table where the flow will be romantic dinner, decorate the head of the bed or any other place in the house that is convenient for decoration. Of course, the main motif of garlands for Valentine's Day will be the use of hearts and all shades of red. By the way, the use of love themes in decorating a room does not have to be tied to any holiday. Interior of a girl's room romantic style similar decorative elements can decorate all year round.

From paper…

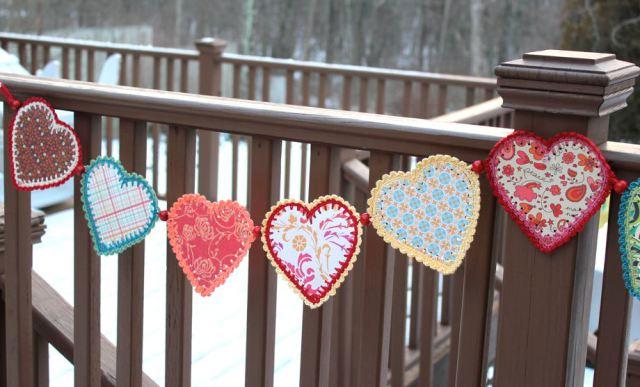

From felt...

Universal option
Regardless of what holiday you are going to celebrate - the birthday of a family member or pet, an anniversary or National holiday, or maybe just one of the relatives has returned after a long absence and a party is being prepared in his honor - there are many universal options for making garlands for any occasion. These can be medium-sized balls strung on a rope or thick thread...
Or flower composition, relevant at any time of the year and on any holiday. Moreover, flowers can be made from various materials. Use twigs or twigs for the base and your composition will be closer to nature.


This option is suitable for those who want to diversify a regular old garland.
What do you need
- white paper cups;
- a sheet of plain paper;
- pencil;
- scissors;
- scrapbooking paper;
- glue or double-sided tape;
- stationery knife;
- electric garland.
How to do
First you need to make a “wrapper” for the cups. To do this, cut one glass in half, cut off the bottom and edges. Flatten it, place it on plain paper and make a template.

Place the template on the back of the scrapbooking paper and cut out as many “wrappers” as you have cups. By the way, you can choose any color of paper. Just try to match the color with the electric garland.

Then wrap the cups in paper and secure the edges with glue or double-sided tape.

Make cross-shaped cuts in the bottom of each cup with a utility knife. Insert the light bulbs of the electric garland into the slits. An unusual New Year's garland is ready!

 purlsoho.com
 Making such a beautiful soft garland is very simple. The amount of material depends on the desired length of the decoration.
What do you need
- white and red felt strips 2.5 cm wide;
- 2 needles;
- threads
How to do
Place the white felt strip on the red one and secure them with needles on both sides. Then make longitudinal cuts in the middle of the strips at the same distance from each other.
 purlsoho.com
 If you want to make a very long garland, cut the felt gradually: make no more than five cuts at once, proceed to weaving, and then repeat the procedure. Thanks to this scheme, the stripes will not move out, and it will be much easier for you.
To make a two-color braid, insert the end of the strip into the first hole and pull tight to prevent the strips from unraveling. Then thread the garland through all the other holes in the same way.
 purlsoho.com
 Trim and sew the strips to each other at the ends of the finished garland so that they do not stick out. By the way, you can combine any colors of your choice. For example, these:
 abigail.engineer
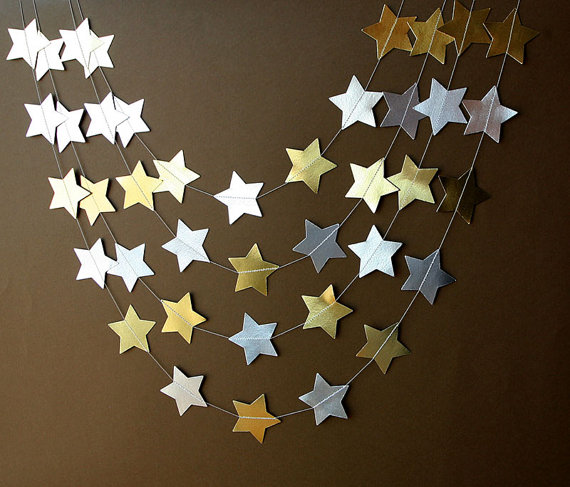
 thecheesethief.com
 These miniature stars look like glass, although they are made of simple cellophane! This material is not as pliable as paper, but such an unusual garland is worth the work done.
What do you need
- cellophane;
- lined sheet of paper;
- scissors;
- thin needle;
- thin threads.
How to do
Cut the cellophane into strips. It is more convenient to do this by placing a lined sheet of paper under the cellophane. Please note that the length of the strips must be at least 30 times their width. In other words, if the width is 1 cm, then the length must be at least 30 cm.
Then make stars out of the strips as shown in this video:
Carefully pierce the stars with a needle threaded with a long thread. The stars should be a short distance from each other.
By the way, garlands made of paper stars also look very beautiful. Therefore, choose the material to your taste.


 oneperfectdayblog.net
 Choose classic tartlets New Year's flowers: green, red and white. Both adults and children will like such bright Christmas trees.
What do you need
- multi-colored paper tartlets (muffin tins);
- glue;
- decorative sequins in the shape of stars;
- twine or ribbon;
- scotch.
How to do
Fold the paper mold in quarters to form a triangle.

Coat the corners of the two triangles with glue. Place three triangles on top of each other and glue them together to form a Christmas tree. In the same way, make as many Christmas trees as you need for your garland.
Decorate them with sequins. If you can't find star-shaped sequins, just cut them out of colored cardboard.
Then tape the Christmas trees to the twine or ribbon at a short distance from each other. The garland is ready! Decorate with it or hang it on the wall.

 createcraftlove.com
 Another way to transform a boring electric garland.
What do you need
- decorative burlap of New Year's flowers;
- scissors;
- electric garland.
How to do
Cut the burlap into equal small strips. Tie them one by one in a knot between the light bulbs.
 createcraftlove.com
 Very simple and beautiful!

 annfarnsworth.com
 This beautiful garland looks very impressive and is very easy to make. If you don't have twine, you can use thick thread or yarn.
What do you need
- Balloons;
- petrolatum;
- ½ liter of PVA glue;
- 2 tablespoons cornstarch;
- 2 tablespoons warm water;
- twine;
- needle;
- electric garland.
How to do
Inflate balloons of the same size. Note: a garland of small balls will look more beautiful. Lubricate them with Vaseline. This is necessary so that the string does not stick tightly to the balls.
Mix glue, starch and water. If the mixture is too thick, add a little more water. Just don't overdo it so it isn't too runny.
Soak the twine in the resulting adhesive solution. Then wrap the rope around the balls. The easiest way to do this is by hanging the balls from some kind of rail. Just do not forget in this case to place an oilcloth under them, where the excess glue will drain. The density of the balls of the future garland depends on how much twine you wind.

Leave the balls to dry overnight. Then poke a needle through each balloon to make it pop. First check whether the string is stiff enough and whether the finished ball will hold its shape. Carefully remove the balloon.

Then insert electric garland bulbs into the twine balls. If the balls turn out to be very dense, then you can make holes in them with scissors or a pen.

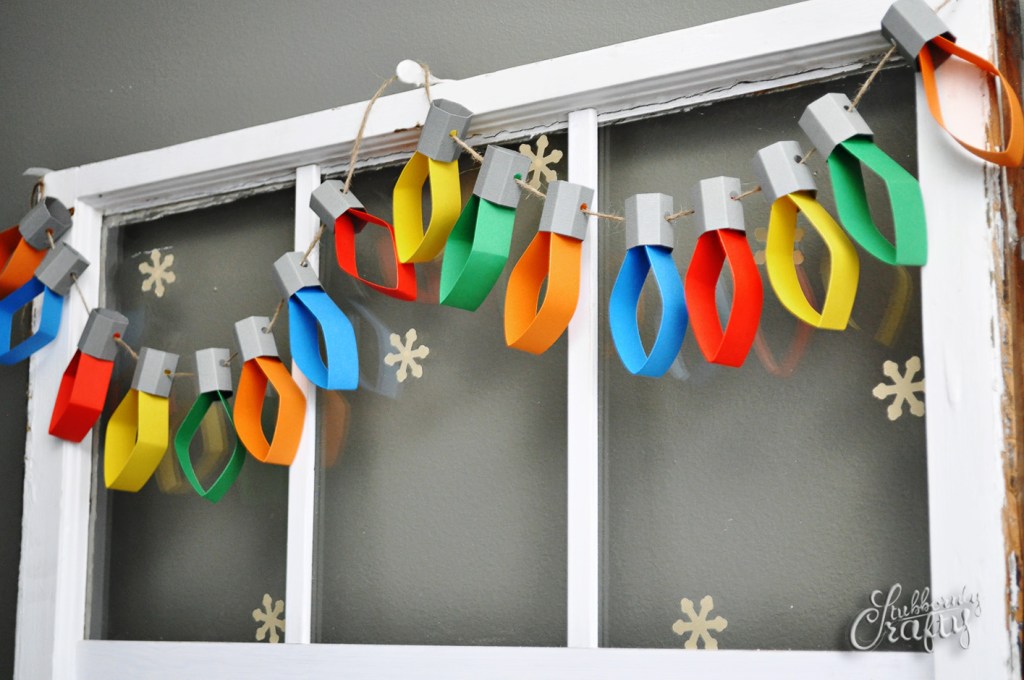
 stubbornlycrafty.com
 For such a garland you need thick paper, such as cardstock. But thin cardboard will do just fine.
What do you need
- thick paper (gray and several other colors to choose from);
- scissors;
- hole puncher;
- glue;
- twine.
How to do
Cut the gray paper into strips measuring 3 × 10 cm. The parameters of the strips from the rest of the paper are 2.5 × 20 cm. The number of strips depends on the desired length of the garland.
Fold the gray strips into octagons and use a hole punch to make holes for the twine as shown in the photo. Then glue the edges of the octagons.
 stubbornlycrafty.com
 Now make the “light bulbs”. To do this, fold the long strip in half, only lightly running your fingers along the fold. Holding the strip by the ends, press it into your palm. When you release the paper, it will take the shape of a light bulb.
 stubbornlycrafty.com
 At the ends of the strip, exactly in the middle, use a hole punch to make a hole for the twine. Pass the string first through one hole on the gray octagon, then through the “light bulb”, and finally into the second hole of the octagon. Repeat these steps with all the other parts and align the “light bulbs” along the length of the twine.
 stubbornlycrafty.com
 acupofthuy.com
 Such beauty can become not only New Year's decor, but also as a decoration for a children's room.
What do you need
- packaging of A4 paper;
- template(download);
- scissors;
- glue stick;
- Double-sided tape;
- threads
How to do
Print and cut out the templates, trace them on sheets of paper as shown in the picture below. For the garland you need 24 first and second parts of the lanterns and 126 stars. And to speed up the process, draw stars on sheets of paper folded four times.
Cut out all the parts.
 acupofthuy.com
 Take one piece of the flashlight and coat one side with glue. Glue the same part to it. One flashlight should consist of six identical parts. Just don't glue the sides of the first and sixth pieces together until you've made the loop.
To do this, apply double-sided tape to the fold. Glue the thread from bottom to top, make a small loop on top, then glue the thread from top to bottom and cut off the excess. Now you can glue the sides of the first and last parts.
Repeat the same with the rest of the lantern parts. In total you will get 8 flashlights.
 acupofthuy.com
 Using the same pattern, make 21 three-dimensional stars. The only difference will be in the gluing of the thread. It must be pulled through three stars, making a loop on the top one.
Now pull the thread through all the loops, forming something like this a beautiful garland:
 acupofthuy.com
 linesacross.com
 It is enough to simply cut out the parts according to ready-made template and decorate them with glitter.
What do you need
- thin cardboard;
- template(download);
- scissors;
- office glue;
- colored glitter;
- twine.
How to do
Print on thin cardstock and cut out the templates along solid lines. The number of parts needed depends on the desired length of the garland. Bend the pieces along the dotted lines.
 linesacross.com
 After one, grease the triangles on the templates with glue and sprinkle with glitter. When the glue is dry, shake them off. You may need to repeat these steps one more time to ensure the triangles are completely covered in glitter.
 linesacross.com
 Then apply glue to the semicircular parts on the templates and glue the figures together. Stretch string through the figures. If you're afraid you won't be able to do this, run a string through each figure before gluing, not after.
 thepartyteacher.com
 These Christmas trees can be decorated with anything: sequins, sparkles or buttons. Use your imagination!
What do you need
- green tissue paper;
- scissors;
- glue;
- yellow cardboard;
- red cardboard;
- twine.
How to do
Flatten the tissue paper. By the way, this can be done using an iron, placing it on the very low temperature. Fold a long sheet in half crosswise and cut lengthwise into two pieces. You will get two long stripes, folded in the middle. Make long cuts on them, leaving part of the fold untouched. You will need as many of these parts as the number of Christmas trees you want to make for the garland.
 thepartyteacher.com
 Unfold the strip and twist it thinly. Make a loop at the bend and twist it several times so that it does not fall apart. If desired, you can secure it with glue.
 thepartyteacher.com
 Tie the resulting Christmas trees to the twine. Then cut out stars from yellow cardboard, and circles from red cardboard and glue them. Try to secure the stars so that the knots on the twine are not visible.
 shelterness.com
 And finally, an option for those who have absolutely no time to make something, but have great desire update New Year's decor.
What do you need
- beautiful Christmas balls;
- twine.
How to do
All you need to do is pass the string through the loops of the Christmas balls, tying it in knots and placing the balls at the same distance from each other.


