How to make a Christmas tree from fir cones with your own hands with photos and videos. How to make a Christmas tree from fir cones with your own hands: creating a festive mood Making a Christmas tree from cones
After almost every walk in a park where there are coniferous trees, children take home cones. This is great for making a variety of crafts. These can be toys, souvenirs, decorative elements. In this article we will talk about how to make a Christmas tree from cones. This product can be a good alternative to a live coniferous tree on New Year's Eve. We present to your attention master classes that tell about the technology of making pine. So, we study the information, look at the photos and recharge ourselves with a dose of inspiration.
Preparatory stage
Before you start directly making the “Christmas Tree of Pine Cones” craft, you need to arm yourself with all necessary materials and tools. Clean the pine fruits from dust and dirt, wipe them with a damp cloth. Sort the pine cones by size: from small to large. In addition, for the work you will need scissors, a heat gun, gouache paints or aerosol, A-3 cardboard, tape, a piece of 50x50 cm, paper (newspapers, old notebooks).

How to make a Christmas tree from pine cones? We study step-by-step instructions
- Roll a cone out of cardboard. We seal the edge with tape. We level the bottom of the workpiece so that the part is stable.
- From another sheet of cardboard, cut out a circle whose diameter matches the circumference of the bottom of the cone.
- We put it inside the product and seal the bottom. The basis for the “Christmas tree made of cones” craft is ready. We install it on the plywood and begin attaching the natural material.
- We glue pine wood in a circle onto the lower part of the cone using a heat gun. We decorate the next row with smaller cones. Closer to the top we attach small specimens of these gifts of nature.
- Inspect the tree, and if your pine cone tree has empty spaces between the fruits, fill them with chestnuts, acorns or nuts.
- You can decorate the product with green gouache paints. An imitation of snow can be created using white paint or by gluing crushed foam onto the cones. A Christmas tree painted with silver or gold spray will look very elegant and original. Leave the product until completely dry.

The height of this composition is approximately 35-50 centimeters. It can be placed in the center festive table or on a closet shelf. On New Year's Eve, decorate it with toys, bows, and garlands.
Small Christmas tree made of pine cones (craft-souvenir)
This version of the tree is made from just one pine fruit. To make a souvenir, prepare rice, green food coloring, glue, a 10x10 cm piece of plywood, beads, and wrapping paper.
Dilute the dye with water according to the instructions, dip the rice in the solution for a few seconds, and then dry it. Cover the plywood with wrapping paper and attach a pine cone in the center. Lubricate all the scales on it with glue and cover them with rice. When the product dries, decorate it with bright beads. That's all, the small decorative Christmas tree is ready. Such a souvenir can become an original gift for relatives and friends.
You will need:
Pine and fir cones;
Scissors;
Thick cardboard;
Decorative berries and birds (or any other decorations);
Hot glue;
Low wide vase;
Artificial snow in a can.
First of all, decide on the size of the future tree, its width. On a sheet of cardboard, draw a circle of the required diameter (you can use, for example, a plate). Cut out the resulting shape.
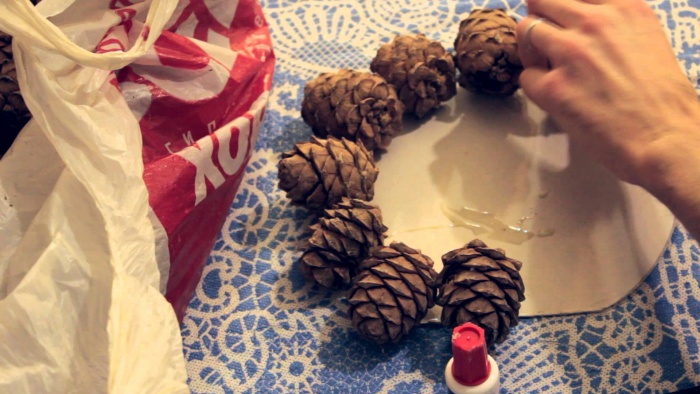
Clean the cones prepared for creativity from debris, then sort them by size into three piles: small, medium and large. Place a cardboard circle in front of you, apply a thick layer of hot glue along its edge, then place cones on the glue larger size wide side to the center of the circle. Fasten the cones together with glue.

Thus, continue to lay out the starting materials in tiers in a circle, trying to make each next tier a little smaller in diameter than the previous one. Remember, larger cones must be at the base of the Christmas tree, medium ones in the middle, and smaller ones at the top. At the very top of the craft, secure one cone vertically.

The Christmas tree is ready, now you can start decorating it. Apply artificial snow to it (it is better to do this outside, since if you apply it indoors, you can stain surrounding objects). Let it dry a little, then decorate the Christmas tree with artificial berries and. The Christmas tree will look very original if the decorations are chosen in the same color scheme.
Once the tree is ready, take a wide vase or flower pot, turn the product upside down and apply glue to the bottom. Glue the cardboard base of the craft to the vase/pot and let the glue dry. The decorative Christmas tree is ready.

Content
The simplest and most accessible material that can be actively used in creativity is an ordinary cone. It can be used both as a separate decor and as part of compositions; its scales can be used in the design of candlesticks or some other decorative items. In this article we suggest you practice making a Christmas tree from fir cones, sounds funny, but just such a craft can enliven the interior in new year holidays. There is no shame in presenting such a tree as a gift or installing it in an office or country house.
You can start preparing materials now. Collect material without flaws, preferably of the same size. Before use, it is better to rinse everything with water and dry it. In the case of creating a Christmas tree, open cones will suit you, so you can safely dry them without fear that they will open too much.
Christmas tree from one cone
Let's start with the simplest option. Since the cone itself has a cone-shaped shape, this design itself can be considered as a small decorative Christmas tree. You will need a fully opened cone, onto the scales of which you can glue small soft balls, beads, sequins, scatter glitter, and attach rhinestones. This craft is easy to do with children; they can be entrusted with the minor work of gluing the parts.
Ready-made crafts can be glued to small wooden blocks, which must also be decorated first. Such Christmas trees can be placed on the table near each guest or you can create different New Year’s compositions.
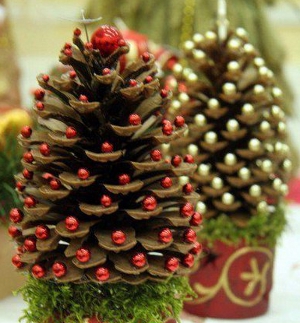
Crafts decorated with various large beads look beautiful. The Christmas tree can also be painted in green and decorate with a star.
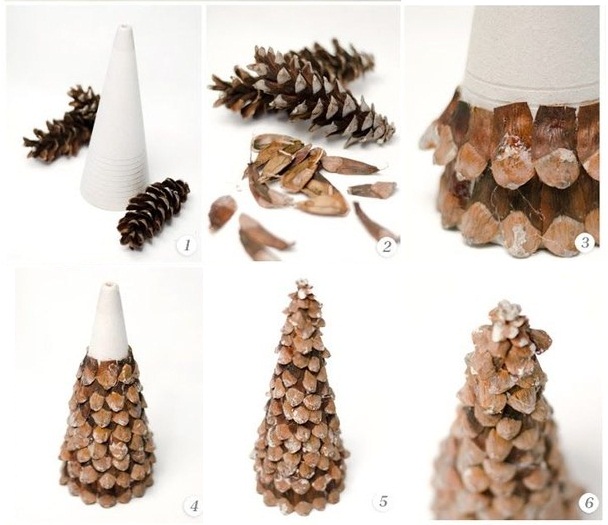
Christmas tree made from several cones
This option is more complicated. It will take enough large number cones and other materials. Such a tree turns out to be voluminous, large, and fluffy. What you need to prepare:
- cones (take more, if there are any left, you can make other decorations);
- cardboard cone;
- glue gun;
- scissors;
- spray paint (choose any color that suits you. A gold or silver Christmas tree looks beautiful).
It is worth noting that cones can be taken not only from spruce, but also from pine or larch. Can be combined different materials in one tree. First you need to sort them out and choose approximately the same size. Using scissors you need to remove any uneven parts and any bad parts.
Now you need to glue the main decor onto the cone using a glue gun. Do this carefully, row by row. When all the parts are glued, they can be painted with spray paint and decorated with some additional decor. Such a tree made of cones can replace the usual green beauty and please the eye for a very long time.
A Christmas tree made from cones with your own hands will remind you of a pleasant time spent creating it and will become a source of pride for the hostess.
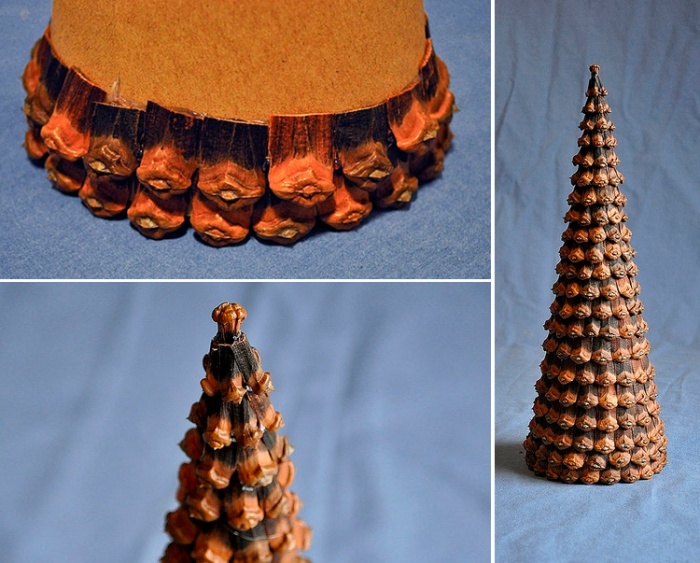
By the way, you can make a similar Christmas tree without using a cardboard cone. The structure itself will be made up of the cones themselves. Such a Christmas tree will turn out more magnificent and larger.
You just need to cut out a circle from cardboard of the same diameter as you would like the base of the tree to be. Cardboard can be replaced with a wooden block. It is necessary to glue the parts onto the blank circle with the base facing inward.

The larger the diameter of the base, the larger and taller the tree will be. But keep in mind that such a craft will require much more basic material.
Christmas tree made of scales
A Christmas tree made from scales turns out to be very delicate and elegant. Of course, such work is more painstaking, requiring more time, effort and perseverance, but it turns out very beautifully.
For our work, collect the following materials:
- a lot of fir cones;
- knife, sharp scissors or pliers;
- cardboard or foam cone;
- glue gun;
- paints;
- sparkles or any other decor (this is optional, because even without additional decor the tree looks very beautiful).
Your very first step is to separate the scales. Do this with pliers or sharp scissors; a sharp knife will also work.
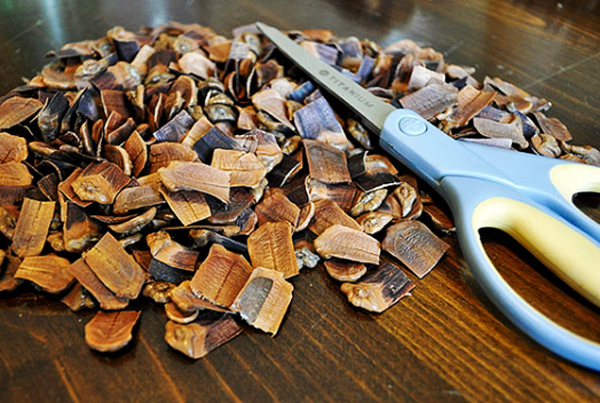
The longer the scales are, the more convenient it will be to glue them and the more magnificent the Christmas tree will be.
Now that the main material is ready, let's start creating the New Year's beauty. We take a cone and attach the scales in a checkerboard pattern. The Christmas tree can be either very small or large, which can be installed on the floor.
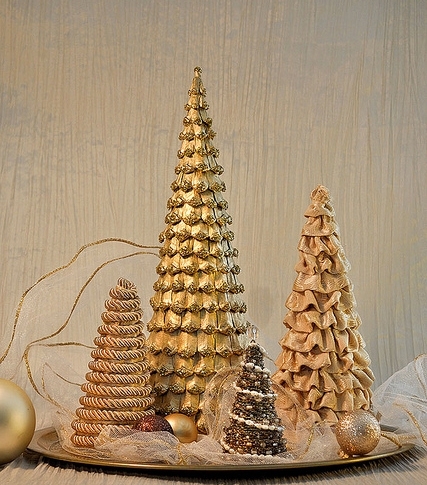
The Christmas tree can be painted gold or green and decorated with additional decor.
The end result might look like this:
Pine bonsai
You roughly understand how to make a Christmas tree out of cones, but what do you think of the bonsai option made from cones? This is such an original move for the New Year. Guests come to you, and instead of a Christmas tree you have a small Japanese tree. For this craft you will need:
- fir cones;
- tree branch;
- small pot;
- filler for the pot (this can be soil, scales from pine cones, or small pebbles).
First you need to form a ball of cones, which will become the basis for the bonsai. It may be small foam ball, onto which you attach the base material using a glue gun. The cones can also be glued directly to each other, forming them into a ball.
New Year. This holiday is beautiful because it does not fly by in an instant, and we prepare for its meeting long before the celebration itself. It is truly felt when we are waiting for it, preparing for it. Every year, we again and again plunge into the holiday bustle. Bright lights, the smell of tangerines and, of course, what New Year does without a Christmas tree. The Christmas tree is the main attribute of the upcoming holiday. If you do not plan to stage a real forest beauty, then you can celebrate with its smaller counterpart, created from scrap materials, for example, pine cones. You will learn how to make a Christmas tree from cones in the further description of MK.
I dedicated this master class to creating a cone-shaped Christmas tree from pine cones. This Christmas tree can decorate the interior of any apartment or serve as an original gift for your loved ones.
So, for work we will need:
- pine cones;
- cardboard (or any thick paper);
- hot glue gun;
- 3 – 4 pcs. transparent rods for glue gun;
- a can of silver acrylic paint;
- scissors;
- stapler;
- beads for decoration.
How to make a Christmas tree from pine cones: step-by-step instructions
To begin with, I went for a walk in the forest with my children. We don't have snow yet, so we quickly replenished our autumn supplies of pine cones, which we didn't have enough of. At home we sorted through the pine cones: we threw away the broken ones, cleared the good ones of debris and sorted them into large and small ones. If the buds are too closed, you can dry them in the oven. The hot air will cause them to open. By the way, you can make a lot of different things from pine cones. New Year's crafts- penguins, spiders, mice, etc.
Collected cones
The next stage is preparing the base of the Christmas tree. I rolled the cardboard into a cone, secured it with glue and a stapler. At the base, I cut off the excess paper with scissors. I did not paint the base for the Christmas tree. But if you want everything to be perfect, you can do it.
 Cone - the basis for the Christmas tree
 Now, using a glue gun, you can start building up the first row. We will start with big cones and finish the craft with small ones. If you don't have a glue gun, you can use any super glue. But still (to speed up the process and to make the tree of cones neat) I would advise you to buy it (even the most inexpensive one will do), because hot glue sets instantly, which significantly reduces work time. I applied hot glue to the bottom of the cone base. We attach the cone to it, pressing it tightly. Glue the next bump next to it, trying not to leave any gaps. The first row is ready.
 Let's start gluing the cones
 Thus, moving from bottom to top, I glued the cones tier by tier. While working, I tried to select the cones so that the next ones would fit with the smallest gaps. If there are any spaces left, that's okay. You can cover them with scales from cones. But this work seemed painstaking to me, and I want to enjoy the process. So I left it as is, and when I painted the entire Christmas tree, they became invisible.
 Cover the cone with cones
 I tried to attach the smallest cones to the last two rows. The most beautiful elongated cone was reserved for the top. Apply a generous amount of glue onto it and secure it. To make a tree made of cones more decorative, you need to decorate it with garlands and tinsel. But first, let’s “sprinkle” it with silver snow.
 Coloring a Christmas tree from pine cones
 Yes, if there are threads left from the hot glue, carefully remove them so as not to spoil them appearance our beauty. In my opinion, such a Christmas tree is already ready to fulfill its festive function. But I optimized it a little more.
I took ordinary silver paint from a can and painted the entire surface of the tree.
It is necessary to paint somewhere outside, as the paint has a very specific pungent odor. Since when spraying, even in calm weather, its vapors will fly in different directions, I advise you to wear clothes that you don’t mind getting dirty.
Spray paint in different directions. We are waiting for the paint to dry completely. Next, I glued the decorative elements using a hot gun. First I cut the Christmas tree beads. In short, you can use whatever is at hand. If you have beads, they will do just fine. We glue them in a chaotic order.
 Cut the beads into links
  Gluing decorations to the Christmas tree
 You can add some decorations and New Year's tinsel, wear small ones. It all depends only on your taste and imagination, experiment! This is what you should get approximately:
 Christmas tree made of pine cones
 The width of the Christmas tree is about 20 cm, and the height is just over 30 cm. This is the kind of Christmas tree made from pine cones, made with our own hands! How do you like it? In my opinion, everything is simple and beautiful. Such an elegant beauty can even be placed on a festive table.
Do you feel the holiday approaching? Share your emotions and impressions, offer your New Year's decorations. In order not to miss all the most interesting things, subscribe to updates via RSS or to your mailbox. Enjoy your creativity and happy new year!
On the eve of the New Year, many people are thinking about how to celebrate it and how to deal with it. Christmas tree. Having a living beauty is no longer so fashionable these days, but those made from various materials, are very relevant. Now let's look at several ways to make the most simple Christmas tree from pre-prepared fir cones in a do-it-yourself master class. Cones are a wonderful raw material for various kinds of crafts. Collecting them will not be difficult; pine and spruce trees grow in almost any park, garden or forest. At the same time, you can save on expensive purchases New Year's decorations. Along with this, we get environmentally friendly natural material, which not only decorates, but also gives a unique pine aroma, creating a festive atmosphere.
How to make a Christmas tree from fir cones with your own hands in MK
Before starting work, to prevent distortion of the dimensions of the finished product, it is advisable to perform some procedures.
- While in a warm place, the cone opens, once in a cold place it closes again, so to fix the shape, you need to hold it in a solution of wood glue for at least half a minute, then dry it.
- If you need to open it faster, you can boil it and dry it on a radiator or keep it in the oven.
This tiny Christmas tree is made from just one large cone, but it is important that it is fully opened; it is very convenient to do this craft with small children.
So, materials:
- Big shot – 1 piece
- Green paint
- Silver nail polish
- Decorative elements - beads, beads, bows, ribbons, snowflakes
- Base – salt dough or a small pot.
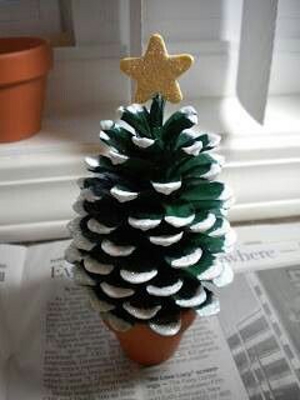
- We paint the already prepared open “Christmas tree” green
- We tint the edges with varnish, you can replace the varnish with sparkles, you need to sprinkle them on the places smeared with transparent glue.
- We also decorate our tree with the help of glue and various beads or whatever is available, the result will depend entirely on your imagination.
- We make a stand. We make our “snow” in the form of a flat cake from salt dough and install the finished Christmas tree in it. Or we simply secure it in a small pot.
Let's consider the simplest option for making a New Year's beauty from pine cones, which requires a minimum of time and necessary items. It is suitable for decorating a table, for example in an office, or a small shelf. What is needed for this:
- Cones
- Glue gun or thin wire
- Rain (preferably green)
- Scissors
- We glue the base, placing the largest cones tightly, glue them with a gun or twist them with wire
- Then we lay the next row of smaller ones, creating a cone and so on, until only one remains, which will be the top.
- We cut the rain into small pieces and glue it in between, decorating the finished creation.
This is what happens as a result.

In this way it is possible to produce christmas tree larger size, of course, and more raw materials will be needed.
To do this you need:
- Cones
- Glue gun
- Cardboard
- Scissors
- Spray paint (silver or gold)

- First we will make the base, cut out a circle of any size from cardboard - this will be the bottom. Then we glue the cone, its base should be slightly smaller than the diameter of the bottom. We fill the inside of the cone with old newspapers and small foam plastic; if this is not done, the cardboard may not withstand the weight and become deformed. And we connect these two blanks into a single structure.
- Now use hot glue to connect the cones to the base, starting from the bottom, in a circle and then up. It is important to fill all possible gaps by selecting the required dimensions of the source material.
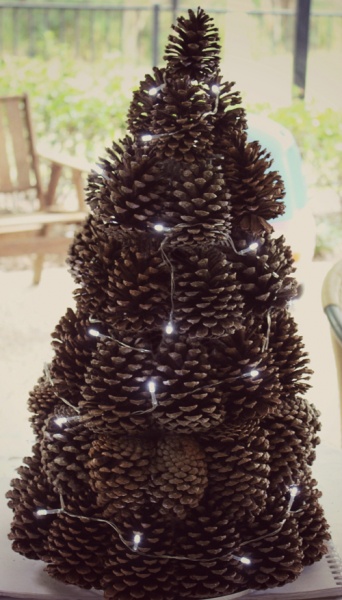
- Cover the formed tree with spray paint. If desired, you can decorate with a glowing garland.
The photo below shows in detail all the manufacturing processes described above.

If you have a huge number of cones and a large supply of patience and perseverance, you can create a large outdoor holiday tree. All family members, both adults and children, can join in working on it.

- A lot of bumps
- Superglue - a lot
- Plywood
- Wooden blocks or furniture legs, or wheels.
- Spray paint (green and white)
- A circle is cut out of a piece of plywood, the diameter of which is from 50 to 70 cm. Blocks or ready-made furniture legs are attached to one side of it, and a New Year’s tree will “grow” on the other side.
- We lay out the cones along the edge of the base and glue them together and with the surface of the plywood. We place the next row with a slight shift towards the center of the circle, and so on for all subsequent rows. The result should be a cone.
- We paint the resulting creation with green paint, and smear the edges with white paint, creating the effect of snow.

Video on the topic of the article
For a clear example, we suggest watching a selection of videos from different options making Christmas trees. Imagine and create.


