How to make it from improvised materials. How crafts appear. Master classes on crafts from improvised materials
Pleasant little things made with your own hands most often become the main factors in creating home comfort. Many of them are not difficult to make - all you need is sleight of hand, a little imagination and creative inspiration.
The interesting things collected in our photo selection not only please the eye, but also make life even more enjoyable. Let’s quickly start reviewing exciting DIY things.
Rug of stones
Let your interior be one step closer to nature. This cute DIY rug made from large pebbles makes a colorful, natural addition - a great alternative to a traditional entryway rug.

Mug with gold accent
Have you been dreaming of transforming your favorite mug? Stop putting off your plans for later. Buy a special aerosol with golden paint and start creating soon. There can be many design options - create for your health or follow original example in the photo.
Lampshade made of lace
You are unlikely to find the likeness of this lace lampshade in any store, because such a masterpiece is the result of manual creativity and craftsmanship. The essence of the work is shown in the photo.

Paper cut: evening city on a shelf
It’s not at all difficult to create real magic in your home. This spectacular fairytale castle lantern is cut out of paper. Even your child can do this technique.

For the craft, prepare the following materials:
- thick paper;
- scissors, pencil, ruler, eraser, breadboard knife, glue stick;
- New Year's garland (preferably battery-powered).
- a shelf for a picture (necessarily with a side that will hold the picture).


We bend the edge of the layout to install it on the shelf. We lay a garland along the bottom and light the lights. The fairytale castle with lighting is ready!

Kitchen organizer
Kitchen devices made with love by you look much more interesting than their store-bought counterparts. With them, the environment around is filled with a special warm atmosphere and comfort. Even such a simple cutlery organizer made from tin cans will add some personality and charm to the interior.

Cardboard frame for mirror
Get creative with your vanity design. Instead of a boring classic mirror, you can hang something more original above it, for example, a mirror with an openwork cardboard frame. Believe me, such a DIY masterpiece looks much more refined than its store-bought counterpart.

City story from cable
Add a touch of unpredictability to your interior. A long black cable lying chaotically near a white wall can turn into an original minimalist urban plot against its background.

Vintage photo frame
An antique frame from a stray picture and simple wooden clothespins are a great material for creating a unique vintage-style photo frame with a creative approach to design.

Charging point in box
If you are one of those who have accumulated a lot chargers, we have for you an excellent solution for an aesthetic and at the same time functional box for storing them. Not only does it visually brighten up the room and keep all your devices organized, but it also charges them on the spot!

Book with kisses
A creative surprise for a loved one - a mini-book with kisses. As you flip through the pages, there are more and more hearts.

An accessory for toast lovers
You can make this cute toast yourself. A nice gift for the occasion.

Shoes with cats
Add a little more color to your daily routine. Old ballet shoes can be transformed in an original way by decorating the socks with charming cat faces.

And you will need very little: plain ballet shoes, a brush, black and white paint, a white marker, masking tape. Further everything follows the instructions in the photo.


A soulful winter accessory
Homemade decorative skates will once again remind you of winter's tale and relaxing at the skating rink.

If you want to make the same ones, then prepare large pins, felt, cardboard, wool threads for laces, hot glue, a marker and a tapestry needle.


A little humor on a rainy day
Comic covers on rubber galoshes will certainly not allow you to feel sad in rainy, cloudy weather.

Adorable prickly hedgehog
A sewn hedgehog made from yarn can also have needles, but not your own, but sewing needles.
 Funny abstractions
Feel like an abstract artist by building bright smiley faces from different miniature figures.

Cute kittens made of cardboard for storing threads

Handmade stamp collection


Children's bunny bag
Why buy accessories for your child if you can make them yourself. A bag for a girl with a bunny face looks very original.

Ice cream garland
Create a summer mood by tying a garland of the most popular delicacy at this time - an ice cream cone.

Notebook in homemade leather binding

Stylish hanger
Loops made of leather ribbons nailed to the wall - an extraordinary minimalist hanger or shelf for books, magazines and other small items.


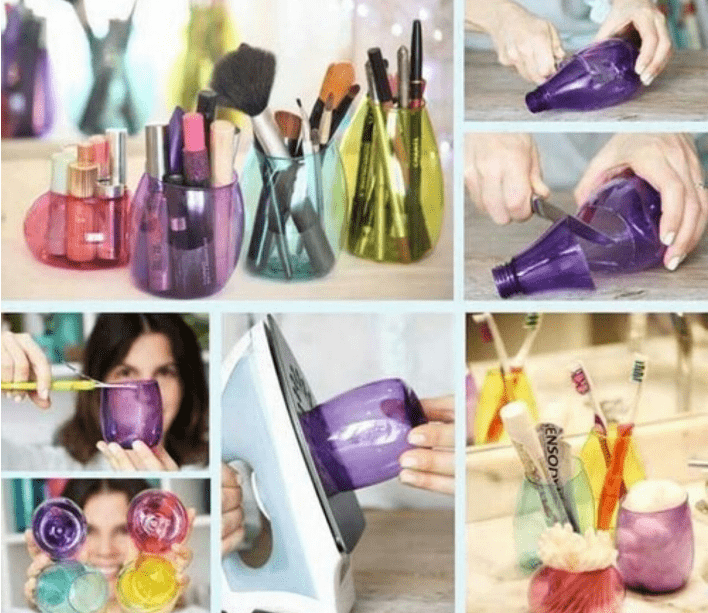
Magic vase
You can create a magical atmosphere in your home with the help of simple, beautiful things, such as this vase.


Rhinestone bracelet


Decorative letters for the refrigerator or children's chalkboard
Learning alphabet letters are a great idea for home decor. All you need is a little gold paint.


Convenient headphone clip

Spectacular shimmer
Candles with golden and silver shimmer will add a little palatial feel to the interior. This beauty can be made at home using old candles and aluminum tape.

Donut Bracelet
Young Homer Simpson fans will love this adorable donut bracelet. All you need here is bright nail polish and a plastic children's bracelet, then all you have to do is get creative with the glaze.


Not boring clothes
A simple hat will significantly transform your everyday style. It is enough to sew a few bright flowers along its edge.


T-shirt with scoop neck

Watercolor sweatshirt

Beach pareo dress

Headband

Braided scarf

A simple white T-shirt will become more stylish if you sew on it a neat pocket with an interesting print.

More ideas for DIY crafts are presented in the following selection of photographs.


As you can see, in order to please yourself and your loved ones, you don’t need to spend a lot of effort and money. Your desire, creativity and inspiration can work wonders. And the result of work done with your own hands cannot be compared with purchased accessories and other store-bought items.
Do you like to do handicrafts? Tell us about your favorite creative masterpieces.
The most interesting DIY homework is much simpler than it seems to inexperienced handmade lovers. Hand made is literally translated as handmade, that is, absolutely all types of needlework can be classified as hand made. This can be either making a rug or making mittens knitted with your own hands.


If you love handicrafts, adding some flair to the interior of your home will not be difficult. We present you ideas not only for experienced needlewomen, but also beginning craftswomen. Prepare your materials and start creating!
Newspaper baskets

You don’t have to spend money to have such baskets for all your household items, because you can make them yourself.
We will need:
- braiding box
- thick cardboard
- a lot of newspapers
- scissors
- knitting needle
1. Cut a sheet of newspaper in half and begin to wind a strip of newspaper onto it at this angle:


2. Glue the tip of the newspaper to the tube.

3. Take cardboard for the bottom of the basket and glue the tubes to it.

4. You need to glue another piece of cardboard on top.
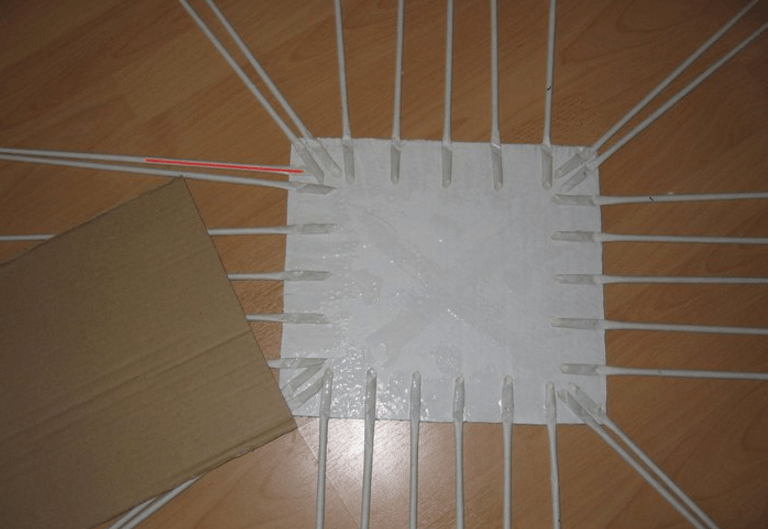
5. For the first row, simply wrap the tubes one after the other.

6. Wrap the last tube as shown in the photo.
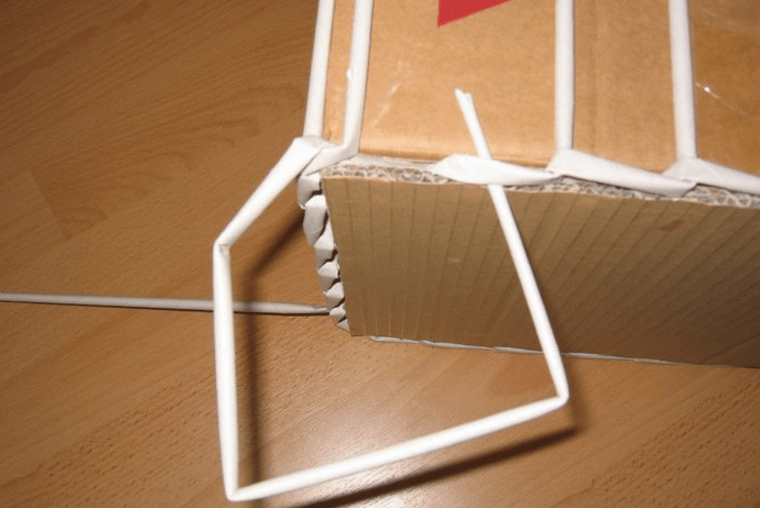
7. Glue the additional tube and begin weaving the basket.

8. Attach the tubes by inserting one into the other.

9. We increase the tubes during the weaving process.

10. Watch how the weaving ends.

11. Place the wrapped tubes inside our basket.


12. At the final stage, the tubes must be cut and singed.

13. The finished basket can be painted in the desired color.

And in this video you can learn how to knit a rug from bulky yarn
Cork mat

We will need:
- base for the rug (you can use laminate)
- plugs of the same size
- knife and scissors
- glue or glue gun

1. Cut off part of the base.
2. Cut the corks in half.
3. Glue the corks to the base. Voila, your new hallway rug is ready!
A rug made from unnecessary things

Such a rug will not only decorate the entrance to the apartment, but will also save you from old, unnecessary things.

1.Cut unnecessary clothes into thin strips.
2. Tie the pieces of fabric tightly to the mesh.
3. Secure with tape and the mat is ready.
Blanket made of pieces
A blanket from pieces can be made in different ways:
1. From knitted pieces. First you need to connect the squares different colors using knitting needles or a crochet hook, and then connect these squares together.

2. From different scraps of fabric.

Bead painting
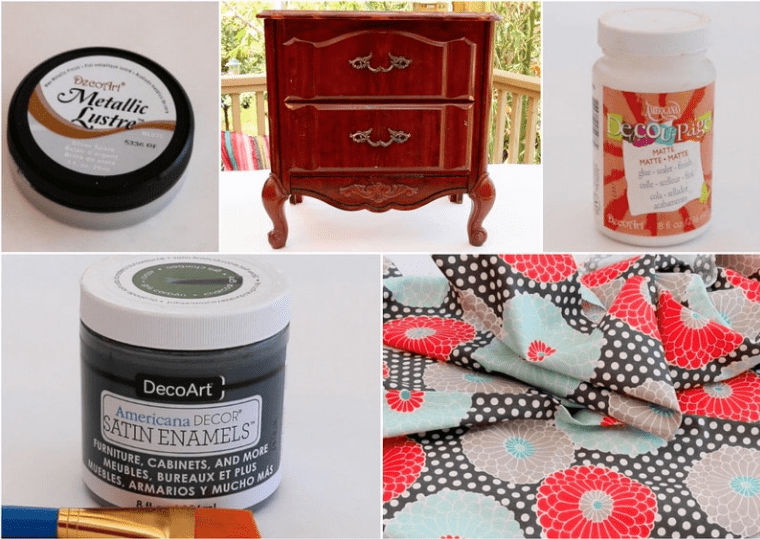
Decoupage furniture
IN lately Decoupage is becoming more and more popular, because it is a great way to update your furniture and decorate the interior of your apartment. For decoupage, photographs, old books, newspapers or magazines, and fabric are usually used. These materials are painted over with varnish or glued to pieces of furniture.
Table decoration


Decorating a chest of drawers

Such crafts will be very useful in everyday life, and they are not difficult to make.


Handmade products can decorate the interior of not only your home, but also your garden. Unnecessary things can turn into very useful ones for the garden.
Crafts from wicker
If grapes grow in your dacha, then you will be provided with materials for needlework for the rest of your life. Decorative figurines, benches and much more can be made from vines.


Flowerpots and rope rug
Mat made from plastic bottle caps
Each of us has a whole bunch of lids from plastic bottles, so why not do something useful with them?

The covers are connected to each other with fishing line, and holes can be made in them using an awl.

Country style paintings
Patchwork ottoman
Patchwork is another latest trend in the world of interior design.

1. To make such an ottoman, we need to cut 12 triangles from colored material and sew them together.

2. Cut out a piece of fabric that will be the side of our pouf. We sew the cut together and stitch it with the previously made triangles.

3. Cut out a circle of the same diameter as the top of the ottoman. Sew on the bottom, leaving a small piece unstitched.

4. At the final stage of making the pouf, it must be stuffed, darned and a decorative button sewn on for beauty.

If you have your own dacha, then why not make a hammock, which will be so comfortable to read your favorite book.

To make a hammock chair we will need:
- thick fabric
- rope
Let's start making:
1. Cut a fabric base (rectangle 115x86 cm) and cut 14 strips measuring 8x15 cm. Each strip must be folded in half and stitched. We fold the resulting ribbon in half and sew it together, so we get a very strong loop.

Handmade products can be of different levels of complexity. Most crafts can be done even by novice craftswomen, as they do not require any skills or special tools. However, only experienced needlewomen can handle the production of individual specimens.
Material for creativity can be old, unnecessary things and various items at hand. In addition, you can go to the forest or park and prepare the most different types natural materials - branches, moss, dried flowers, dry herbs, stones. This kind of raw material is quite popular today to use in needlework.

Craft ideas
There are a lot of ideas for DIY interior decorations. Every year, designers offer us more and more new decor options. Let's look at the simplest craft solutions that can be made to decorate the interior.

Hot stand
Do you have a lot of beer can caps? Use them to create original coasters. This is a necessary item in the household, since it allows you to protect the table surface from exposure to high temperatures.

If you don't have beer caps, use regular river or sea pebbles. This option will be even better, since there will be no risk of scratches.

Unusual flower pots
Don't rush to get rid of old books. You can use them to make beautiful pots for indoor plants. To do this, you need to open the book and cut a hole of the required shape in the middle. To protect it from moisture, you need to take care of sizing it with cellophane. All that remains is to fill the soil and plant the flower.

Small vases with magnets will also look impressive. They can be used to decorate a refrigerator. The basis will be corks from under wine bottles. You need to hollow out a hole in them to fill the soil and attach a magnet to one side.

Original shelves
Old books are also suitable for creating such original shelves. You only need to purchase corners and screws. The result is a beautiful and stylish decoration walls.

"Warm" crafts
It is the so-called “warm” crafts that add the most coziness and comfort to any environment. It could be crocheted or knitted pillows, bedspreads, tablecloths, blankets, covers and much more. So, one of the most creative ideas is a DIY cover made of wool yarn for a mug. In addition to it, you can knit a square napkin, which will serve as a hot stand. The thread color can be any. But it is better that it harmonizes with the color palette of the kitchen interior.

Homemade souvenirs
Souvenir products have always been expensive. Therefore, it makes sense to figure out how to make a souvenir yourself. Moreover, handmade products are always more attractive in appearance. Also, they will not affect the family budget, since improvised means are suitable for their creation. Plush and plastic toys, artificial flowers, herbariums - all this can be used.

Here's a short tutorial. Prepare:
- liter jar with lid;
- decorative elements;
- multi-colored glitter;
- glue;
- glycerol.

Sequence of actions:
- Pour 2 tsp into a glass container. shine.
- Fill the jar with water.
- Add glycerin (a few drops).
- Make a composition from decorative elements and attach to the lid with glue.
- Screw the lid onto the jar securely, lubricating the threads with glue.

Handmade items made from unusual materials
Crafts today can be made from anything. For example, from geographical maps. Such products will appeal to all lovers of travel. A globe lamp, a map painting, as well as candles, ceiling lamps, buckets, etc. objects depicting continents and oceans - all these things will organically fit into most modern interior styles.

Stones of different textures and sizes are another unique material for crafts. Thus, flint stones with holes made by nature itself can be used as candlesticks. Such homemade accessories will be appropriate if you have chosen a rustic design for the decoration of the room. Do you need a lamp in classic style? Place small stones in a glass glass and place a scented candle inside.

Stones are appropriate to use for marking indoor plants. It's very convenient and simple. You just need to sign the names of your green “friends” on them.

Another way to use it is to play tic-tac-toe. You can go further and make backgammon, chess, checkers.

Drawing letters on rocks will help your child learn the alphabet.

Advantages of crafts for the home
Crafts have the following advantages:
- uniqueness;
- originality;
- special energy;
- low cost.

This article shows just a few options for crafts for the home. When engaging in such creativity, it is important to strive not just to copy someone else’s idea, but to come up with something of your own. This is the only way to get exclusive decor.
To keep you in a great mood in any weather, make new things from available materials. Quick crafts that take less than an hour to make.
Contents of the article:
Sometimes you want to pamper your child with a new toy, but you don’t have the financial resources or time to make one. Therefore, we decided to select for you the fastest simple crafts, on which you will spend no more than an hour. Family budget will not suffer, since they are made mostly from waste material and all sorts of leftovers.
How to make a doll from threads and a dandelion with your own hands?

You will create it while relaxing in a cozy chair. The main thing is to place everything you need nearby so that you don’t have to once again get up. This:
- threads;
- half a sheet of cardboard;
- scissors;
- strip of fabric flesh-colored;
- markers.
- Wrap the threads around the card in an impressive layer.
- Tie the finished winding with thread. Determine where the doll's head will be. Mark it by also rewinding it with thread.
- Do the same for your right and left hands. To make a doll's hands from threads, wrap your hands at wrist level and cut the yarn in the area of the toy's fingers.
- Also use threads to separate the torso from the legs, and perform them using the same technique as the arms, just make them longer.
- Measure a strip of flesh-colored fabric according to the volume of the head, glue its sides.
- Wind hair threads around your hand and cut through the resulting roll on one side. Glue to the head, trim the bangs if desired.
- Markers different colors draw the facial features.
- Sew a sweater for a toy or tie it with a piece of fabric to make an apron. You can tie a handkerchief to make it a cloak. Children are happy to make such clothes, and they will certainly appreciate a new doll made from threads.
If you are making a girl doll, then you do not need to mark her legs. Let the threads cut evenly at the bottom become a skirt.
Such simple crafts will surely delight the kids. You can also create a fluffy dandelion from leftover threads.

For this charm you will need:
- yellow and green yarn;
- wire;
- PVA glue;
- knitting fork or metal staple;
- scissors;
- gypsy and thin needle.
- Wind the yellow yarn around a crochet fork. Thread a thread of the same color into the gypsy needle. Sew it down the middle.
- Lubricate the resulting line well with glue. Remove the created fabric of yarn from the fork and roll it with a roller.
- A thread is wound in the middle to give the workpiece a dumbbell shape. Coat the middle of this part with glue on top and wait until it dries.
- Such simple crafts are interesting for both adults and children. They are made quickly, but part of the time is spent waiting for the glue to dry. Therefore, it is better to make crafts in the evening, and continue the entertaining needlework the next day. What are we going to do now?
- Cut the resulting dumbbell in the middle. On the first and second flowers, you need to cut the loops with scissors and carefully comb them to get fluffy caps of two dandelions.
- The green yarn from which we will make sepals must be cut into pieces 4 cm long. We thread the same thread into a gypsy needle, sew the pieces across, but not in the middle, but 2/3 away from the edge.
- Trim the top with scissors, trim it, make another line parallel to the first.
- Apply glue to the back side of the flower and attach the sepals here. Wrap it with the same thread you used to stitch it. Glue both ends and leave the workpiece to dry.
- Meanwhile, you will wind the green thread onto the glue-coated wire. You will get a stem.
- Insert a thick needle into the sepal from below and twist to make a hole for the stem. Install it there, having previously lubricated this part with glue.
- The leaves can be crocheted, but since we are making simple crafts, cut them out of green paper or cardboard and glue them to the stem.
How to quickly make crafts from animal tissue?
If you want to spend less than 30 minutes making a new toy, then make these funny mice. They don't even need to be sewn. By making the slits in a certain way, you will make these rodents.

See if you have:
- pieces of felt;
- juice straws;
- beads or small buttons.
- For each mouse you need to cut two parts from one fabric. The first will become a body, pointed on the muzzle, rounded on the other side. Cut out the ears in the shape of a figure eight.
- From a fabric of a different color you need to cut out a small circle for the nose and two larger ones for the ears, and glue them in place.
- Using scissors or a utility knife, make 4 cuts on the body of the mouse. Two will be vertical, at the back of the head, and the other two you will make in the rump area to place the straw here. Place the ears on the head, threading them through the slits.
- All you have to do is glue beads or buttons instead of eyes and marvel at how quickly crafts are made from simple materials.

If your child is bored, you can make a fabric applique with him. Such funny bunnies are also sewn onto the worn knees of children's trousers to update this item.

Transfer the applique onto the fabric and cut it out. The bunny is decorated by sewing a bow to his ears and a carrot on his body. Attach eyes and other facial features. If this is an applique, then you need to glue the hare onto the cardboard.
And here are some simple crafts - in the shape of birds. You can cut them out from leftover felt, glue on a nose, eyes, wings and perform a home performance.

DIY crafts from pine cones for children

They are also made simply and quickly.
To make gnomes, take:
- pine cones;
- light plasticine;
- pieces of felt or fleece;
- glue;
- brush.
- Let the child roll a ball out of plasticine and use the back of the brush to make indentations for the eyes, mouth, and nose. They will be filled with pieces of plasticine of the corresponding color. So, the eyes can be brown or blue, the mouth red.
- Attach the head to the top of the pine cone. Cut a triangle out of felt and glue its sides together to form a cone. Place this cap on your character's head.
- Cut out mittens from the remaining fabric and attach them to the pine cone with plasticine.

For a craft made from pine cones like an owl, we will also need:
- 2 acorn caps;
- yellow paint with a brush;
- plasticine;
- accessories in the form of feathers, ribbons.
- First, you need to paint the cone and the acorn cap, and continue subsequent work when they are dry.
- Let the child roll small balls from black plasticine and stick them to upside-down acorn caps - these are the pupils.
- Make a nose out of orange plasticine, attach it in place.
- This owl craft made from pine cones is decorated with feathers or ribbon.
- pine cone;
- pieces of thick fabric;
- two toothpicks;
- cotton wool;
- 2 ice cream sticks;
- white paint.
- Let the child paint the pine cone and remove it until it dries completely.
- Mom will cut out a scarf from plaid fabric and tie it around the snowman’s neck. Make headphones from felt and glue them to the character’s head.
- The child will make a snowman’s nose and mouth out of plasticine and attach it to his face.
- Make your hands from wire wrapped in a strip of fabric or ribbon. You need to wrap the cone with wire.
- Place toothpicks in the snowman's hands, with pieces of cotton wool glued to the bottom of these sticks.
- Paint the popsicle sticks and when dry, place the snowman on these skis.
They are quick and easy to make and these are the piglets. Glue the scales from the cones to the fir cones in the form of ears. Attach the snouts that will become the acorn caps. You can use plasticine rather than glue for this.

Color the piglets in pink, you can use spray paint for this. Once it's dry, only then will you attach the little black beads that will become the eyes.
For this craft you need an unopened pine cone. But over time, the scales open up. To avoid this, dip the cones in wood glue diluted with water for half an hour.
Remove them from the solution and shake them off. After 3 days, the cone will dry completely, securing the scales, which will now not open. After this you can cover this natural material paint and make new items.
The next simple craft is a forest corner. For her, take:
- CD disk;
- plasticine;
- spruce and pine cone;
- acorn cap;
- glue;
- paints;
- eyes for toys.
- Paint the disc in green, draw flowers on its surface.
- Let the child roll the caps and stems of the mushrooms and connect them.
- The base for the hedgehog can be sculpted from plasticine or polymer clay. Then cover it with brown paint.
- When it dries, stick scales from the hedgehog into the back of the hedgehog. fir cone. Place a cap on his head.
- Glue the eyes, nose, mouth, put a cane stick in your hand. In the other there will be a basket with mushrooms, which are molded from plasticine.
- Attach the hedgehog to the stand, after which another wonderful craft is ready.
Tie floral wire to the pine cones and place picturesque flowers in a jar previously wrapped with twine.

You can also make another craft from pine cones for the garden, such as a wonderful decorative basket.

If you need to quickly make a hedgehog to bring to kindergarten, mold his body and head from beige plasticine, and roll his eyes and nose from black. Stick in the seeds, which will become spines.

Simple crafts for a great mood
Now the sun rarely comes out, and the weather is increasingly cloudy. To avoid succumbing to despondency at this time of year, create mischievous tricks that will certainly improve your mood.

Place these cheerful flowers in a vase at home, which can be made from practically nothing. All you need to do is:
- colored paper;
- cardboard from a white box;
- marker;
- stationery knife;
- tape;
- scissors.

Color the eyes with a black marker and bend the petals forward.

Cut a stem from cardboard. At the top, on one side, glue the finished part, on the other, a pre-cut flower with petals.

Fold a green sheet of paper in half, draw an oval line on it, and cut along it. If available, use zigzag scissors. Keep the notches simple.

Tie the paper flowers with a ribbon, and if you have taffeta, then use this fabric for decoration. You have got a bouquet that will never fade and will make you happy.

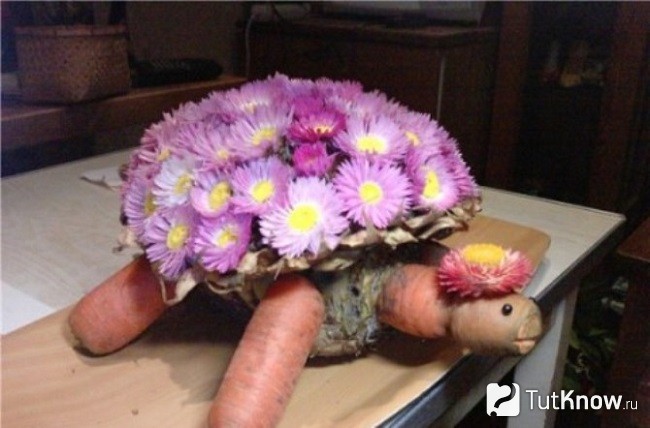
You can attach flowers with a toothpick to washed beets or pineapple. You will get a beautiful shell for a turtle. You will make her arms, legs and head and neck from carrots. Attach these parts to the body using toothpicks as well.
If you want him to come quickly New Year, decorate white objects in the apartment, turning them into snowmen.

Attach black magnets to the refrigerator, and now a holiday character has taken up residence in your kitchen. If you draw on a white vase or glue round eyes and an orange nose in the shape of a carrot, then another snowman will amuse everyone gathered at the table.
See what other quick and easy crafts you can make.
Many people prefer not to work "for someone else." Such citizens need to earn money somehow. For example, by organizing your own business. This is the most correct solution for those who want to receive money without being hired. But in this case, every businessman faces the question of defining activities. Quite often people prefer handmade things. They are highly valued in the modern world. Today we have to find out what we can make with our own hands and sell. What tips and tricks will help you make good profits from your business? Where and how best to distribute handmade things? If you thoroughly study the answers to these questions, you can become a famous businessman with a good income.
About popularity
With the advent of man on Earth, handicrafts arose. In the past, people made things out of necessity. With the development of society, handmade things began to be valued not only because of their importance, but also because of their beauty.
The so-called handmade is usually genuine, original and unforgettable. It carries the love and positive energy of a person. Many say that the philosophy of art of conserving the planet's resources is promoted through the creation of handmade things. After all, craftsmen usually use only natural materials in their work.
Owning and wearing handmade items means always being on top of fashion. People also think about what they can do with their own hands and sell because such things are distinguished by their originality and uniqueness. They emphasize a person's individuality. Besides, not everyone can do something with their own hands. Some people don’t know how to do anything, some are good at embroidery or sewing, others have a talent for drawing or forging. In any case, in the modern world, handmade items are in great demand.
The problem of choice
Is it possible to sell something you made yourself? Yes. A similar prospect opened up in ancient times. As already mentioned, people used to make things for themselves. Then they started exchanging items. With the development of the economy on Earth, handmade goods began to be sold. This is normal.
But every businessman who wants to create handmade things faces a number of problems. The first of them is the question of what you can make with your own hands and sell. Next, the most common, relevant and useful ideas will be presented for those who plan to try themselves in the field of handmade. 
Jewelry and decorations
The first thing we can recommend is to make jewelry and accessories. They are usually worn by women. Such handmade things are always in price. They never go out of style. Such items are unique and eye-catching.
What can you make with your own hands and sell? Any jewelry and accessories. They can be either male or female.
You can make beads, bracelets, pendants, brooches, keychains and so on. In this case, the use of absolutely any materials is allowed - beads, clay, wood, wire. This is not an exhaustive list.
What can you make with your own hands and sell? Bracelets made of beads and beads made of polymer clay are now popular. Even a schoolchild can make such decorations.
Many people say that kanzashi style jewelry is extremely popular - it is a unique various decorations for hair. When making such handmade items, they use the technique of folding fabrics in a variety of ways.
Please note that many decorations from semi-precious stones without a clear cut cannot be found in stores. Such items can only be purchased secondhand. They look original, which attracts buyers.
Paper filigree
What can you make with your own hands and sell at a profit? The next idea is suitable exclusively for diligent and neat people. We are talking about paper filigree. It is called quilling.
What is it? The art of creating various crafts (decorations) from paper. Typically, craftsmen use paper tapes for their handmade items. They create different decorations that can be used to decorate cards, letters, frames and gift wrapping.
In addition, using quilling you can make a variety of decorations. What exactly should I do? It's difficult to predict. Any figures made from paper ribbons will be bought up by modern fashionistas. 
Some ideas for paper filigree:
- creating flowers;
- crafts in the form of zodiac signs;
- paintings;
- toys.
Paintings are especially popular today. Making them with a certain skill is not difficult. And such hand-made items are sold at a high price.
Quilting
What can you make with your own hands and sell? At home, modern people can create a variety of objects. The range of available materials is practically unlimited. Therefore, there are plenty of ideas for business.
The next interesting direction to work is quilting. This is the process of creating objects from scraps of fabric. Usually such things turn out to be bright, original and original.
The art of quilting has come to modern world from past centuries. Ancestors quite often sewed from scraps of fabric. Modern craftswomen use in their work expensive fabric different colors.
What can be done this way? Here are some ideas:
- blankets;
- pillows;
- towels;
- paintings;
- rugs;
- toys;
- bags.
This is far from full list of what can be done with quilting. But these ideas will help you test the activity and evaluate its profitability.
Decoupage
Not everyone can do tinkering. Some people have certain talents for art. What can you do with your own hands and sell in this case?
When decoupage, the use of any materials is allowed - from napkins to fabric. Such a business will not require any special expenses. The main thing is to have talent in the field of decoration.
You can paint anything - plates, saucers, cups, vases, stands and even furniture. It all depends on what exactly a person wants to do. At first, it is recommended to work with available items - dishes and vases.


