How to sew a corset dress with your own hands. How to sew a simple corset. Pattern building options
Many do not undertake to sew such products due to lack of experience and special knowledge. In fact, either a corsage dress is not difficult - "the eyes are afraid, but the hands are doing it." The main thing is to follow the instructions exactly and know some of the sewing features of this beautiful piece of clothing.
Corsage or corset?
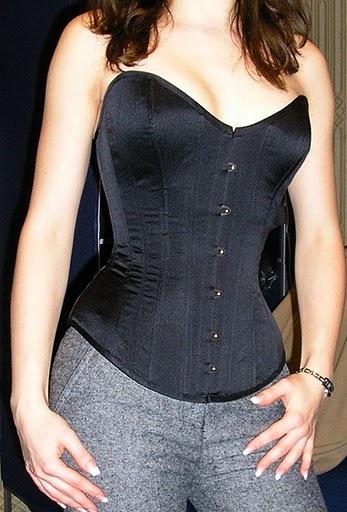
To begin with, let's deal with the definitions of what is what in order to avoid confusion.So what is it? This is an independent item of women's clothing, which tightens the lower part of the chest and stomach to give the figure the desired shape. The corset favorably models the silhouette, reduces the waist circumference. Its main distinguishing feature is the dragging function. As a rule, a corset is a multi-layer product with pads between the layers. The corset keeps its shape due to specially inserted rigid elastic bones, and is pulled together with the help of lacing, which is usually located at the back, but can also be at the front, from one or both sides. The permissible maximum reduction in the waist without harm to health is 8 cm.
A corsage is a part of a woman's dress that is tightly fitted over the body, covering the chest, back and sides, and does not have a slimming effect. It can be both an independent product and part of a dress.
Corset based bodice
is an adapted version of the corset. Cups can be inserted into the bodice of such a product, which visually increase and lift the bust. Based on it, you can sew a dress. Details of the bodice are cut out without allowances for freedom of fitting.If it is necessary to achieve a slimming effect, excess fabric is taken into the relief seams during the fitting.
Features of sewing a dress with a corsage
- Plastic bones are inserted into the drawstrings (tunnels), sewn from the wrong side to the seams, or formed by sewing allowances on the part. From the front side, such lines look like finishing ones.
- Across the drawstrings, into which the bones are inserted, are fastened with bartacks along the line of allowances.
- Corsage sticks or a ribbon with corsage sticks are inserted into the relief seams in front, back and right side seam. The lightning will be located on the left.
- If the bodice of the dress is below the waist, then it is better to refuse from, whalebone and other plastic inserts. Since in the process of wearing they bend, leaving creases that can no longer be corrected. In this case, for a dress with a corsage, special sticks are used on a dense fishing line, the ends of which are packed and rounded. They come in different lengths, bend well, but then restore their original shape without the formation of creases on the product.
- If it is necessary to tighten the tummy more, we make the maximum adjustments to the pattern in front.
- If you want to emphasize the waist - we make adjustments to the side seams.
- To strengthen the details from the inside, it is better to use cotton calico for collars and cuffs as an adhesive.
Corsage

Dresses with bodice

How to sew a seductive corsage with your own hands, you will learn from the master class.
From personal experience
I made two corsage dresses. The first is in jacquard fabric, model 107 from Burda 3/2010. The second dress (pictured) is , model 125 from BURDA 1/2012.
In both the first and second cases, I used cotton with elastane, as dense as denim. I cut out the outer and inner details of the bodice and back from the main fabric. Each detail was duplicated with fabric dublerin. The corsage turned out to be quite dense, so I refused to use corsage sticks or ribbon with corsage sticks. The dresses are very comfortable, the corsage bodice does not wrinkle, does not move out and keeps its shape perfectly. After washing in the machine, the products completely retained their original appearance.
Master class from a non-professional amateur
We sew this corset:
To sew a corset with your own hands we will need:
- Lining fabric (I used thick cotton fabric)
- Upper fabric (I used stretch cotton satin)
- Regilin
- Dolevik or rep tape
- eyelets for lacing holes
I sewed a regular modeling corset, not slimming, because. I don't have much to pull. For a slimming corset, you need to use a more durable regilin, whalebone or special metal bones.
- We cut out the details of the corset according to the finished patterns. I decided to slightly change the model and make the top straight (see picture). Don't forget to transfer the marks to the fabric. It is very important to correctly position the parts relative to the shared thread, otherwise you will get an ugly skew of the fabric on the finished product.

- We sweep all the details from the lining fabric. Waist marks must match.

- Now it is necessary to perform the first fitting. Help someone pin the back of the lining. Since the corset must fit snugly to the body, it is very important now to fit the details to the figure. My measurements are a little short of size 44, so in some places I removed the excess fabric in the seams. If you are sewing a slimming corset, you can remove even more. Just don't overdo it!
- Stitch the details of the lining. In particularly kinky places, make notches close to the seams.
- Repeat steps 3-4 for top fabric. Stitch the seams at a distance of 0.5 cm. Iron.
- Take regilin and cut strips 1-1.5 cm shorter than the length of the seam to be reinforced. Melt the ends of the reguilin strips on both sides with a match. This must be done, otherwise, in the process of wearing, thin knitting needles from the regilin tape (resembling a thick fishing line) will come out and not only ruin the fabric, but also hurt the skin.

- Sew the reguiline with a zigzag stitch along the line of each seam on the lining. If you want a little more stiffness, make 2 strips of reguilin for each seam, placing them to the left and right of the seam. Regilin should not come close to the top and bottom lines, let it remain about 0.5 cm each.

Sew 2 more strips of regilin along the cut under the fastener. If you use grommets or loops, these strips will give the right rigidity and prevent the fabric from skewing at the tension points of the lacing.

- Take the dolevik and stitch it exactly along the waist line on the lining fabric. I used rep tape instead of a dolevik. In principle, it does not matter whether it will be located on the front or wrong side. I sewed to the front. Why is it needed? So that the worn-out corset (it will be stretched at least a little in any case) does not cross the transverse ugly folds.

- Fold the details of the top and lining right sides inward and sweep along the top line of the corset. Turn out and try on.

- On the fitting, I realized that the oval bottom line does not suit me, and I decided to make it straight as the top edge of the corset. Therefore, I swept the lower part along the new outlined bottom line. At the same time, regilin had to be torn off a little, cut and singeed again. Turned out, tried on. After trying on, I completed stitching along the lines of the top and bottom. I cut the allowances at a distance of 0.5 cm.

- It remains to process the clasp. If you are sewing a non-tightening corset, then you can use a strong zipper. If tightening is expected or you want to use lacing, then put eyelets or loops. I decided to use eyelets. To do this, I simply ironed the allowances along the edge of the corset inward and laid a line close to the edge.


- If you remember, I sewed 2 strips of reguilin at a distance of 1.5-2 cm from each other along the edge of the corset. Now you need to stitch along the second line to secure the lining in relation to the top. Install the eyelets along the edge, placing them between the regilin strips.
This is what I ended up doing.

Back view. My measurements are slightly smaller than the standard size 44, so there is a distance between the edges of the corset on the mannequin. The corset sits on me without this gap.

You can topstitch the corset along the top and bottom lines, or you can leave it like that, just iron well.
Solemn dresses for going out are traditionally performed with corsets, but this wardrobe item has also firmly entered everyday life. There were urban models, variations of underwear, products for weight loss. To have an idea of how to sew a corset, you can read the master class for beginners. The preparation of materials, the assembly method, the design of the clasp - all this is possible even for a beginner. And in the end, the product can be decorated to your liking.
A corset is often associated with a wedding dress. An integral attribute of the celebration can be sewn with your own hands. Manufacturing does not require special skills when it comes to simple options. The more complex the model, the more experience is required from the master.
Do not take on complex items of clothing. First you need to practice on basic models, to understand the intricacies of building a pattern, sewing. If everything goes well, you can take the more difficult option.
Corsets are divided into two groups: decorative, slimming. The former are suitable for those whose figure does not need correction, as well as for pregnant women, people with health problems, when tightening can be harmful. Grace, grace will add a slimming option. He will lift the chest, make the waist thinner, the back straighter.
The product can be made from absolutely any material that will withstand long-term operation. You should not take on the sewing of a corset for weight loss on your own, excessive prolonged tightening will harm the internal organs.
When choosing a model, take into account whether the figure requires correction. When the answer is yes, the place is indicated:
- If a girl wants to lift her chest, then choose models with a dedicated neckline and cups.
- For a thin waist, the peculiarity of building a corset is reduced to a pronounced center line.
- For a general tightening, a standard model is sewn.
For lining, take a soft cotton fabric. For the upper part, the fabric is selected at the discretion of the future owner of the corset. It can be denim, guipure, silk, satin, satin.
The stronger the figure requires correction, the denser the fabric should be.
Materials and tools
Tools and materials play a key role, as does pattern building. For the base, they take cotton fabric, for the upper part, any high-quality matter. It is undesirable to purchase bulk material; when attaching eyelets and frequent use, there is a risk that the canvas will simply disperse. As accessories you need to purchase:
- eyelets, buttons or hooks;
- locks;
- strings;
- whalebone;
- regilin;
- bones are spiral and steel.
Lacing is performed both from the back and on the center line in front. Also, both options can be combined in one model. The appearance of a thing directly depends on the accuracy of the design of the fastener.
Tools for modeling the product and its assembly are needed in full force: a ruler, cellophane strips, a sewing machine, accessories for fastening eyelets, scissors, a cutting tool. You can always practice and sew a corset for a dress from an inexpensive material available. When working with a final version, it will be difficult to make adjustments. 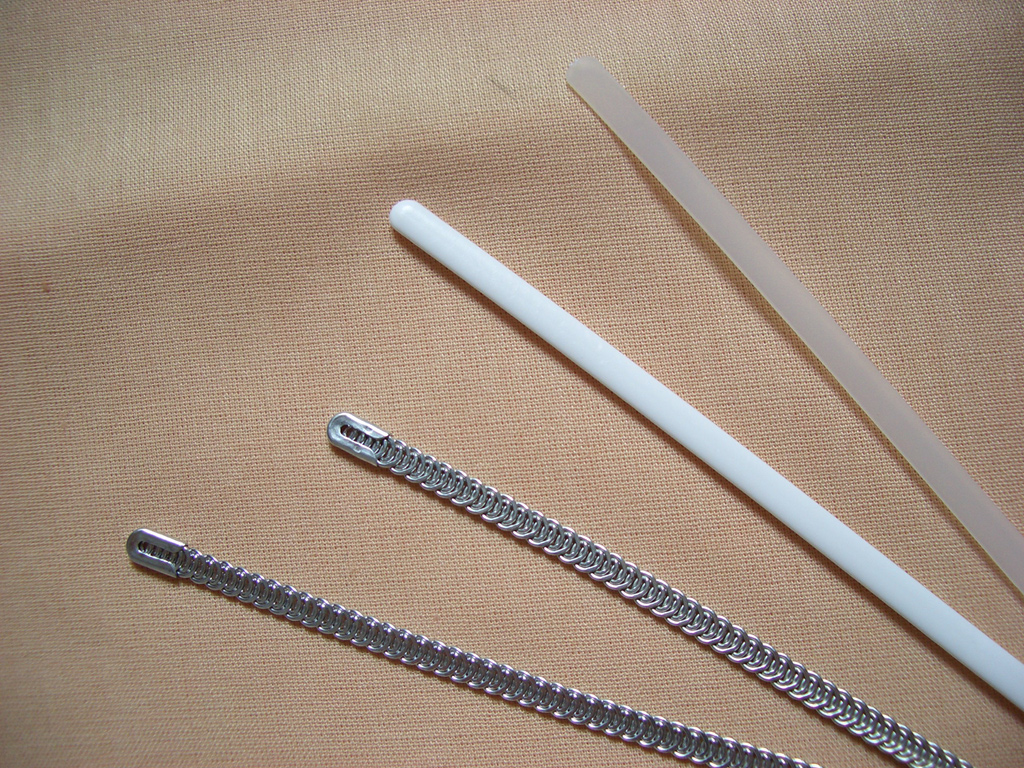 Bones
Bones  eyelets
  Regilin
  Corset cord
Taking measurements and creating a pattern
Once the craftswoman has decided on the type of corset, you can begin to create a pattern. First of all, measurements are taken so that the product fits perfectly:
- chest girth;
- hip girth;
- waist circumference;
- from the point under the bust to the waist;
- from the waist line to the bottom along the side seam;
- from the waist line to the bottom of the stomach.
Modeling and tailoring of a corset can be carried out using two different ways of constructing a pattern - calculated and dummy. The latter is usually called the tattooing method. The calculated one consists of taking measurements, building an individual pattern. The second one is simpler - the fabric is pricked according to the figure (or a spaced mannequin is used). For the dummy method, follow the instructions:
- Tie the cords on the mannequin in three places (chest, waist and abdomen). They are drawn with a marker for cutting and removed.
- Also, with the help of a disappearing marker, lines, seams are drawn, the relief parts, the location of the bones are marked.
- Wrap part of the mannequin with cellophane film, circle the details with a pen. Finished elements are obtained by adding only a seam allowance.
The construction of a slimming corset is not much different from a decorative one. Difficulties arise when modeling unusual original products. In this case, the master class will not help, professional courses will be required. Modeling technology comes down to simple steps:
- The pattern is transferred to a rectangular grid, adjustments are made. After that, they make a pattern. If the model is made for a girl, then the waist line becomes less pronounced.
- Transfer the pattern to the fabric, marking all the details and numbering them. Check the accuracy, add an allowance for the seams, cut out.
The technology of sewing a corset is performed according to a template. After going through all the steps, you get a “naked” standard model. It can be decorated or left as is.
It is worth remembering that only options with a cord, ribbons will help to pull the figure, to model the silhouette. This effect cannot be achieved with buttons or a hidden zipper.
Sewing instructions
After the above preparations, it is necessary to transfer the pattern to the fabric. For transfer, use tailor's crayons, special pencils for cutting or thin pieces of soap. For this, the following rules are observed:
- Position the pattern so that the back is parallel to the lobar thread.
- The points of alignment of the parts (namely at the level of the waist) should run parallel with the weft thread.
- The correct corset does not stretch at the waist.
- The left side duplicates the right.
The material is cut according to the transferred pattern. In order for the product to fit better and perform its functions, the cut fabric is numbered, then dipped in warm water.
Instructions on how to sew a corset with your own hands:
- Sweep the central, side elements. Stitch with back details, try on. Iron the seams, stitch.
- Repeat the steps for the main parts. If no adjustments are required, then also finish with a machine seam.
- Connect the outer part and the lining.
- Sew drawstrings at the side seams and insert bones. Ideally, they are located between the base and the lining. Instead of drawstrings, it is allowed to use rigilin - this will greatly simplify the work.
- Fix Rigilin with two lines, process the edges with masking tape. Sew both parts of the product.
An important part when sewing a corset is the design of the clasp. You can perform it both on loops and on eyelets, buttons, hidden zippers. With eyelets, everything is simple: holes are made with a punch, a metal edging is fixed. To make a corset with loops, follow the instructions:
- Cut off the fabric strip, attach to the wrong side.
- The strip is turned inside out, fastened with a pin, then cut into pieces of the same length.
- The edges are overcast so that they do not crumble during sewing and operation. Otherwise, the fabric may disperse at the most unfortunate moment. Loops are baited so that they are the same length and width.
- Attach the loops on the inside with a matching thread.
A tape or cord can be inserted into the fixed stitched loops for subsequent tightening. To make the corset clasp for a wedding dress look neat, it is made of fabric of the same color and texture as the main product. Before tightening, check the reliability of the fastening of the loops.
 Product decor
The corset pattern does not imply the presence of jewelry. The advantage of simple models is that they can be modified through decoration. For evening, wedding options, rhinestones, crystals, which shimmer when hit by light rays, are more often chosen. At the same time, it is important to observe the measure, the more abundantly the top of the corset is strewn with crystals, the more modest the skirt should look.
Models in a romantic style are decorated with satin ribbons, lace, weaving, graceful frills, embroidery, translucent falling sleeves. Decor is usually chosen in the same color as the corset itself. If desired, you can make a belt from a satin ribbon. It is tied, fixed with a bow, which can be located both in the back and in front.
Corsets, hand-embroidered with rhinestones, beads or decorated with handmade embroidery, are considered a special luxury. Such models are chosen for special solemn events, including weddings. They are much more expensive than standard options. This also includes exclusive products with a corset adorned with precious stones or feathers.
A master class on sewing a corset will allow you to make a standard product that is easy to transform with embroidery or appliqué. At the same time, even a novice craftswoman will be able to create a slimming or decorative model at home. The main thing is to choose high-quality materials and do everything exactly according to the instructions.
Video
A corset is an indispensable item in a woman's wardrobe. It will help hide the flaws of the figure and "drag" it, aligning the silhouette; will emphasize feminine forms and add charm and irresistibility to the image. This corset model is simplified.
Depending on what fabric you choose for it, it can be worn with both day and evening outfits.
Materials:
- fabric for the front of the corset
- lining fabric
- dublerin
- corset bones (20 pieces)
- lace
- accessories for lacing
- machine for accessories, hole puncher for fabric

Patterns and fabric
The most important thing when sewing a corset is choosing and drawing up a pattern. First, decide what shape you want: how much the corset should tighten the waist and whether it should at all; what shape of the top (more like the top of a dress or like a bra); in modern style or such as were worn in past centuries.

Here we do not describe the construction of a pattern for a corset.
Having made patterns (if you are using them for the first time, and in general for the first time sewing a corset), do not be too lazy to sew a trial version of the corset from the cheapest fabric. At this step, you can accurately adjust the patterns for your figure and correct all the shortcomings. Insert and bones in the key seams to assess how well the corset "fits".
Choose the main fabric for the corset so that it is not too delicate, but rather tightly woven. Ideally, take a special lining fabric - koutil (cotton for corsets). But any non-stretch cotton fabric will work, the denser the better.
In most sewing stores, cheap plastic bones are most often sold. An example of such in the photo: on the left (a plastic bone in a bone case) and in the center (rigelin). Do not use such bones. They twist. Moreover, for example, when you sit down, such bones are bent and a trace of the fold remains. As a result, the shape of the corset is deformed.

For the corset, use steel and spiral bones (pictured right). Steel is inserted into the side or back seams, where there are no curved lines. Spiral bones are used for curved seams as they curve to fit the seam line. But they can be inserted into all seams, as in this corset.
The bones should be two centimeters shorter than the length of the seam. Otherwise, their ends will break through the fabric after a fairly short time.
Cutting fabric
Fold the fabric in half with the right side inward, arrange the patterns and circle them along the contour. The seam allowance should be quite large, about 1.5 centimeters. Allowances will serve as additional reinforcement for the bones. Circle all the details on the lining fabric as well. Cut out. If you have a rotary knife, then you can lay the pattern on the fabric and immediately cut along its contour. Remember that you need to work with a rotary knife on a special surface (mat for a rotary knife).


Cut out two pieces of dublerin for the stripes on the back of the corset where the lacing will be. Glue the corresponding lining fabric parts with these dublerin parts. If there is no dublerin, you can use a dense fabric. Cut out two parts from it according to the pattern (in the photo with patterns, the last part is on the right). Smooth out the details with an iron, if necessary.


Stitching parts
Sew the pieces from the main fabric together along the side seams, and also from the lining.


Cut the seams at the waist and bust with the necessary gap so that there are no folds at the bends. Turn the ends of the seams in different directions and iron with an iron.


Sewing the main part of the corset with the lining
Fold the corset parts from the main and lining fabric right sides inward. Sew one side edge first, unfold and iron the seam to one side on the wrong side. Then sew the other side edge and iron the seam. Turn the corset inside out, iron the seams again using a thin fabric or gauze, laying it over the ironed seams on the corset.

Bone channels
On the corset, you need to lay vertical lines on both sides of each seam. Sew along the main fabric. It is important that the seams on the main and lining fabrics are approximately at the same level (the more precise, the better).
In this corset, the bones are inserted, two in each seam and one in the seams with lacing. It is best to start stitching from the center of the seam and then to the side of it. Thus, if the seams on the front and lining of the corset do not exactly match, the channels for the bones will be located more evenly than if you start laying the stitches from one side to the other.

Connect the seam lines of the front and back sides so that they are as close as possible to the same level. For convenience, you can sweep the seam line with a thread. Slowly stitch as close to the seam line as possible. Then lay a line at some distance from the first.
You also need to sew a second channel on the other side of the seam. So that the bone does not sit very tightly, you need to make a channel of sufficient width for its free location. Make the width about one and a half to two times the width of the bone. Here's what should happen.


After you finish sewing the channels, align the top and bottom edges of the corset, cutting off protruding threads and any irregularities.

Cutting out details for processing the edges of the corset
Decide how you want to finish the edges of the corset. They can be sheathed with piping, which can be bought at the store. If you want a straight edge, without piping, then at the step when you sewed the front part with the lining, you can lay a line along the top edge of the corset and along the bottom (leaving an unstitched place to turn it right out). Then, along the face, lay the lines close to the edge, at the same time stitching the open space from below.
Here, the edges of the corset are finished with lining fabric. To piping the top, lay the fabric flat on your work surface. Its width should be slightly larger than the overall width of the corset.
Lay the corset on the fabric and straighten. Trace and cut the fabric along the top edge of the corset and 4 cm from the sides.


Remove the corset. At short distances, mark points (4 centimeters down) from the top edge. Align the points in a line and cut along this line.

Also cut out the edging for the bottom of the corset, making sure that the bottom part is as flat as possible on the fabric.
Sewing straps
Decide what width you want the straps to be. This number must be multiplied by 4. Cut two strips of the desired width and sufficient length. The straps here are 1cm wide. So, you need to cut strips 4 centimeters wide. Fold the edges of the strips inside out towards the center so that they touch, iron. Then fold the strips in half and sew on both sides.

Processing the top edge of the corset
Pin the ends of the straps to the top of the corset on the front side as in the photo.

Attach the piping to the front of the corset with the wrong side up. Stitch along the top of the corset close to the edge. Unscrew the edging and stitch along its edge as in the photo.


Turn the border inside out and iron it with an iron. It is desirable to process its edge with an overlock (zigzag).


Insertion of bones
Each channel has four layers of fabric (main and lining plus allowances). Boning can be inserted in the middle, between the top two layers of the main fabric and the bottom two layers of the lining fabric. However, if you are using a very heavy backing fabric and a thin front fabric, you can insert the underwire between two layers of strong lining fabric. Insert bones into all channels.

Processing the bottom edge of the corset
Attach the piping to the bottom edge of the corset with the right sides inside and sew along the edge. Make sure that the bones are not close to the border, otherwise you can break the needle, hitting the end of the bone. Repeat all the same as with the processing of the upper edge of the corset.

From the inside, manually sew the edges of the lower and upper edging.

Lacing
Mark the location of the holes in increments of approximately 2.5 centimeters.

Pierce or cut holes.

Install the eyelets in the holes.


Throughout the ages have been the main clients of tailors. And pleasing, the tailors came up with - special clothes that pulled off what needed to be pulled off and supported what needed to be supported. Corsets were made to look like hourglasses, but they had a thin waist and high breasts.
Modern - this is not a brutal structure, as it was in the Middle Ages. Today it is not customary to pull the waist down to the size of the lover's neck, as it was before. However, having a waist is fashionable today. Therefore, corsets are sewn today to slightly correct the figure in some places.
For sewing underwear corset First of all, you need to make a pattern. Take some measurements of your figure and measure the circumference under the bust (the centimeter passes at the level of the lower bar of the bra), waist circumference. The centimeter covers your waistband where you choose to position your waist.
If you want to tighten the waist, then reduce this size by the required number of centimeters, only within reasonable limits. Hip circumference - a centimeter passes along the protruding bones, the distance from the waist line to the point under the chest, the length of the product below the waist - is measured along the side line from the waist to the bottom of the product, the length of the product below the waist along the belly line - is measured in a sitting position with a ruler from the waist to the bottom belly so that the ruler does not interfere.
The simplest linen corset consists of seven parts: a back part with a fold, the side part of the back - 2 parts, the side part of the front - 2 parts, the front - 2 parts, because lacing will be located here. Take a sheet of paper (preferably graph paper) and build a rectangular grid of the future pattern. The width of the mesh is equal to the half-girth of the hips, the length of the mesh is equal to the height of the product, which consists of measuring the distance from the waist to the chest plus the length of the product below the waist.
Divide the horizontal line of the hips in half and draw a vertical line. This will be the side line of the corset. Now on the left is in front of the corset, on the right is his butt. Divide the front of the corset in half and draw a vertical line. Also divide the back of the corset. Find the centers of the side parts of the corset and draw a dotted line. From it you will postpone the main measurements.
Divide your underbust measurement by four and put the resulting centimeters on the upper segment. On the details of the front, the received centimeters are deposited from left to right from the leftmost point, on the details of the sidewalls, this number is located on both sides of the central dashed line equally (halfed), on the details of the back, 1/4 of the half-girth of the chest is deposited from right to left from the extreme right point.


