Application made of colored paper on the theme of autumn. Applique of autumn leaves. Creative workshop Applications from dried leaves
Applique from dried leaves is one of the most common types of crafts, a fascinating activity for adults and children. Besides the fact that joint creativity gives a special charm to mosaic drawing; such a hobby contributes to the development of imagination, color perception, and introduces the child to the concepts of geometry and proportion.
From dried leaves, herbs and flowers you can make delightful compositions and panels - a woman’s face, a girl’s figure, the silhouette of a tree - everyone is free to depict autumn as their imagination tells them and their soul desires. If you have difficulties with the idea of a future work, a template for an applique or panel can be found on the Internet. But often the very shape and color of the dried leaf suggest an idea for a future plot. Animals, fish, birds, portraits and landscapes made from leaves and flowers evoke admiration and a desire to immediately try to make the same picture. You need very little for this:
- Dried autumn leaves, herbs, flowers, seeds different colors and size, collected from different plants. There should be as many of them as possible. Material can be harvested not only in autumn. The color palette of the future puzzle will be enriched by leaves collected in summer and spring.
- PVA glue, paper, cardboard, scissors, tweezers, paints, pencils and markers can be found in every home.
- Matte varnish is used to secure the work done.
Techniques for making leaf applications
Types of techniques, used for applications from dried natural material, differ in the method and complexity of implementation. Which one to use is decided by the author himself, focusing his choice on his internal state, on how he sees the final result of his work.
Mosaic applique of leaves
 This technique allows you to make panels based on the principle of a puzzle, resulting in silhouette pictures. The leaves are selected and laid out in the right order. The result is a certain image, a plot. When working on appliqué using this technique, the authors use scissors to give the pieces the required shape.
Mosaic technique often involves maintaining symmetry, and in this case you should have identical pairs of leaf material (for example, making a mosaic picture with the image of a butterfly, a crab, creating some kind of pattern). Sometimes not the entire pattern may be symmetrical, but only certain zones of it.
Bulk application using dry leaves
Not only whole autumn leaves can be used in work. It will look very harmonious in an application sprinkling of dried and crushed leaves of different colors. You can also make it from loose leaf tea or flowers.
For example, the silhouette of a ballerina applied to paper is carefully coated with PVA glue and covered with leaf chips on top. Excess material should be shaken off, and the skirt should be made from whole leaves.
Another example. The silhouette of the parrot is divided into sections, which are also filled with sprinkles of leaves or flowers of various colors. The area of the tail and wings is sealed with solid elongated leaves, superimposed on each other in the form of feathers. To maintain the roundness of the wing at its base, the leaves are trimmed along the contour with scissors.
Gallery: making applications from dry leaves (25 photos)


Compositions of leaves using graphics
 This is one of the most interesting methods applications, superbly imaginative. This type of creativity is very exciting for children.
The dried sheet is pasted onto a blank sheet of paper or cardboard, and the entire plot of the picture is completed with pencils, watercolors, gouache, and felt-tip pens. You can first make a drawing, and add the missing details with leaves, flowers, grass. To make the objects look more realistic, some details in the image are made of plasticine and colored paper inserts are used.
Painting dried leaves with gouache and watercolor
Amazingly beautiful panels can be created from autumn leaves, having previously decorated them various patterns and designs. They are applied in the form of strokes, dots, stripes. After drying, all kinds of patterns are laid out from the resulting fragments, and they are attached to the cardboard using PVA glue.
For example, you can lay out leaves from the center of the cardboard base in a circle. So they diverge sun rays. The outer and inner contours of the composition are outlined with pencils or paints, and after drying, the layout is cut out with scissors. It turned out to be a fabulous sun.
Using paints, the leaves can be turned into various insects, fish, birds, and the faces of animals can be drawn on them. Using scissors, bring the craft to perfection. If the author has artistic skills, you can even draw a picture on a single dried sheet with paints. A craft made in this way will make a wonderful gift if it is framed.
Applique on a figurine cut out of cardboard
 Cardboard is very convenient to use when making crafts. Due to its density, the cut blank holds layers of leaves, grass, twigs, and seeds without deforming.
The most commonly used animal theme. For example, the outline of an owl is drawn on cardboard, the body is covered with overlapping leaves, moving from bottom to top, imitating plumage. You don’t have to paste over the head and legs of the bird, but cover these areas with gouache, and make the eyes from colored paper, seeds or plasticine. You can make the entire owl figurine out of cardboard, and add foliage to the wings, ears and paws. The finished craft is attached to the main picture, and the planned plot is built around it.
Another variation of this technique. Contours, for example, proteins are applied to cardboard. On the reverse side, the base sheet is completely covered with multi-colored or plain foliage, and when the workpiece is dry, the animal is cut out along the previously drawn contour. The image is supplemented with the necessary elements: eyes, nose, antennae, and the outlines of the paws and ears are drawn.
Another example. On a sheet of cardboard, draw a large lion's head, decorate it with gouache and cut it out. On another sheet of cardboard, stick yellow leaves in a circle in several layers, which will imitate the shaggy mane of the king of beasts. Glue the lion's muzzle blank into the center of the circle of leaves. Mustaches can be made from dry grass.
Crafts made from dried natural material
There are many ways to realize creative ideas. The technique and methods of performing the application directly depend on the master’s ideas.
Vase of autumn leaves
An original decoration for any interior will become a vase made from autumn maple leaves. For this you will need:

The capacity of the future vase depends how much leaf material should be stored and to what size the balloon should be inflated. The larger the vase, the larger the ball should be.
- The resulting sphere needs to be secured in some container to make it convenient to do the work. Apply a thin layer of Vaseline to the top of the ball.
- Collected maple leaves must be free of defects, large and bright. You need to carefully cut off their cuttings with scissors. Each leaf is generously coated with glue using a brush and glued to the surface of the ball. Assembly of the product begins from the top of the ball. The leaves are layered in random order, overlapping. After fixing each element, it must be covered again with a layer of glue on top. The vase is formed from several layers of leaves. When assembling the structure, you need to ensure that the edges of the future vase have a beautiful carved edge.
- Having completed the main work, the entire product must again be generously coated with glue and left to dry for about 48 hours. Then the ball should be pierced and separated from the resulting vase. The craft can be treated with water-based acrylic varnish. The varnish is applied in 2–3 layers, with intermediate drying. The result is a wonderful decorative element. In such a vase you can store all kinds of little things.
Children's autumn applications from leaves: step-by-step master classes and ideas for children's creativity. Photos of children's applications. Video for kids.

Children's autumn applications from leaves
Hello, dear readers"Native Path" and participants in our autumn children's creativity week! Today in this article we will continue the topic of autumn leaf applications.
You already know from previous articles on the site in the series about leaf applique:
- how to prepare leaves for application, what types of autumn leaf applications there are, technology for their production (see article).
- how to do appliques - portraits made of autumn leaves : portrait of the queen - autumn, the girl - autumn and girlfriends - autumn (article),
- how to make a three-dimensional figure - a bird from autumn leaves: .
- And today you will learn from this article - the third article in the series about applique from leaves - what other appliques from autumn leaves can be made with children and how you can decorate a greeting card with a children's autumn applique from leaves.
The idea is shared by Tatyana Panova, a participant in our children's crafts competition (city of Novomoskovsk, Tula region). Tatyana did all the work together with her daughter Varechka Panova (4 years 2 months). Tatyana is happy to share with you the joy of joint creativity:).
No. 1. Children's autumn applique of leaves: postcard “Autumn landscape”

How to make a children's applique “Autumn Landscape”
Step 1. Prepare the background of the postcard. The postcard is made on watercolor paper, which Varya tinted with gouache (white + blue).
Step 2. Make a window in the card.
The window was cut out. We walked along the edge of the window with a foam brush blue. The result was the edging of an oval window.
Step 3. Make the “Forest” applique inside the card using PVA glue. Glue on the pre-dried leaves. How to dry leaves - in the previous article of this series
Step 4. Birds flying in the autumn sky. Mom painted birds in the sky. which fly to warm countries for the winter in the fall.


No. 2. Children's autumn applique from leaves “Birds”
Step 1. Collect leaves for the applique. Varya collected the leaf birds herself.
Step 2. Dry the leaves (how to do this, see the previous article in the series about leaf applique at the link above).
Step 3. Glue the leaves with PVA glue (it is sold in liter jars at a hardware store).
Step 4. Make leaves from Play-Doh plasticine.
How to make autumn leaves: mixed several autumn shades of plasticine, rolled it out and squeezed out the shape of a leaf with a mold.
Step 5. Draw a nest. 
No. 3. Children's autumn applications from leaves: hedgehog
The first version of the children's application “Hedgehog”
Tatyana and Varenka took a picture of a Hedgehog without needles with them for a walk and collected leaves, attached them to the image and tried them on right on the street. Then at home they dried it in a book and decorated the hedgehog. This is what they did!

Another idea for making a “Hedgehog” applique was shared with us by Ovchinnikova Marina Viktorovna (Krasnoyarsk Territory, Norilsk) and her son Timofey (5 years old, MADOU “Kindergarten No. 45 “Smile”). Marina and Timofey’s craft is called “Hedgehog with Autumn Leaves”
The second version of the children's autumn applique “Hedgehog with autumn leaves”
This is a large hedgehog applique or autumn panel that can be used to decorate a room.
Material: cardboard hedgehog, dry leaves and flowers, buttons.
How to make a hedgehog:
Step 1. Cut out the hedgehog’s body from cardboard, draw eyes and a nose.

Step 2: Choose the autumn leaves you like and glue them to the back of the hedgehog. We form needles on the hedgehog’s back from the corners of the leaves.

Step 3. Decorate our hedgehog with dried flowers and buttons. Glue them with PVA glue.

The application is ready!
No. 4. Children's autumn leaf applications: rainbow
This idea was shared at our Autumn Workshop competition by Svetlana Kuznetsova and her son Artemy (2 years 2 months).
You will need for the application:
— Autumn leaves
— Cardboard white or colored
— Gouache
— PVA glue
— Paint brush and glue brush
Step 1. Prepare autumn leaves - collect and dry. How to do this - in the previous article in the series about applications from leaves (the link is given above in this article),
Step 2. Paint the leaves with gouache in the colors of the rainbow and let dry. A child can do this.
Step 3. Glue the leaves onto the glue in the desired sequence of colors (“Every hunter wants to know where the pheasant lives”: red, orange, yellow, green, blue, indigo, violet).

No. 5. Children's autumn applique of leaves: panel “Girl Autumn”
The master class was shared by Olga Nikolaevna Tegaeva (Moscow region, Sergiev Posad district, Shemetovo village, MGBOU d/s No. 75 “Fairy Tale”). The application was made by Yaroslav Kucherikhin (4 years old).
To complete the application we will need:
- frame with glass,
- dried flowers and leaves,
- drawing or photo of a girl.
How to make an applique with children:
Step 1. Preparing the leaves.
The longest process is drying flowers and leaves. We dried it between magazine pages.
Step 2. Girl figurine - autumn.
Glue a picture of a girl of a size suitable for the frame onto the background. From dry leaves and flowers we form an outfit for Autumn.
We decorated the flower on Autumn's head with sequins.
Step 3. Place the finished autumn applique in a frame under glass. This is what Yaroslav did.

No. 6. Children's autumn applique of leaves: “View from the window”
This application was made and sent to our competition by Alexandra Albertovna Naumkina and her children: son Ivan (4 years old) and daughter Maria (1 year and 3 months) from Barnaul, Altai Territory.

How to make the “View from the Window” application with your children:
Step 1. First we make the background - draw the sky (Masha helped for 1 year and 3 months).
Step 2. Then we draw birds in the sky (my mother did this).
Step 3. Cut out the window frame.
Step 4. Together with the children, we glue the “forest” - autumn leaves - at the bottom of the picture. Glue them with PVA glue.
Step 5. Glue a frame on top of the finished applique. And we put finished work under a thick book so that everything dries well and sticks evenly.
No. 7. Children's autumn applique: “This is me”
This craft was also sent to our Autumn Workshop competition by Alexandra Naumkina. She writes: “The craft is simple, but the children really like it. I took a photo of my son mobile phone, sent a photo to myself by email. I opened the email on my laptop and printed out the photo. My son cut out his silhouette and pasted it on a white sheet of paper. Then we glued some leaves. It seemed to us that there were few of them. Using a stationery knife, I cut out a stamp in the shape of a leaf from an elastic band. My son quickly put some leaves on our craft.”
This is the kind of children's autumn applique with autumn leaves that Alexandra and Vanya came up with.

Children's autumn applique No. 8: sailboat
This children's autumn applique from leaves was made by Georgy Osolikhin (5 years 10 months), and sent his work to our children's competition autumn crafts Georgy's mother Marina Osolikhina.
The applique uses leaves and seeds (to place the sun in the sky).

Children's autumn leaf applique No. 9: butterfly
Other materials can be used in leaf applique, such as in this children's Butterfly applique. The application was made by German Osolikhin (3 years 11 months) with his mother. Herman’s mother, Marina Osolikhina, sent an application to our competition.

Here is another version of an autumn appliqué made from leaves in the shape of a butterfly. This work was completed and sent to our autumn crafts competition by little Sofia (5 years old) and her mother Anna Shikhareva. How to make such a butterfly:
You will need:
- A4 cardboard (base for applique),
- PVA glue,
- scissors,
— leaves for wings: 4 different types of leaves in pairs,
- an acorn hat for the head,
- 2 acorns for the body.
Progress of the application step by step:
Step 1. Glue two leaves of the same type onto the background as upper wings. Below them, glue the lower wings - 2 leaves of a different type.
Step 2. Glue two acorns in the middle between the leaves to make the body of a butterfly
Step 3. Glue the acorn cap on top of the body. This will be the butterfly's head. Using a black marker, draw butterfly eyes and a mouth on the head.
Step 4. Make mustaches. To do this, glue 2 petioles from the leaves.
Step 5. When the wings are dry, they can be decorated with smaller leaves and a different color. Now the application is ready!

Children's autumn applique from leaves No. 10: bun, rooster
These applications were completed by children from MBOU Secondary School No. 5 (secondary group No. 11 “Stargazers”), Tyumen Region, Yugorsk. A teacher sent an application to our autumn competition for children's crafts "Autumn Workshop" middle group Petushkova Lyubov Anatolyevna.


Children's autumn applique of leaves No. 11: autumn vase

This master class was sent to our competition of autumn children's crafts by Yulia Yuryevna Zainetdinova (Republic of Bashkortostan, Sterlitamak city. Municipal budget educational institution additional education children - Center for Extracurricular Activities "Nadezhda" of the urban district of Sterlitamak)
Children's age: 3-4 years.
Materials: autumn leaves are fresh and dry (preferably different colors), a sheet with an image of the outline of a vase, PVA glue, a brush and good mood!
Application technique:
Stage 1. “Dressing up the vase.”
We rub the dry leaves with our fingers (at the same time we train fine motor skills and tactile sensitivity), apply a layer of PVA glue to the outline of the vase and sprinkle with leaves. Here our vase is ready.
Stage 2. “Filling the vase.”
From a set of fresh leaves, children choose the ones they like, then use a brush and glue to fill the vase, creating their own unique composition.
Examples of children's compositions are in the photo below (these are the works of children 3-4 years old).


Children's autumn applique No. 12: hedgehog under an autumn tree

Master class by Yulia Yuryevna Zainetdinova from the Republic of Bashkortostan (Nadezhda Center for Extracurricular Activities of the Sterlitamak Urban District)
Children's age: 5-6 years.
Materials for application:
— autumn leaves are fresh and dry (preferably in different colors),
- rowan bunches,
- maple or ash seeds, so-called “helicopters” for hedgehog needles,
- a sheet with an image of the outline of a tree and a hedgehog,
- PVA glue,
- brush,
- plasticine
- and a good mood!
Appliqué technique for children: step-by-step description
Stage 1. “Dressing the tree in autumn attire”
From a set of leaves, children choose the ones they like, then use a brush and glue to “dress up” the tree.
Stage2. “Bring the hedgehog to life”
We roll plasticine balls and dress up the hedgehog, then we stick needles from “helicopters” into these balls.

Stage 3. “We decorate with rowan berries”
Stage4. "Autumn Land." Sprinkle the bottom of the picture with crushed dry leaves (see description of Yulia Yuryevna’s previous master class on this page).
Application of autumn leaves: idea No. 13. Flowers
You can make a pattern or mandala from autumn leaves. You will get original flowers. These are the flowers made by Sofia (5 years old) and her mother Anna Shikhareva.
How to make a flower mandala:
MANDALA "Flower" ( bottom photo in the illustration)
You will need: A4 size cardboard, 4 pieces of different types of leaves (yellow and brown), pine needles, PVA glue, acorn hat.
How to make an application: First glue the leaves in a circle, alternating in color. Next, glue the acorn cap into the middle. Finally, decorate your pattern by gluing green pine needles onto it.
MANDALA “Autumn Eye” (top photo in the illustration).
It is done by analogy with the “Flower” mandala.
You will need: A4 size cardboard, PVA glue, two pairs (four pieces each) different types leaves: 4 yellow, 4 green, 4 smaller brown and 4 smaller green, an acorn cap and 4 sprigs of dry grass such as feather grass.
How to make an application: As in the previous work, you first need to glue leaves of contrasting colors, alternating them by color. Then glue an acorn cap into the middle of the flower. When the leaves are dry, glue smaller leaves of a different color on top, place two branches of feather grass and secure them at the top and bottom to form an “eye” shape.

Children's autumn applications from leaves: video for kids
And in conclusion, I would like to invite all little readers of “Native Path” and little artists to watch lesson on leaf applique at the fun “Shishkina School” my favorite TV channel for children “My Joy”.
Together with the mouse Shunya, children will learn how to make appliqué from leaves and learn how to make crafts.
Enjoy watching everyone!
You will find more ideas for autumn applications with children in the articles on the site:
Get a NEW FREE AUDIO COURSE WITH GAME APPLICATION
"Speech development from 0 to 7 years: what is important to know and what to do. Cheat sheet for parents"
Click on or on the course cover below to free subscription


Collection beautiful leaves in good weather autumn day- a most exciting activity. And when you return home, you want to somehow preserve this splendor or use it to create something beautiful - the material simply begs for it! The most interesting thing is to make various compositions and applications from colorful autumn leaves. This type of creativity develops the child’s fantasy and imagination. In it, images can be created from ready-made shapes by simply placing them on top of each other, rather than cutting them out of paper. And the color palette of leaf fall will put any largest set of colored paper to shame!
YOU WILL NEED:
Colorful autumn leaves
Multi-colored cardboard or velvet paper
PVA glue (you can use starch glue or rubber glue)
Brush
Scissors
Tweezers
Oilcloth
DRYING AUTUMN LEAVES
Applications can be made from either freshly picked or dried leaves. If you want to preserve the leaves, two drying methods can be recommended.
The first, well-known, method is to insert leaves between the pages of an old unnecessary book. It is better to lay each leaf on both sides with a paper napkin.
The second method is express drying of the leaves using an iron. Just remember that the leaves are not sterile, so it is better to iron them on a surface that you don’t mind throwing away later, for example, on large sheets of paper. You also need to place a sheet of newsprint or a paper napkin on top of the sheet before ironing.

AUTUMN LEAVE APPLICATION TECHNIQUE
Before you start work, cover the table with oilcloth so as not to stain it with glue. Prepare the base - a sheet of cardboard, collected leaves, scissors, glue, tweezers.
First you need to come up with a future picture. Then arrange it on a separate sheet. And only then start gluing the individual leaf parts to the base. It is best to apply the glue in droplets along the edges. If you apply glue to the entire surface of the sheet, it will warp when the application dries.
The finished picture should be placed under a press for one or two days.
Don't forget to frame it!
4.
TYPES OF APPLICATIONS
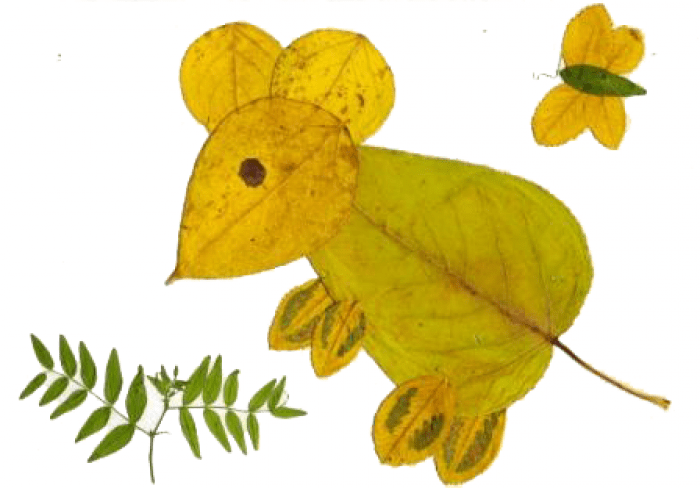
Overlay applique. Try to start by coming up with pictures that do not require cutting out any details from the leaves, but are created by overlaying the leaves. You can come up with a lot of such pictures: butterflies, mushrooms, chickens and other birds... The missing elements can be drawn in with a felt-tip pen or made from other natural materials.
Having mastered simple pictures, children can begin to come up with multi-tiered images. In this technique, leaves are glued on top of each other in layers. The application will turn out bright and cheerful if the leaves are different in color.
5.
6.
Silhouette applique.
In this type of appliqué, excess parts of the leaf are cut off so that the result is exactly what the little artist intended.
7.
8.
9.
10.
11.
12.
Modular application (mosaic).
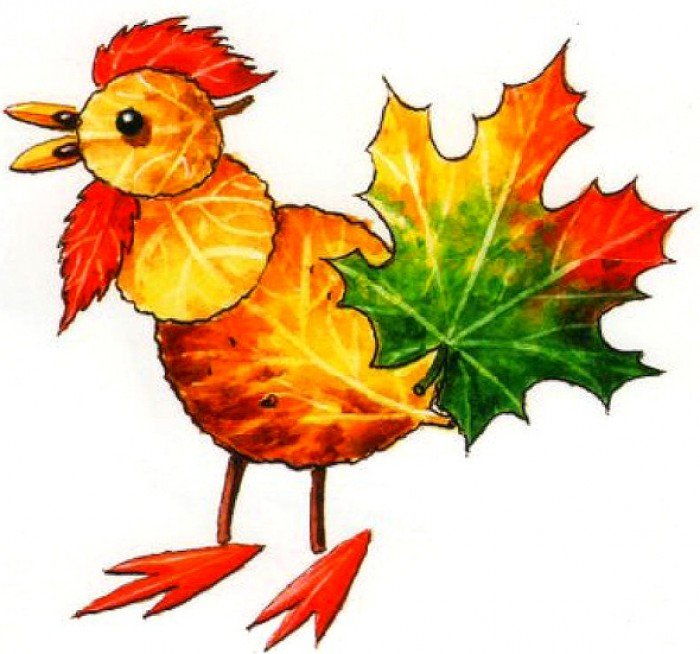
Using this technique, a picture is created by gluing many leaves of the same or similar shape and size (or, for example, maple seeds). This way you can make the scales of a fish, the tail of a cockerel or a firebird.
13.
Symmetrical applique.
It is used to create individual images or entire paintings with a symmetrical structure, as well as to obtain two completely identical images (for example, reflection in water). To do this, you need to select similar leaves to get an image with its “reflection” or symmetrical in itself (“Butterfly”, “Dragonfly”, “Landscape with a lake”, “Boat on the river”).
14.
15.
Ribbon applique- a type of symmetrical applique.
Its difference is that it allows you to get not one or two, but many identical images - ornaments. You get a whole “round dance” of trees, flowers, mushrooms, butterflies, etc.
In conclusion, here is a small selection of pictures collected from different parts of the Internet - to awaken the first associations in you and your baby. One has only to show the child how this is done, and his imagination will allow him to create more and more pictures from this amazingly beautiful natural material - autumn leaves!
16.
17.
18.
19.
20.
21.
22.
23.
24.
25.
26.
27.
28.
29.
30.
31.
32.
33.
34.
35.
36.
37.

Source: http://allforchildren.ru/article/autumn01.php

And these work samples are taken from
1.
2.
3.
4.
5.
6.
7.
8.
9.
10.
11.
12.
13.
14.
15.
16.
17.
18.
19.
20.
21.
22.
23.
24.
25.
26.
27.
28.
It’s very sad to watch how autumn comes after a sunny summer: the leaves on the trees turn yellow, it almost always rains, it becomes cold outside, you have to take warm things out of the closets.
Despite this, autumn can also become beautiful and full of colors during the onset of sunny days. Cheerful children run around the city parks, play, and collect colorful bouquets from fallen leaves.

At home I start collecting various crafts for school and kindergarten, sometimes just for yourself. There are a huge number of exciting ideas, and our article will be about them.

Leaf crafts for kindergarten
The child loves to take part in the creation various crafts. Show him what can be made from the colorful leaves that filled all the streets of your yard, and he will be incredibly happy to take part in it.
Making crafts is not only fun; thanks to such activities, children can gain wonderful exciting lessons to get acquainted with the world around them, develop thinking and creativity. The presented options for working in kindergarten will help you with this.

What is needed for crafts from autumn leaves:
- The leaves themselves, of different colors, sizes and types;
- Stationery (Glue, pencil, scissors, paper, white and colored cardboard);
- Threads;
- Wish.

Possible options for crafts made from leaves
Applique of autumn leaves
It is considered the simplest type of crafts made from leaves. You and your child can easily make an applique in the form of animals or birds.
You can create a lot with dry leaves, PVA glue and paper. To make your work more vibrant, use leaves of different colors.
Crafts from leaves and cardboard
Making a craft from cardboard and leaves is not difficult. You just need to cut out the base from cardboard and glue dry leaves to it.
Herbarium
One of the most exciting and common types of crafts for children is an amateur herbarium. You can collect many types of natural material, which will help your child to study with interest the variety of plants growing in your area. Include as many plant species as possible to create a beautiful herbarium.
Garland of autumn leaves
Dry the leaves, then dip each of them in paint yellow, to give the leaves more bright color. Then we hang the leaves to dry in the form of an elegant garland.
You need to take maple leaves of different sizes and colors, then cover them clear varnish. After the leaves have dried well, you need to hang them on strings, decorate them with beads or beads and hang them. The resulting pendant will be an excellent decoration both outdoors and indoors.

Bouquet of flowers from autumn leaves
Flowers created from maple leaves look very impressive.
Vase of leaves
You can use any leaves you like. For one vase you can use several types of leaves, different in color and shape, or you can make them from the same ones.

Instructions on how to make crafts from leaves Applique First you need to prepare everything necessary materials, and shoot the table with oilcloth.

To create an overlay applique, you should draw the picture itself on cardboard, then put leaves on the drawing, there is no need to cut the leaves, they are used entirely. Anything that is not enough can be painted on with paints or made from other materials.

Silhouette applique is created from cut leaves. The leaves are cut to realize the intended design with their help.

The most difficult way is to create a modular application. It is made from leaves of the same size. Fish scales or bird feathers are made in this way.

To obtain a symmetrical application, it is necessary to select paired leaves that are identical in all respects.
Pay attention!


Tape - with its help, many details are created in one drawing.
Herbarium
It is better to collect leaves for the herbarium in dry weather, since wet leaves require additional processing. Each part of the herbarium must be straightened with a cold iron; before this, all creases in the sheet must be carefully removed.

If there is constant dampness outside and there is no time to wait for dry weather, then they should be given the opportunity to dry on their own. After the leaves have dried, they are ironed with a warm iron, placing them between two sheets of paper. There is no need to press the leaves with an iron, just press a little so as not to flatten them.
The prepared elements are placed on a sheet of paper, which will serve as a background and at the same time a frame. Fix the leaves with threads or glue.
Bouquet of flowers/rose
In order to get neat and beautiful flowers, the leaves must be even and clean. Place the piece of paper directly in front of you and fold it in half. Then you need to twist half the leaf into a tube, but do not twist it very tightly, the flower should be voluminous.

The result is the core of the flower; we make the petals from the remaining leaves. The core is placed in the second maple leaf. Take turns folding the edges of the sheet to form petals. The sheet can be secured with a thread so that it does not fall apart later.

Pay attention!

To make the flower voluminous, you should twist at least six or seven maple leaves in this way, each of which is secured with a thread. To create a bouquet you need several of these flowers.
Vase
To make this craft you will need:
- PVA glue;
- Leaves of different colors;
- Ordinary balloon IR.

You need to inflate the balloon to the desired size of the vase. Take glue diluted half and half with water. Lubricate one half of the ball with adhesive solution.

Each sheet must be properly glued and lubricated with another layer of solution on top so that the upper layers of the sheets adhere just as well. When you have glued the top layer, it should also be lubricated with glue.

After this, remove the ball for several days until it hardens completely. When our fake is completely dry, you will need to burst the balloon. A vase of leaves is suitable for use. Making such work is not difficult, but it is very interesting, so it is good to do it with children.
Photos of crafts made from leaves

Pay attention!


So let's make funny little animals together and fairy-tale heroes from dry leaves.
Other such material for leaf applique: bright, various forms and sizes, with interesting play of colors - there is no need to look for them.
Autumn leaves are not only a cheap and accessible material, they simply fall on your head and spread like a carpet under your feet. Don't be lazy! Choose and create!
Making applications from leaves
For the applique of autumn leaves you will definitely need paper And glue. To reach desired result, change the shape of the leaves using scissors. Remember, you can only use dried leaves(usually they are dried between the pages of books, or with an iron, covered with paper on top).

The next step is to come up with a picture. I think there will be no problems with this. From the leaves you can make fairy-tale characters, animals, various landscapes, or just a beautiful ornament.

What types of applications are there?
When making applications from leaves, you can use various techniques, giving the craft uniqueness and originality. I will tell you about several such techniques.


Examples of leaf applications
Hope, examples of photographs of autumn leaf applications, which I have prepared especially for You, will certainly help you create interesting images, picturesque landscapes, and your room will always be decorated with a small a piece of autumn. Making leaf applique is very easy when there are so many beautiful examples available. Usinfantry!