DIY Christmas tree at home. How to make a Christmas tree with your own hands? Photo instructions for a master class on how to make Christmas trees yourself at home and at school
Bet on New Year Christmas tree is a good tradition supported by many families. But cutting down a living spruce in order to enjoy the beauty of the forest beauty for just a few days is not very humane. Fortunately, in lately people began to think more and more often about this issue and make their choice in favor of artificial beauties that can brighten up the New Year holidays for many years.
To get the main attribute of the New Year into your home, you don’t have to buy a Christmas tree. It will be much more interesting to make it yourself, especially if there is no free space for a big fluffy beauty or there is an active baby in the house. Moreover, similar DIY Christmas trees– a great gift for the New Year.
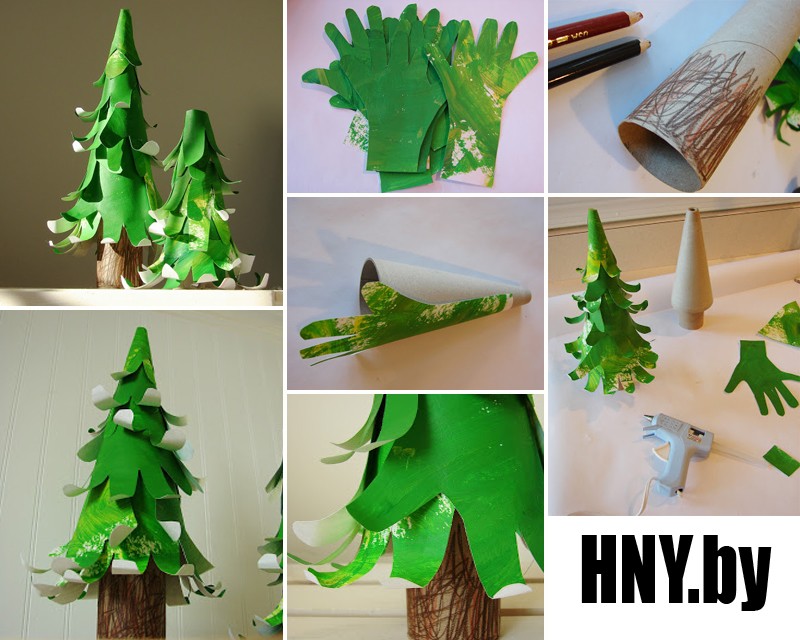
If you choose colorful magazine pages, you will get a bright Christmas tree that can be placed in the nursery.
To make an original Christmas tree from pieces of a magazine you will need:
- old magazine (book with bright drawings, glossy posters, etc.);
- thick sheet of paper or cardboard;
- PVA glue (it’s better to take a glue gun);
- pencil;
- scissors (it is much more convenient to take a shaped hole punch).
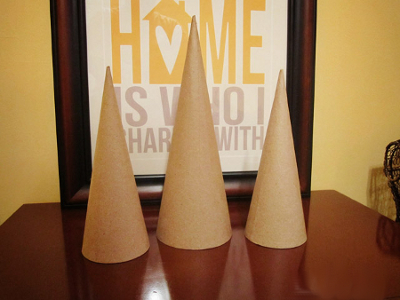
Step 1. Make a cone from a thick sheet of paper, securing the edges with glue.
Step 2. Take magazine pages from bright pictures and cut out many identical circles. If you have a shaped hole punch, it will be much more beautiful if you use it.
Step 3. To make the cut circles curl a little, wrap them around the pencil for a while.
Step 4. It's time to start assembling your Christmas tree. Starting from the base of the cone, cover it in a circle with bright swirling circles. Try to make neat rows, gluing the circles tightly so that there are no gaps.
Step 5. Make a small cone from one of the circles and place it on the peak.
DIY fragrant Christmas tree made from dried citrus fruits and pine cones

Such a Christmas tree will advantageously decorate any interior, and will create a subtle aroma. festive mood.
To make a fragrant Christmas tree you will need:
- a sheet of thick paper or cardboard;
- dried lemon or orange slices;
- cones;
- puncture;
- glue gun
Step 1. Make a cone out of cardboard or thick paper. You can make several cones of different sizes at once.
Step 2. Prepare and dry citrus slices. Prepare the cones.
Step 3. Glue dried lemon or orange circles and cones onto the cone. You can make a separate citrus Christmas tree, or a separate Christmas tree from pine cones, but it is better to combine the ingredients and you will get a lemon-cone Christmas tree.
Step 4. Twist a star from the wire and attach it to the “top” of the tree.
A wonderful fragrant Christmas tree is ready!
Christmas trees made from wrapping paper
You can decorate your house with these Christmas trees, supply them to a group in kindergarten, and also present them to the teacher on the eve of the New Year holidays.
To make a Christmas tree from bright wrapping paper you will need:
- a large sheet of cardboard or thick paper;
- wrapping paper;
- double-sided tape and regular tape;
- scissors;
- small decorations (beads, seed beads, sequins, sequins, ribbons, etc.).
Step 1. Make a cone out of cardboard. If the wrapping paper is thick enough, then the cone can be made directly from it.

1.1. Fold the paper diagonally to make a cone.
1.2. Secure the resulting cone with tape.
1.3. Carefully trim off the excess paper at the base of your cone.
Step 2. Take some brightly colored wrapping paper and cover the cone.

2.1. Place the wrapping paper face down on the table. Tape the end of the colorful paper to the top of the cone.
2.2. Slowly turn the cone and wrap it tightly in the wrapping paper.
2.3. Attach double-sided tape to the edges of the paper and connect the end to the cone. Cut off the excess at the base so that the “bottom” is even.
Step 3. Decorate the Christmas tree as you like.
The creative Christmas tree is ready!
DIY felt Christmas tree
A soft and delicate fabric Christmas tree can be presented as a New Year gift to a colleague, friend or relative.
To make a felt Christmas tree you will need:
- felt (it is better to take felt of two or more colors in the same range to make the Christmas tree look prettier);
- cardboard;
- double-sided tape or glue;
- scissors.
Step 1. Make a narrow cone out of cardboard, securing it with glue or tape.

Step 2. Now take the felt and use scissors to cut out circles of different diameters in ascending order. It is better to use pre-prepared cardboard circles as templates.

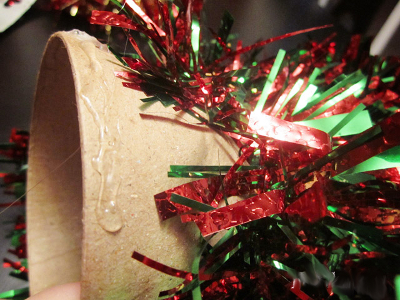
Step 3. Attach Christmas tinsel to the base of the cone with glue or tape.

Step 4. Make a cross in the center of each felt circle.

Step 5. Sequentially put circles on the cone to the very top.

Step 6. To decorate the “top” of the Christmas tree, add tinsel, attach a star or a pre-prepared felt cone with decoration at the very peak.

The cute cozy Christmas tree is ready!
DIY glowing creative Christmas tree.
This tree will be a wonderful night light for your baby during the New Year holidays. It can also be placed on the windowsill, which will add special originality to the interior of your home.
To make a glowing Christmas tree you will need:
- floristic (flower) mesh (it is better to take a mesh of several shades of green);
- floral wire;
- cardboard or thick paper;
- scissors;
- cellophane
- PVA glue;
- pins;
- Christmas tree garland with small lights;
- additional decorations (optional).

Step 1. Roll the cardboard into a cone.
Step 2. The top of the cone should be wrapped in cellophane.
Step 3. In a deep container, make a solution of small amount water and PVA glue.
Step 4. Dip small pieces of floral mesh into the solution and stick them onto the cone. The joints can be coated with additional glue.
Step 5. Strengthen the structure with pins and wait until the first layer has completely dried.
Step 6. In the same way, make the second layer of the future creative Christmas tree.
Step 7 After drying, you need to remove the Christmas tree from the cone and remove the cellophane.
Step 8 Place a garland inside the Christmas tree, securing it with floral wire.
The wonderful glowing Christmas tree is ready! All that remains is to decorate the Christmas tree to your taste.
Christmas tree made from pasta

You can make such an interesting Christmas tree with your child. An exciting activity will also be useful for fine motor skills fingers.
To make a Christmas tree from pasta you will need:
- a cone made of foam or plastic (you can make a cone from thick paper or cardboard);
- pasta (various shapes and sizes);
- dye;
- PVA glue;
- brush.
Step 1. Prepare a cone and paint it any color.
Step 2. After the cone has dried, you can start gluing the pasta in any desired design.
Step 3. After all the pasta has been applied, they can be carefully painted, preferably in two layers.

The pasta Christmas tree is ready! Every grandmother will be delighted with such a sincere gift from her beloved grandson or granddaughter.
DIY colorful Christmas tree made of paper
A paper Christmas tree will decorate any workplace and create a festive mood for everyone who is lucky enough to see it.
To make a paper Christmas tree you will need:
- long skewer;
- colored colorful cardboard or design paper;
- thick cardboard;
- glue gun or glue moment.
Step 1. From thick cardboard, cut out a square base for the future Christmas tree.
Step 2. Using glue, secure the skewer to the base.
Step 3. From designer paper or colored cardboard you need to cut out circles (preferably with curly edges) of different diameters, 3 circles for each diameter.
Step 4. Make small holes in the center of each circle.
Step 5. Lubricating the holes in the circles with glue, gradually assemble the Christmas tree.
Step 6. Decorate the top of the finished Christmas tree with a paper star or any other beautiful detail.
Christmas cozy tree made of thread
Cute fluffy Christmas trees made from yarn will give you a lot of warm, pleasant impressions.
To make a Christmas tree from thread you will need:
- cardboard for a cone or a ready-made foam cone;
- pile yarn;
- thick yarn;
- miniature pins;
- decorations.
Step 1. Prepare a pre-purchased styrofoam cone or make a cone out of cardboard.

Step 2. Take two threads at once and secure the ends with pins at the very base of the cone.

Step 3. Wrap the threads around the base of the cone, securing approximately every 5 cm with pins.
Step 4. Wind the threads towards the top of the cone; after a full circle at the base, you can no longer secure the threads with pins.

Step 5. Having reached the top, fasten the threads and wrap the cone in a downward direction, covering the Christmas tree with a second layer of threads.
Step 6. Cut the ends of the threads at the base and secure them with pins.

The Christmas tree is ready! You can leave it in this form, but it is better, nevertheless, to decorate the New Year tree with various beads, seed beads and other decorative elements.
Creative Christmas tree made of corrugated paper

If you want something unusual, you can make a huge Christmas tree for the wall.
To make a Christmas tree from corrugated paper You will need:
- matte cardboard or foam base;
- corrugated paper;
- scissors;
- masking tape;
- stationery knife;
- PVA glue;
- marker.
Step 1. Lay the cardboard on the floor and, using adhesive tape, connect all the sheets to form a large rectangle. Black tape is used in the photo, but it is better to use white (painting tape works best).
Step 2. Draw the size of your future Christmas tree and using a utility knife, cut out a large triangle.
Step 3. Fold the crepe paper in half and cut the fringe with scissors.
Step 4. Carefully apply the fringe, starting from the base of the tree to the very top, without leaving any gaps.
Step 5. Make a trunk from a rectangle of brown paper or cardboard. You can decorate the trunk with a fringe of brown corrugated paper.
The Christmas tree is ready! You can hang it on the wall and decorate it as you wish. It turned out to be a wonderful photo area for New Year's photos.
The New Year tree is, of course, the main attribute of the most important winter holiday. You won’t be able to do without the forest beauty, the atmosphere is not the same, and where will the kind grandfather put the gifts? It just so happened that in the house New Year's holidays They decorate the Christmas tree: some put up a live one, some prefer an artificial one, and some prefer a paper one.
A paper Christmas tree can not only replace a needle tree, but can also be used as a Christmas tree Christmas decorations, a unique gift for your loved ones, or simply decorate your office desk, reminding you of the upcoming weekend!
We have collected for you the most interesting options paper Christmas trees that you can make with your own hands.


See more paper crafts:

Time runs inexorably forward and now white flies are flying outside the window, slowly falling to the ground and covering everything around with a snow-white fluffy blanket. However, despite the cold, my soul is warm and joyful. And all because suddenly appearing snowflakes herald the coming of the New Year. Most main holiday The year is already very close, which means it’s time to think […]
#6 Christmas tree made from wrapping paper

#8 Simple Christmas tree made of colored paper


#13 Cute Christmas tree that will decorate your desktop


You might be interested in:

Of all the variety of bright, colorful and soulful holidays, perhaps the most beloved and long-awaited is the New Year. Thanks to this holiday, the whole family can get together, relax and have fun. But it's not just that. The New Year is shrouded in a special atmosphere created by holiday decorations in the interior. You can start planning your preparations for the New Year in advance. For this […]

#16 Paper Christmas tree for patient needlewomen: master class


#26 Christmas tree made of paper with snow effect

#27 Christmas tree made of paper using Japanese technique

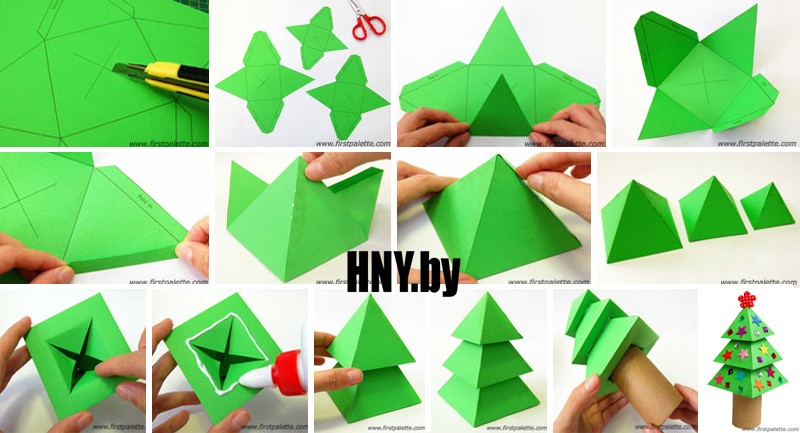
#28 Christmas tree made of paper pyramids
#29 A simple paper Christmas tree that even kids can make
New Year is the most favorite holiday of the youngest residents of the house. Don't deprive them of joy and create beautiful decor together. For such a Christmas tree you will need thick paper for the base, a lot of colored paper circles, and glue.

And here is another paper forest beauty that children can handle making. Well joint creativity with parents - what could be better for little fidgets!

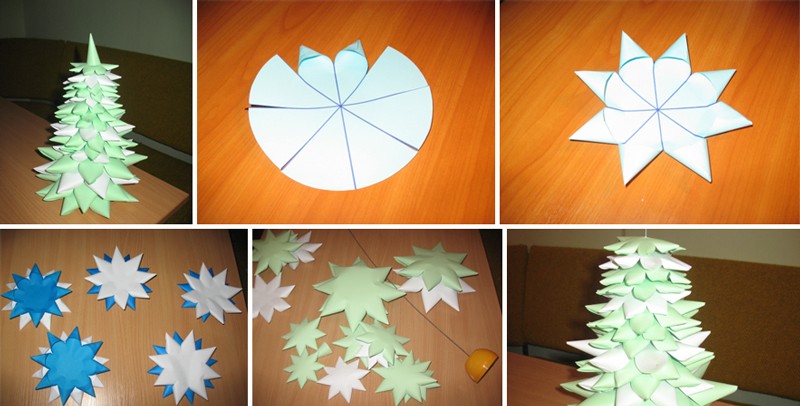
Star Pattern
#32 Christmas 3D Christmas tree made of paper: making a Christmas tree with children

#33 Fluffy Christmas tree made of crepe paper

#34 How to make a New Year's origami tree with your own hands
#35 Christmas tree made of paper using origami technique
#36 Simple origami Christmas tree
Help us improve: if you notice an error, select a fragment and click Ctrl+Enter.
Summary: How to do christmas tree with your own hands. Original Christmas trees from cones and tinsel. Photos and templates of paper Christmas trees. Homemade origami Christmas tree. Christmas tree made of candies.
Even kids can take part in preparing for the New Year and making New Year's crafts with your own hands. For example, even a two-year-old can make a Christmas tree from an ordinary pine cone and plasticine. You just need to teach him how to roll balls different colors from plasticine and secure them to the pine cone. The base of the Christmas tree is a spool of thread wrapped in foil.
Here are more complex versions of Christmas trees made from pine cones. In the first case, the bump was painted acrylic paint in green and white colors. In the second version, the pine cone was decorated with beads.


You can make a Christmas tree like this with your own hands from a large number of cones. The basis for the Christmas tree is a cone made of thick paper or cardboard, which is then covered with cones on all sides using a glue gun. Decorate the finished Christmas tree with beads and large beads.

Another very simple homemade Christmas tree made from tinsel. You can make it in literally five minutes.

To do this, you need to make a cone out of cardboard and stick tinsel on it in a spiral.
Christmas tree made of candies. DIY candy tree. How to make a Christmas tree out of candy
If, before wrapping a cardboard cone with tinsel, you use tape to attach candies to the future Christmas tree, you will get a sweet Christmas tree made from candies. Detailed New Year's master For a class on how to make a Christmas tree out of candy, see the photo below or follow the link. When creating a Christmas tree from candies, it is convenient to use double-sided tape.


Large quantity You can make Christmas trees with your own hands from paper. Let's start with the simplest New Year's crafts.
DIY paper Christmas trees
DIY Christmas tree made of paper (option 1)

Print on thick paper or cardboard and cut out the blanks with scissors >>>> Bend each Christmas tree in half and glue them together. This Christmas tree is made according to the same principle as Christmas ball from our previous article. See link >>>>

The openwork Christmas trees from the website Country of Masters are made using the same principle.

Epson's Singapore website offers ready-made templates your Christmas trees:


DIY Christmas tree toy (option 2)
If you have an unnecessary cardboard box, then you can use the same technology to make a Christmas tree like this.

DIY Christmas tree toy (option 4)

Or you can make a curly Christmas tree by gluing a cardboard cone base with strips of rolled paper.


DIY Christmas trees made of paper (option 10)
To make such a Christmas tree, you must first cut out circles of different diameters from paper. You will also need wire and a stand, which can be successfully replaced by half of a large Kinder Surprise. The Christmas tree is easily assembled with wire, and, most importantly, it is easily disassembled. See link >>>>

Origami Christmas tree from a magazine
This origami Christmas tree is very easy to make with your own hands. Small format magazines that can be found in any home are suitable materials.

Work plan:
The procedure described below must be done with each page in the magazine. If the cover is thick, you can simply detach it (tear it off).
1. Fold the page, upper right corner, at an angle of 45 degrees to you.

2. Once again fold the sheet in half diagonally.

3. We go through all fold lines with a fingernail or other object so that they do not open, especially thick pages.
4. Fold the bottom corner that extends beyond the borders of the magazine upward.

In this way we add up all the pages in the advertising magazine.

The result will be cute New Year's origami Christmas tree.

Origami Christmas tree from a magazine
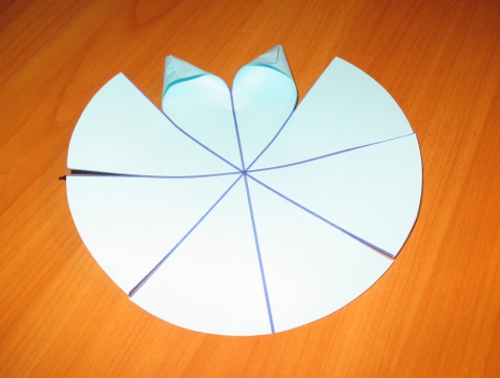
Another origami Christmas tree model for the New Year. Unlike the previous origami Christmas tree from the magazine, the pages here are not folded, but figuratively cut out according to a template.

The manufacturing principle is very simple. You need to prepare a template for half of the Christmas tree, circle it on one page and cut it out. Further, the cut out page itself will serve as a template for other pages. You can cut out several pages at once, but you shouldn’t cut a lot at once, as the cut line will turn out uneven (crushed) and the tree will not open well.

The tree itself turns out to be more one-sided; to achieve volume, you can fold and glue 2-3 magazines together. But believe me, she looks good anyway.
Origami Christmas tree made of modules. Modular origami Christmas tree
Collect from triangular modules Origami Christmas tree is not at all difficult. It consists of individual branches, so you can make Christmas trees of a wide variety of shapes and sizes. In addition, from such branches you can make New Year's compositions, make toys, snowflakes, and stars. See the New Year's master class at the link >>>>

Christmas tree-coloring on the wall
Large Christmas tree painted on the wall. The individual parts of this New Year's beauty must be printed on 22 A4 sheets and pasted on the wall in the correct sequence. The advantage of this New Year's paper craft is that the Christmas tree is made in black and white, so the printer's ink consumption is low. In addition, this New Year coloring book with many small details will captivate the child for a long time. Link >>>>

DIY napkin tree
A master class on making a very beautiful, unusual Christmas tree from napkins can be found at the link >>>>

How to make Christmas trees from corrugated paper
The Country of Masters website invites you to make two Christmas trees with your own hands from corrugated paper.
Option 1. The candles and the Christmas tree itself are made of corrugated tubes. Link >>>>

The closer the New Year gets, the more often the question arises, how to make a Christmas tree with your own hands. Indeed, in addition to the live or artificial spruce, which is the main character in New Year's interior, people’s homes are decorated with lovely crafts, including a Christmas tree craft. New Year trees are made in kindergartens, in schools during labor lessons, and at home. DIY Christmas trees are finding their rightful place in the workplace.
This article will talk about simple and affordable ideas on how to make a Christmas tree. Christmas tree made of paper, Christmas tree made of papier-mâché, Christmas tree made of polymer clay, Christmas tree from natural materials, a Christmas tree made of fabric, a Christmas tree made of ribbons and braid, even a Christmas tree made of plywood! Which method of making a Christmas tree is closest to you? Choose any one and get to work!
7 ideas on how to make a Christmas tree out of paper
This is the easiest way that even children can handle. To make a Christmas tree, as in the photo, you will need a long wooden stick or pencil, cardboard, a cube-shaped stand, pieces of multi-colored paper and a small piece of ribbon.
Work progress: cut out circles of different diameters from cardboard or thick green paper. Glue on figures cut out of colored paper. We make holes exactly in the center of the circles and begin to string them onto a pencil, starting with the largest circles in diameter and ending with the smallest circle. We fix the pencil in a cube-shaped stand. The stand can be made of thick cardboard. You can use another stand, as long as it is stable. If the Christmas tree is still unstable, weight the base with plasticine by sticking a pencil into it. Decorate the top with a star.
You can do the same thing Christmas tree made of corrugated paper. If you don't have such paper, cut out strips of colored paper of different widths. Fold each strip evenly into an accordion shape. Fasten them to form circles. String the corrugated circles onto a long stick or pencil, placing pieces of colored tape between them.
Here are a few more ways to make a Christmas tree out of paper:
In this case, spruce paws are more difficult to manufacture. Look at the photo. Otherwise, the principle of making a Christmas tree is the same. Only between the paws of the spruce balls are placed. Balls can be made from padding polyester or cotton wool.
It’s easy to make a Christmas tree like this out of cardboard:
Here's another way: make a cone out of thick paper, and multi-colored flags are glued to it. We attach a small star at the top. The Christmas tree is ready!
Here's something similar:
Like this Christmas tree craft can be done from paper decorative tapes or fabric braid
Watch the video to see how interesting it is to make a Christmas tree out of paper:
Not difficult at all make a Christmas tree using bouclé yarn or braid.
To make such a Christmas tree you will need a small flower pot, glue, green boucle yarn or braid, ribbons, decorative elements, a cone made of foam or thick cardboard.
Now look at the photo of the master class on how to make a Christmas tree using yarn or braid:
Take a flower pot and paint it white.
We make a cone from polystyrene foam or thick paper or cardboard. You can make a cone out of papier-mâché.
Glue the parts to each other. Let it dry. Take boucle yarn or braid and...
We begin to glue it around the cone.
We form the crown of the spruce to the very top and begin to decorate. This is how you can make a Christmas tree for the New Year: Here are more similar Christmas trees:
How to sew a Christmas tree for the New Year
There are many ideas on how to sew a Christmas tree for the New Year. I present to you several manufacturing methods:
To sew such a Christmas tree you will need the following materials: green, yellow and brown decorative fabric, padding polyester, multi-colored buttons, threads, shades of green, brown and yellow flowers for adding shades, brush. The photo shows a sequential master class for making such a Christmas tree:
You can sew a Christmas tree like this:
From fabric and padding polyester and other available materials you can make a Christmas tree like this:
You can make a Christmas tree with your own hands according to the master class posted below. Here are more examples fabric Christmas trees:
You get a nice Christmas tree if you do it in papier-mâché technique. This is when the desired shape is molded from pieces of paper, water and glue. In this case, this figure will be the Christmas tree itself. In this master class you will understand how to make a Christmas tree using the papier-mâché technique. Here you will need a minimum of materials: paper, glue, a flower pot, green paint, decorative elements, clay or plasticine and small stones.
How to make a Christmas tree from polymer clay
You can make a Christmas tree from polymer clay, which does not need to be baked in the oven. To work you will need a small bottle and a jar of yogurt, a decorative pot, self-hardening clay in green, yellow and brown colors, wooden stick, decorative elements, plaster, water and glue.
How to make a Christmas tree from natural materials
Natural materials provide a lot of original possibilities in terms of making Christmas trees and New Year's compositions with your own hands. Live, dried, and artificial branches, flowers and leaves are used. See photos as examples:
Here are a few more interesting ideas how to make and decorate a Christmas tree:
I hope that the ideas presented in this article will how to make a Christmas tree with your own hands from scrap materials, will stimulate your creativity, and you will make a wonderful Christmas tree for the upcoming holidays!
admin [email protected] Administrator Beautiful and smartUseful tips
The Christmas tree is a symbol of the New Year, so many people want to make a Christmas tree with their own hands and give it to loved ones or decorate their home and/or their New Year tree.
There are many options on how you can make a Christmas tree with your own hands.
In this article we will look at the most interesting options for small Christmas trees from various materials that you can make at home.
Christmas tree from an old book

1. Prepare an old, unnecessary book (the thicker the better), carefully remove the cover.
2. On the first page, draw the outline of the Christmas tree and cut out along the contours (see image).

3. Using the Christmas tree template, trace the tree shape onto all the sheets and cut out. You can cut out several pages at once.
4. Paint the edges of the pages.

5. Cut out two stars of the same size from colored paper or candy wrappers, glue them to each other and at the same time to the top of the Christmas tree.

Christmas tree craft made from thread and buttons

You will need:
Styrofoam cone (can be made from cardboard and wrapped in film)
Thick thread
Buttons different shapes, sizes and colors
Hot glue
Pom poms (if desired)
Scissors.
1. Use glue to secure the end of the thread at the bottom of the cone. Start wrapping the thread around the cone, adding glue from time to time to secure it.


2. Glue the pompom to the top of the head and the buttons to the Christmas tree.

Christmas tree made of pine cones (pictures)

You will need:
Acrylic paint or gouache and brush
Sequins
PVA glue
Hot glue or play dough, stars and small pots (if needed)

1. Wash, dry and paint the pine cone.

2. Decorate the cone with glitter. You can add a little glue and sprinkle with fine salt to imitate snow.
3. You can buy small pots and use hot glue to glue the pine cone to them. Instead of pots, you can use colored cardboard. If you don't have hot glue, you can use plasticine.
4. You can make stars out of paper for the top of the head. You can also buy stars.
How to make a Christmas tree from funnels and fabric

You will need:
Wide ribbons from any fabric
3 funnels
Hot glue
Colored cardboard
Small foam balls (3-5 pieces) to glue to the tip of the funnel
Small Christmas tree decorations.
1. In order to place one funnel evenly on top of another, and they will not wobble, you must first glue it to the spout of one funnel with hot glue foam ball, and glue the next funnel to it.

2. For the base, you can use a toilet paper or paper towel roll. It needs to be cut, painted or wrapped in colored paper or tape, and glued to colored cardboard. You can also use other items of similar size.

Christmas tree made of colorful ribbons (master class)

You will need:
Foam cone
Several ribbons of different colors (width about 1 cm)
Scissors
Pins
Any decoration for the crown (star, pompom)
PVA glue.

1. Cut a circle out of felt to glue to the bottom of the cone, thereby ensuring its stability.

2. Start cutting 10cm pieces of ribbon.

3. Fold each piece of ribbon in half and thread a pin through it. Make several of these.

4. Starting at the base of the cone, attach the ribbon pieces with pins to the cone (see image). Make one row first, then a second row with a small overlap (to cover the pin) and so on.
The last row can be glued down to avoid using pins.

5. Glue the top of the head. It could be a bow, a star, a pompom or something else.
DIY Christmas trees made of felt

You will need:
Felt of any colors
Crepe paper
Thread and needle
Hot glue.
1. First, cut out a few felt squares. You should choose 3 colors and cut out several different sized squares for each color.

2. Place all the squares in one pile, alternating colors, and thread a needle and thread through them.


