Pattern for children's wide pants with elastic. How to sew demi-season fleece pants with your own hands (with a pattern). How to sew warm pants for a child: job description
Are you thinking about making something new for your son, but don’t know what exactly? Make pants for a boy with elastic. These pants are perfect for everyday wear, and you can also make a holiday version. You can find patterns for six different styles in this article.
Plain pants
There is nothing easier than an elastic band for a boy. The pattern consists of only two parts. Accordingly, the product will need to be supplemented with wide elastic bands that will support the pants at the waist and be fixed at the ankles. In such trousers, a boy can walk and walk around the house. They do not restrict movement, and the child will feel comfortable in them. But for festive event These pants won't fit. They are too simple.
Pattern of children's trousers for children preschool age given above. To sew such pants, you should scale the picture and print it in the desired size. To do this, you need to measure the length of the child's trouser leg, as well as his waist circumference. Based on these dimensions, we scale the pattern. Now you need to cut it out on the fabric. There is nothing complicated here. We trace the pattern on the material and cut out the details. We make side seams. IN top part product, as well as a wide elastic band must be sewn into the legs. If desired, the trousers can have patch pockets.
Long pants
It is good to sew such trousers from and use synthetic padding as a lining. These pants will protect the child from cold wind and slanting rain. And sewing them will not be difficult at all. for a boy with an elastic band is presented in the article. It needs to be scaled, printed, and then transferred through the window to tracing paper. As a result, you should get two shelves - back and front.

We transfer the patterns onto fabric. You should have 4 parts. Don't forget that the right and left legs should be cut in a mirror image. If you plan to sew trousers with a lining, then you will need to cut out 4 more parts from padding polyester and from the lining material. Now you need to sew all the parts together in pairs. First of all, we lay the side seams on all the legs. If the product is sewn with a lining, then the inner part is assembled first, and only then the outer part is wrapped. The last stage is sewing in the elastic. It should be inserted into both the waistband and the legs.
Jeans
These trousers will be similar to those that appear in the first paragraph of this article, but the difference will be in the middle seam, or rather in its presence. In this model it is assumed. Why make an extra seam at all if you can do without it? The fact is that clothes consisting of large quantity details and having constructive darts always fits better. Therefore, you should not waste time creating a product.

The pattern for boys' elastic trousers is attached above. We will sew such pants from denim material, since guys often fall and the thin fabric will quickly become unusable. We cut out 4 parts from the fabric and begin to sew them in pairs. First we make the trouser legs, and then attach them to each other. The elastic should be sewn in last. In this model it will be a decorative element, so it is worth choosing it to match the fabric.
Short pants
Making these pants will be quite a difficult task. After all, this style is a complete copy adult model. The pattern of children's trousers with elastic for a boy is not difficult. First, you need to adjust it to the child’s height. When this action is completed, you need to transfer the pattern onto paper. You should cut it along the dotted lines, that is, separate the front and back pockets. They will require separate patterns.

Now you need to start making fabric parts. When they are ready, you can move on to sewing the trousers. The big parts are assembled first. Then the front and back pockets are sewn to the legs. And only after this the trouser legs are ground together. Lastly, the elastic is sewn into the waistband. Be sure to trim the edges of the pants. There is no need to sew an elastic band there; you just need to tuck them in and stitch them.
Shorts
The finished elastic band for a boy is shown below. You can use it to sew both full-length pants and shorts. Everything will depend on the size and length that you give to the product. We scale the pattern and then cut it out. Now you need to transfer all the details onto the fabric. You need to choose a dense material, even for summer. Why? Most boys are quite active, so they cannot sit still and run around all the time. From constant friction, pants quickly become unusable.

After all the parts are cut out, you can proceed to sewing. First you need to sew on the decorative trims. Then you need to sew the pant legs. And only after this can the product be stitched. You can see the belt on the pattern. You must first sew the fabric to the elastic band, and then attach it to the top of the trousers. If desired, the pants can be decorated with an applique of your son’s favorite cartoon character.
Pants for little ones
The pattern for elasticated trousers for a boy who recently turned six months old will look like the image below. It’s easy to sew these pants yourself; you just need to know exactly the height of your baby. Based on this parameter, you should scale the image attached below. We transfer the pattern onto paper, and then cut out the parts from felt or any other soft fabric.

Let's move on to sewing the product. The first step is to sew the pant legs together. Then you need to attach the overlay to them. We sew it to the bottom of the trouser leg, and in order for it to be easily fastened, you should install buttons or Velcro on the trousers. Now all that remains is to assemble the product and sew on the elastic. These trousers can be paired with a jacket, the pattern for which is shown in the same image.
Hello to all needlewomen, today I will show you how to easily and quickly sew pants for girls with your own hands for beginners, I will give you patterns. On the eve of summer, we decided to go through our wardrobe and on the mezzanine I found my light scarf from Centro, which I had not used for a long time, and I decided to find a worthy use for it.
You can sew your child’s pants with your own hands from any piece of material you have at home. The main thing is that the fabric is made from natural fabrics so that children do not sweat.
What did I need to sew pants for a girl with my own hands for a height of 120 cm. Age 7 years
- staple fabric 70 cm or any material containing cotton
- threads in color
- elastic band for wide belt 3 cm - length 60 cm.
- tailor's tools: scissors, measuring tape, pins, chalk
How to sew pants for girls with your own hands for beginners step by step
1.I measure the desired length of the trouser legs - the distance from the child’s waist to the floor. I lay out the pattern pieces on the fabric, observing the direction of the grain thread. As you can see, I have two patterns - these are the front and back halves of the trousers.

Since my master class is for beginner needlewomen, so to get you up to speed a little, I’m showing you what cuts are in any pattern of trousers and trousers.

2. I cut the front and back halves of the trouser legs, observing the established allowances.
What seam allowances should be made on the cuts:
- bow cut, seat cut, belt cut - 1 cm.
- side, step cut - 1.5 cm.
- bottom cut - 3 cm.
You can narrow the same pattern at the bottom and sew banana pants with your own hands, just model the pattern to suit your style.
It was also possible not to cut in the middle - or along the side cut, anyway, this part will then be sewn together. But I have a pocket in side seam, so I did just that. If you also want to sew your child’s pants with pockets yourself, then look at my tutorial on sewing pockets with a cut-off side or pockets - hooligans.

3. I connect the front and back halves of the trousers along the side cut.

4. I overcast the edges using an overlocker or a zigzag stitch. I iron the seams onto the front.
5. I connect the pants along the seat cut on the back half of the legs and the bow cut on the front.

Almost ready! All that remains is to connect along the step cut and cute pants for the girl are already emerging.

5. All that remains is to sew the belt to the pants. Using a measuring tape, I measure the line of the belt on the pants, multiply by two - this will be the length of the belt, the width of the belt is the width of the elastic, multiplied by two plus 3 cm for allowances.


6. Now you need to sew the belt to the panties. You can see how to do this in my detailed tutorial on sewing on a belt.
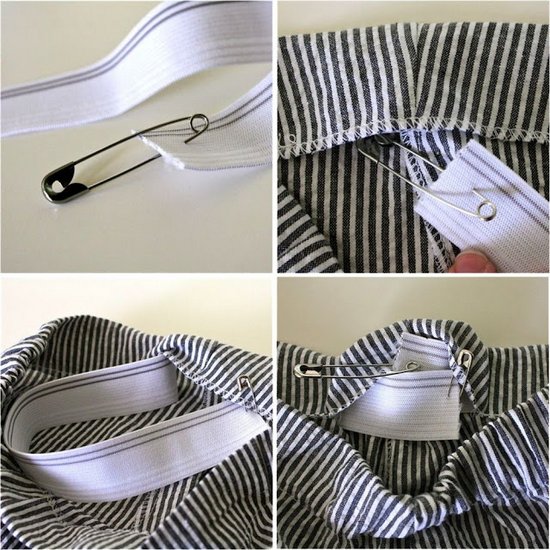
Using a pin, I insert the elastic into the waistband. I sew the ends of the elastic bands on a machine using a zigzag stitch.


The pants are ready. I am sure that sewing pants for girls is not difficult for beginning needlewomen. But what pleasure will the child, who also participated in the process, help his mother, get a pin or match the color of the thread.
If you have already tried to sew children's clothes and complained about the “unruly” knitwear, forget about these minor problems! After all, today we will sew warm, waterproof children's pants from a membrane, and this is a rather difficult experience. Although if you follow all the rules and select the right tools, everything will work out the first time! So, we suggest you sew waterproof pants for a boy.
The pattern and calculation are presented for a child aged 2-3 years (height 92 cm). But according to the described master class, you can easily increase or decrease the size and be able to calculate the amount of materials needed for the work. By the way, these trousers are suitable for both boys and girls. For a girl, I would like a brighter color, but if you remember that the cold is not only pure white snow, but also often the dirtiest dirt, parents often decide that dark gray and black are quite suitable for their daughter’s warm pants.
In order to sew warm pants for a child, you will need:
raincoat fabric on a membrane base, dark gray – 1 m;
fleece orange color(for lining) – 1 m;
wide elastic waist – 0.5 m;
adhesive transparent tape for gluing seams – 2 m;
double-sided tape;
pattern paper;
tailor's pins;
sewing machine;
synthetic threads.

Pattern for waterproof warm pants for boys, size 92
This pattern is designed for a baby about 92 cm tall (2-3 years). To get the pattern in full size, you need to save this photo to your computer (click on it to enlarge), then enlarge it to a size so that the waist line (top horizontal in the photo) is 30 cm. After this, you can attach the pattern paper to the monitor and trace the outlines with a pencil. Cut the template along the outline and the pattern is ready!

How to sew warm pants for a child: job description
1. As you have probably already noticed, the pattern of these pants is not entirely standard: the pants will be two-seam. This means that there will be no side outer seams on the legs: only seat seams and crotch seams (inner seams on the legs). So the pattern shows one whole trouser leg, which needs to be cut out of raincoat fabric in two mirror-image copies.
It is difficult to cut fabric from raincoat fabric according to a pattern, because you cannot attach the template to the fabric with pins: any holes in the membrane will leave marks. Therefore, it is better to fold the raincoat fabric in half (wrong side in), attach the pattern to it with double-sided tape and cut out two pant legs at the same time. Don’t forget to allow seam allowances - 7 mm away from the pattern outlines on all sides.


2. Place the two legs together and use tailor pins to fasten both parts along the seams of the seat: the front sections and the back sections of the pants, the left and right halves. Here you also need to remember that there is no need for extra holes from pins on the raincoat fabric. Therefore, pins should be attached at the very edge of the fabric: in the area that is located in the territory of the seam allowances. In addition, the pins must be placed perpendicular to the seam so that they do not interfere with the progress of the machine needle.

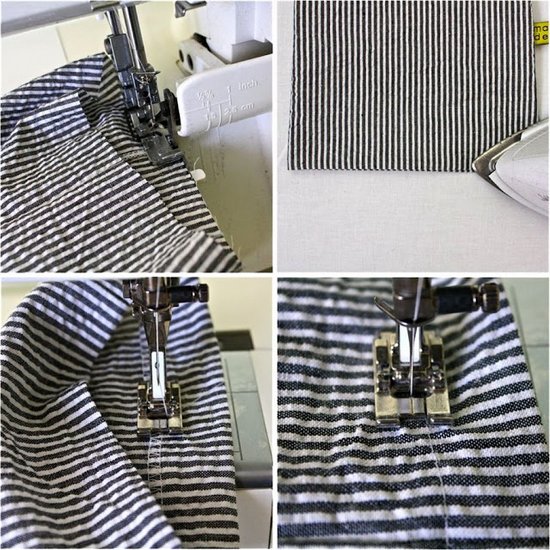
3. Machine stitch the seat lines using a straight stitch with 3mm stitch spacing.

Useful advice. Sewing membrane fabric is quite difficult: if your machine has a regular needle and regular foot, the raincoat fabric on the membrane can stretch or, conversely, slow down (this leads to numerous stitches in place). First try sewing on a scrap piece of fabric. If it doesn't work, take a Teflon foot and a #75 needle.
Another “trick” up the seamstress’s sleeve is sewing through paper. If the membrane does not obey, place a sheet of tracing paper under and above it: the machine will sew such a “sandwich” perfectly.
4. Sew both seams of the seat - both back and front. After this, be sure to tape the seams: the fabric is waterproof, but water can seep into the holes in the seams. Moreover, if the pants are intended for an active baby who does not like to miss puddles and snowdrifts.

How to glue seams in warm waterproof pants for a child
To glue, you will need to literally “solder” the adhesive tape into the seam. But even here you can’t do without a “sandwich”! Place a wooden block on the ironing board (it is needed in order to raise the seam and prevent the membrane coating from melting from the iron), on it - a product with a seam inside out, the allowances of which are bent in one direction, place adhesive tape on top with the adhesive side down (so , so that it covers both the allowance on both sides, and, of course, the holes in the seam), cover with two layers of gauze and press down with a warm iron. As a result, the tape should stick to the membrane, completely covering both the seam holes and allowances.
The seat seams are completely finished, so you can move on to the next seam!
5. This will be a crotch stitch: from the bottom of the left pant leg through the top and to the bottom of the right pant leg. Here, again, you will have to carefully pin the edges of the trouser legs so that they do not extend too far onto the canvas.

Then sew this seam on a machine and glue it with adhesive tape.

6. The base of the waterproof warm pants is ready! Now you need to sew the fleece lining. For the lining, use the same pattern as for the outer layer of the pants. Cut two legs from fleece in a mirror image.

Sew them together the same way as the outer pants, pinning the top armholes first.

And then sew the crotch seam.

7. Now the fun begins! The fleece lining must be inserted into the membrane pants.

Baste the bottom edge of the legs with thread. This needs to be done on the inside out: you should see not the raincoat part of the pants, but the membrane part.

Sweep the top part of the parts in the same way. In this photo, by the way, you can see the taped seam of the seat.

Having swept the legs and the top of the pants, you should end up with a closed “donut” like this.

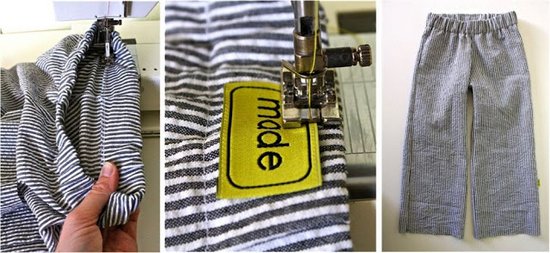
8. Machine stitch the bottom edge of both legs using the same straight stitch at 3mm intervals. Then sew the top edge of the pants, leaving a small hole (up to 10 cm) for turning the product right side out.

Through this hole, turn the pants inside out and straighten the legs well.

Already in the inside-out position, stitch the bottom edge of the pants to give the product a finished look.

Topstitch the top edge of the pants too, slightly moving away from the very top. In this case, you need to retreat so much that a wide elastic band for a belt can fit into the resulting “tunnel”.

9. Using a safety pin, thread the elastic into the tunnel and sew the ends together.

Machine stitch the remaining hole through which you threaded the elastic.

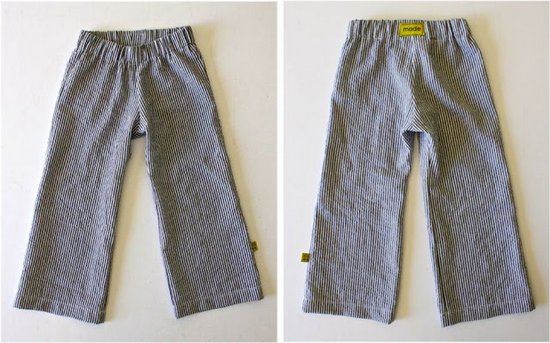
Warm waterproof rain pants for your child are ready! This is quite a difficult job, because here you have to not only sew, but also adapt to the whims of the fabric, glue the seams... But the result is undoubtedly worth it: after making pants from the membrane, you will be able to proudly say that you sewed outerwear for a child with your own hands, and the baby will always be warm and reliably protected from adverse weather conditions.


By the way. To make water-repellent clothing, they often use exactly the same patterns as in our case - with a minimum number of seams. Extra seams not only increase the chances of the fabric leaking, but also add hassle to the craftswomen, because each of them needs to be glued!
Kaho specifically for the site
In a newborn's wardrobe or infant, in addition to vests, rompers, caps, there must be a type of clothing such as panties. This product is more practical than. They are very comfortable to wear for walking or sleeping. In addition, this is the simplest item of children's wardrobe that even a novice seamstress can sew. Moreover, things made with love are always the warmest and most comfortable for a baby. In general, let's move from words to action and try to sew pants for a baby using a special pattern.
The provided pants pattern is designed for a child weighing approximately 6 kg. We will use it to sew pants from flannel fabric. Flannel is a soft natural fabric, perfect for babies.

Let's prepare:
How to cut and sew panties:
First of all, we need to prepare materials and tools for cutting and sewing. We will sew children's pants on a regular universal machine (see in more detail how to choose a sewing machine). Flannel fabric should first be treated - washed in hot soapy water (50-60 degrees), rinsed, dried and ironed with a hot iron. It is better to buy an elastic band for pants, not a universal one, but one intended for children's things - they are softer. The same applies to the braid with which we will trim the bottom of the trousers.

Next, you should transfer the pattern onto a sheet of paper. Cut it along the contour. Then you should fold the fabric in half along the grain thread (if any, align the edge with the edge), transfer the contours of the pattern to the material, and cut out the parts. We will have two of them.


We will sew braid to the bottom of the parts of future panties or use bias tape. You can simply hem the bottom of the panties with a hem seam with a closed or open cut.

Then we will process the edges of the side cuts in a convenient way (by hand or with an overlocker) and sew them on a sewing machine.

We bend the top of the panties by 1.5 cm and sew them together so that there is room for the elastic. Insert the rubber band.

The baby's or toddler's pants are ready. We spent less than one hour on cutting and sewing, which allowed us to save not only family budget, but also to buy a new comfortable and practical thing for the baby.
Children's trousers are an essential item for both boys and girls. This one comfortable clothes for walks, games, trips, and just for everyday wear. And modern styling makes the trousers very elegant. But which ones to choose so that they are both convenient and practical at the same time? From my own experience, I can note that trousers should have a waist no lower than medium and with an elastic waistband; the latter detail is especially important for small children. Thanks to the elastic band on the waist, the pants fit snugly to the baby’s body, do not bulge, slip or press.Well, for older children you can already sew trousers with zippers and pockets, like real jeans.
Pattern for children's trousers for ages 2 to 10 years
The simplest and most comfortable trousers are the sports-style model with elastic. Children are very comfortable in such clothes, and mother, in turn, can easily and simply handle the sewing.
In MK, for this pattern it is proposed to sew pants from double fabrics, the upper one is mesh, and the lower one is elastic synthetic fabric. But you can sew from any other fabric and not necessarily in two layers.


Details of the pants: orange - lining, dark - faces. side
Download the PDF pattern, print and glue the sheets. Select the appropriate size (plate below) and cut out. Transfer the details onto the fabric. Cut and sew the pieces.

Fold the top edge under and sew, insert elastic. Process the bottom of the trousers. Stripes can be sewn on the sides if desired.

Master class: how to sew pants for a child

Step 1. Print out the pattern and transfer it to the fabric. Cut, leaving 2 cm allowance at the edges.

Step 2. Complete all seams.

Step 3. Measure the width of the waistband of one leg. Using stretch fabric, make a belt and cuffs of the appropriate width. Sew and fold in half.

Step 4. Sew the pieces to the panties.

Pattern for children's trousers with elastic
This pattern of children's trousers is designed for children 2-3 years old. Below you can download it and watch a master class on sewing these pants. Required quantity fabric - 90 cm.

Master class: trousers with elastic

Step 1. Print the pattern and transfer the details to the fabric. Cut it out.


Step 2. Complete all seams one by one.

Step 3. Finish the edges with an overlocker.

Step 4. Tuck the top edge to the width of the elastic. Sew, leaving a small area open. Insert the rubber and sew up the remaining area. Sew the waistband along with the elastic.
Step 5. Overlay the bottom edges. Turn and sew.
How to sew children's pants from a sweater: master class
And another master class with a clear example of how to sew warm pants for a baby from an unnecessary sweater.


