Raglan shoulder pad made of molded synthetic padding. Learn to sew with your own hands How to properly sew on dress hangers
To a beautiful sleeve - business card any jacket, jacket or coat. A correctly sewn sleeve should fit the arm freely without creases or distortions, the sleeve cap should be without folds or gathers, with a slight roll. To sew a sleeve correctly, you need to know a few rules that will allow you to do this.
Rice. 1. Sleeve and jacket allowances
Along the hem of the sleeve, between the control points for fitting, lay 2 machine seams with a stitch length of 4 mm.
Rice. 2. Place two lines along the seam allowances
The distance between the seams is 1-2 mm. Both seams should be laid along the edge allowance and not extend onto the sleeve (Fig. 2-3).
Rice. 3. Two lines along the sleeve hem
Take the lower threads and lightly pull the sleeve along the edge, distributing the folds so that the fabric fits, but large folds were not formed (Fig. 4-5).
Rice. 4. Place the sleeve along the edge
Advice! If small wrinkles do form, loosen the thread tension a little. To make it easier to fit the fabric along the band, after gathering, steam the band with an iron with light pressure.
Rice. 5. Finished okat
In Fig. Figure 6 shows control points marked on the product and sleeve with snares.
Rice. 6. Control marks on the sleeve and jacket
Align the high point of the hem with the shoulder seam and pin (Fig. 7).
Rice. 7. Pin according to marks
Distribute the pellet between the control points, chip and sweep (Fig. 8).
Rice. 8. The sleeve cap is pinned along the marks
Rice. 9. Sleeve stitching
When sewing the upper half of the edging, to avoid wrinkles, slightly stretch the fabric to the left and right of the needle (Fig. 10).
Rice. 10. Stitching in the upper part of the sleeve cap
Cut off the folds formed on the allowances of the upper part of the edging, not reaching 2 mm from the seam (Fig. 11-12).
Rice. 11. Cut seam allowances at an angle
Iron the roll with light pressure using a steamer.
Rice. 12. Sleeve allowances
From padding polyester, cut out a strip 4 cm wide and about 20 cm long (Fig. 13). The strip is attached only along the upper side of the edging (on the planted area). Sew a strip of padding polyester along the edge.
Rice. 13. Strip of padding polyester for sleeve edging
Sew from the side of the product, as shown in Fig. 14. The stitch should be 1-2 mm to the right of the sleeve stitching line.
Rice. 14. Sew a strip of padding polyester along the edge
A strip of synthetic padding along the edge, stitched - fig. 15.
Rice. 15. Finished strip of padding polyester
Determine the center of the shoulder pad, align the shoulder pad with the shoulder seam (Fig. 16).
Rice. 16. Determine the center of the shoulder pad
Sew the shoulder pads by hand from the sleeve seam allowance using wide stitches (Fig. 17).
Rice. 17. Sew the shoulder pad by hand
Try on the product, sew the thin rounded side of the shoulder with several fixing stitches to the shoulder seam (Fig. 18).
Rice. 18. Fixing stitches along the edge of the shoulder pad
Unscrew the cover front side, steam and form a beautiful, even roll along the edge (Fig. 19).
Rice. 19. Formation of a roll along the top
Sew in the left sleeve in the same way. Now you know - share it with others!
Rice. 20. Finished jacket sleeve
HOW TO SEW SHOULDER PADS WITH YOUR OWN HANDS
Some styles of clothing require emphasizing the line of the shoulders, and sometimes posture also looks better if shoulder pads are sewn under the clothes. Sometimes such a little thing is difficult to buy and therefore you need to learn how to make raglan-shaped shoulder pads and triangular shape with your own hands.
You can sew shoulder pads with your own hands; it’s not at all difficult if you make the pattern correctly. Shoulder pads consist of a pad (cover) and an inner lining made of batting or foam rubber. The finished height of the shoulder pad at the end of the shoulder is no more than 10-12mm. The cover (cover) is made of two layers of calico, identical in shape and size. Make a pattern for life-size shoulder pads according to the drawing, taking into account that 1 square measures 2x2cm.
SHOULDER PADS FOR A DRESS, BLOUSE, JACKET PATTERN
According to the drawing, make a pattern for shoulder pads in full size. Using the pattern, cut out two pieces of thick fabric or rigid interfacing. Cut two from soft interfacing, but along the lines of pattern No. 2, so that they are shorter than the previous one along the rounded line.

Then fold the soft padding pieces together and pin them together. Then pin them together with part No. 1, so that the smallest one lies on top and the straight cuts coincide. Then pin part 2, bending the shoulder pad for convenience, and stitch all the layers.

Shoulder pads for a dress, blouse or jacket without lining, made of translucent fabric; the top part should be cut out of fabric to match the item or from the same fabric as the item. If the item is lined, the top layer of shoulder pads is made from lining fabric.

In this case, the top is cut out according to the first pattern with a fold in a straight line and an allowance of 2 cm along the rounded line. Fold this part in half, insert the prepared thick shoulder pad and sew the outer sections with a zigzag stitch. Trim seam allowances as close to the stitching as possible.
RAGLAN SHOULDER PADS PATTERN
To make it, draw patterns according to the cells in full size. Cut out 4 pieces of shoulder pads from the rigid pad according to pattern 3.4, and two pieces with a bend according to pattern 5.

Sew parts 3 and 4 in a zigzag, folding them together so that the marks on them coincide. Place a piece of thin foam rubber or padding polyester between them.

Cut the bottom part to the mark along the “cut” line. Fold the edges overlapping and pin to the top of the shoulder pad.

Sew the parts together, giving shape. Cut the upper shoulder pad from the lining fabric and pins on the main one, stitch with a zigzag.
HOW TO SEW SHOULDER PADS TO A DRESS OR OTHER THING
To sew on the shoulder pad, fold it in half and align the fold with the shoulder seam of the item, so that the thick part aligns with the edge of the shoulder at the armhole. In this position, secure the shoulder pad with pins, then sew it to the shoulder seam at the ends of the fold, and sew the corners to the armhole seam of the dress.
Shoulder pads are most often used in outerwear: coats, raincoats and jackets. In clothes made of thin fabrics, blouses and dresses, shoulder pads are also sometimes used to give, at the request of the customer, an additional shape to the product or to straighten the shoulder line.
Our master class will tell you how to sew shoulder pads with your own hands to the finished product, how to sheathe them necessary material and how to sew Velcro onto the shoulder pad so you can attach it to your bra straps.
Shoulder pads: basics and nuances
How to sew shoulder pads with your own hands? You should choose shoulder pads that suit your model. Shoulder pads can be purchased at any sewing supply store. They come in different sizes, shapes and thicknesses.Standard shoulder pad sizes are 6, 13 and 25 mm. There are shoulder pads that are thicker or thinner than standard ones. Thinner shoulder pads are used when sewing light blouses and dresses. You can buy shoulder pads already covered with colored fabric; they come in a fairly wide range color scheme, and you can choose the shade that suits your model.
But if you are sewing from thin fabric, it is best to cover the shoulder pads with the main fabric of the product. We'll tell you how to sew shoulder pads with your own hands, it's not difficult at all! Make sure that the shoulder pads do not show through the main fabric. If there is no suitable shade on sale and there is no main fabric left, use nude or beige shoulder pads.
When sewing a lined product, you can use unlined shoulder pads.
If you are sewing a model and using a pattern from a magazine, you will find instructions on choosing shoulder pads in the instructions. Try to find these exact shoulder pads because the pattern was designed to fit their specific dimensions. If you do not use shoulder pads at all, without changing the pattern, the product may sag in the shoulder area, because it will lose the necessary support.
Most ready-made shoulder pads have notched edges or other markings to help position them correctly on the shoulder. Align the shoulder pad marks with the shoulder seam or marks on the garment. If you use removable shoulder pads, remove them before dry cleaning the product.
So let's learn how to work with shoulder pads!
How to sew shoulder pads
Try on the product in front of a mirror. Decide on the exact position of the shoulder pad.


Hand sew the shoulder pad to the shoulder or yoke seam allowances, following the pattern instructions. Stitches should not be visible on the front side of the product. Attach the ends of the shoulder pad to the armhole allowances.

How to Attach Shoulder Pads to a Harness
Cut two pieces of Velcro to the required length (about 5 cm) for each shoulder pad. Velcro consists of two parts: one with loops, the other with hooks.

Pin the Velcro loop pieces symmetrically to the center of the shoulder pad, about 2cm from the straight edge.

Hand sew along the perimeter of the strip, without catching the right side of the shoulder pad.

Place the parts with hooks on top of the parts with loops. Sew the ends of the parts near the straight edge; on the other side the parts should open freely.

When putting the product on, unfasten the Velcro and place the shoulder pad on your shoulder. Pass the hook strip under the strap and fasten the Velcro.

How to sew shoulder pads
Cut two squares from a suitable fabric of such a size to cover the shoulder pads on both sides with a margin.

Fold the square in half diagonally, tightly grasping the shoulder pad, and pin along the edge of the semicircle.


Sew the shoulder pad with a zigzag stitch or overlock the edge of the fabric. Cut the fabric close to the stitching.


Shoulder pads
If shoulder pads are included in the list of model parts, they are necessary, since they “hold” the entire structure, and it is impossible to do without them, otherwise the shoulders will sag and lose their shape, as will the intended silhouette and the entire product. Sleeve patterns in this case are constructed taking into account the freedom for padding.
The shape of the shoulder pads depends on the cut of the sleeve. There are two main types of shoulder pads - triangular for set-in sleeves and raglan (the latter have variations). Shoulder pads come in different thicknesses - from 0.6 to 2.5 cm, which depends on the degree of convexity of the sleeve. They are filled with a special non-woven synthetic material, padding polyester [or batting]. Don’t be afraid to change the shape of ready-made shoulder pads or reduce their thickness if they don’t quite suit you; shoulder pads are “fitted” to your figure in the same way as ready-made standard patterns.
Triangular shoulder pads end at the top of the shoulder and create a sharp, hard edge on the sleeve. They are used to strengthen regular set-in sleeves and set-in sleeves with an extended shoulder line.
Raglan shoulder pads They are worn on the shoulders like caps; they hold the soft, rounded shape of raglan sleeves, kimonos, and lowered sleeves.
In the case when the shoulder pads are sewn to a product without a lining, they can be covered with the same fabric from which the entire thing is sewn, if this fabric is thin, or with a lining fabric to match the main one. For light dresses and blouses, you can purchase ready-made shoulder pads made from lining fabric. In the section shoulder shape shows how to make shoulder pads for a lined product.
In the photographs below, the right shoulder is shown in finished form with the shoulder pad hemmed from the inside out; The shoulder pad is placed on top of the left shoulder, in the same position in which it holds the finished shoulder.
Shoulder pad placement
 |
 |
| Set-in sleeve. Check the product and place the triangular shoulder pad on the shoulder so that its edge extends 1 cm beyond the shoulder seam line into the sleeve. Pin the shoulder pad along the shoulder seam. |
Kimono or raglan. Place the shoulder pad over the shoulder to create a flat surface that curves toward the sleeve, baste the shoulder pad to the shoulder seam or attach it with Velcro so that the shoulder pad can be easily removed. |
 |
 |
| Set-in sleeve with gathering. Sew a triangular shoulder pad onto the shoulder so that it extends 1 cm into the sleeve and keeps the gathers straightened. In this case, you can also use a sleeve head amplifier. |
Long shoulder or dropped sleeve. The raglan shoulder pad fits over the shoulder like a cap. If you want to use regular triangular shoulder pads, they must extend into the sleeve by at least 1 cm. |
TO How to make a fabric cover for a shoulder pad
 |
 |
 |
| 1. Make a pattern for the cover by tracing the outline of the shoulder pad on paper. Cut the bottom two pieces (for both shoulder pads), allowing a 1.3cm seam allowance. Then cut the top two pieces, allowing a 2.5cm seam allowance. |
2. Place the smaller lining piece on the underside of the shoulder pad, lining up the rounded edges. Then turn the lining back and baste it to the shoulder pad using bias stitches so that the short stitches are visible only on the lining side. Then fold the lining so that it rests on top of the shoulder pad and the second stitch is 3.8 cm from the first. Continue sewing the lining to the entire surface of the shoulder pad in this manner. |
3. Pin the top lining onto the shoulder pad along the rounded edge, seating the fabric or adding small folds if necessary. Do not put too much tension on the fabric over the shoulder pad. Then stitch the lining on all sides of the underwing by machine or stitch it by hand. Trim the seam allowances with serrated scissors or join them with a zigzag stitch. |
How to attach shoulder pads to clothing
 |
 |
 |
| First, attach the edges of the triangular shoulder pad to the armhole in three places: at the point of the apex of the sleeve on the back and on the front. Then sew the tip of the shoulder pad to the shoulder seam allowance. The shoulder pad should lie softly without stretching. |
Attach the shoulder pad to the machine in the same places as in the previous method, using a wide zigzag stitch with closely spaced stitches. Start at the top of the shoulder pad. Make sure that the stitching does not cover the front side. |
You can make a Velcro fastener on the shoulder pads - then you can quickly remove them and attach them again. Take a thin Velcro tape, sew the upper half to the shoulder seam, and the lower half to the shoulder pad. In this case, there is no need to additionally baste the shoulder pad. |
In this article you will find tailor tips for those learning to sew. Technology for sewing parts, how to rip seams correctly, how to make hangers with your own hands and others.

When ripping seams:
a) Use a ripper knife (knife for cutting loops).
b) Cut stitch by stitch, not in a row, but sequentially, through several stitches of the seam. You need to cut the needle thread, then the shuttle thread can be easily pulled out.
c) If the threads are difficult to distinguish on the fabric, rub them with a piece of soap that you use to cut the fabric, the stitches will become clearly visible.
d) To remove thread trimmings from the fabric, use adhesive tape (scotch tape) or a small brush.
e) When ripping a seam, the ripper knife should not slide between layers of fabric, as this can easily damage the threads of the fabric.
f) Before sewing parts again, iron them.
Sewing two parts with different cut shapes

When sewing parts, one of which has a straight cut and the other has a concave cut, use the following technique:
a) Stitch along the allowance of the concave piece next to the seam line (Fig. A).
b) Make notches along the entire allowance, reaching the stitching (but not cutting it). There should be enough notches so that the concave cut can be straightened into a straight line (Fig. B).
c) Fold the parts to be joined with the right sides inward so that the part with the notches is on top, pin and stitch, the stitching on the seam allowance can serve as a guide (Fig. B).
Sometimes, the edges of the overcast seam allowances form a ledge that is noticeable from the front side of the finished product (when sewing thick fabrics). In this case, it is necessary to perform stepwise trimming of the allowances, that is, trim them to different widths.
The seam allowance that is located closer to the front side of the product should be wider.
If the product part is processed with a gasket and adhesive fabric, then it is advisable to cut the gasket from the seam allowance to the stitching line; if this is not possible, then the allowance with the gasket should be made wider.
Stitching of facing parts

In overstitched parts with corners, before turning them out onto the front side, allowances in the corners should be cut off in order to obtain a clear, beautiful corner in the finished product. The following options are possible:
a) The angle is right, the stitching goes along both sides of the corner, then the allowance is cut diagonally (Fig. B), when turning out, the remaining allowances fill the corner of the part without excess fabric.
b) A straight angle, the stitching goes along one side of the corner, the other side of the corner is formed by a fold of fabric. In this case, the allowance in the corner is not cut off, because when turning the part out, the allowance fills the corner without excess fabric, forming a clear line (Fig. B).
c) The angle is sharp, the stitching goes along both sides of the corner, then the allowances are cut to such a size that when turned out they fill the corner without excess fabric (Fig. B).
Stitching rounded parts

In rounded seams:
a) The allowances of the concave seams are cut to the stitching (not reaching 0.1 cm) so that the stitching is not damaged, then when turning out, the sections of the allowances move apart and lie flat, without tightening the fabric of the top of the product. If this is not done, the seam in the finished product will be pulled together by a shorter cut of the seam allowance. The greater the curvature of the seam section, the closer the notches should be to each other (Fig. A).
b) Allowances for convex seams are cut out with teeth (not reaching 0.1 cm, so as not to damage the stitching) so that when turning out there is no excess allowance fabric, that is, allowances on wrong side lay flat, without waves visible from the front side of the product (Fig. B). This is conveniently done using scissors with a serrated cutting edge.
How to sew elastic tape from knitwear

Inexperienced tailors usually cut an elastic knitted binding for processing cuts in the transverse direction of the fabric (the direction of the weft). However, in this case, professionals adopt a direction of 5 degrees relative to the weft, at which such materials are formed.
1. If you don’t have a protractor, you can make a template from cardboard to determine 5° to the weft. To do this, lay a segment equal to 15 cm on the cardboard, designate its ends A and B. From point B, perpendicular to the segment AB, set aside 1.5 cm and designate point C. Connect A and C - this is the direction 5° to line A B (Fig. . A). Cut out the ABC template.
2. Place the template on the fabric so that side AB coincides with the direction of the weft (Fig. B).
3. Draw a line AC on the canvas and continue it to the required length - this will be the direction of 5 degrees to the weft.
4. Mark and cut out strips of the required length and width. If necessary, you can connect their ends with a seam in the longitudinal direction.
Making tucked cord with stuffing

An ordinary cord can serve as stuffing for a tucked cord, which will significantly improve appearance the last one.
1. Select an acrylic or cotton lace of the desired size. Take a piece of it twice as long as the tuck piece blank, plus 5 cm.
2. Cut out a bias strip of fabric of the required length and width so that it can be wrapped around the cord and at the same time there should be 2.5 cm allowances on both sides.
3. Place the cord on the strip from the front side in the middle so that at one end of the strip it protrudes 2.5 cm. Sew the cord to the other end, cross-stitching the strips with a tack.
4. Fold the strip so that the cord is inside it. Using a zipper foot, stitch the strip as close to the cord as possible, applying slight tension as you sew.
5. Trim the seam allowance to 3 mm, and if the fabric is loose - to 5 mm.
6. Holding firmly the end of the cord, which protrudes 2.5 cm from the fabric, move the fabric, pulling it over the other part of the cord and thereby turning the stitched strip to the front side, and the cord, now its other part, ends up inside the dart.
7. Trim off excess cord.
How to make shoulder pads with your own hands

It is better to buy shoulder pads ready-made in the store. But sometimes, with certain features of the figure or clothing model, it is advisable to sew shoulder pads with your own hands, individually. Let's consider one of the options for making shoulder pads.
1. Cut out two squares with a side of 15 cm from the trim, lining fabric or product fabric (depending on the required rigidity).
2. Cut out one square with a side of 10 cm from padding polyester or other similar material, fold it diagonally and cut along the fold. To make more voluminous shoulder pads, you can use several of these squares, reducing them layer by layer, trimming them from the short cuts.
3. Place a triangle of padding polyester inside a square of fabric. Quilt parallel to the fold in several rows. While quilting, you need to hold the shoulder pad convexly.
4. The sections are overcast or sewn with a regular stitch, and then the fabric is cut with scissors with serrated blades.
Triangular shoulder pads are suitable for set-in sleeves.
Raglan, kimono and dropped shoulder sleeves require raglan shoulder pads. They fit over your shoulders like caps and maintain a soft, round shape.
The second option for a shoulder pad for a set-in sleeve in the shape of a shoulder.
1. Fold the front and back patterns along the shoulder seam. Trace the armhole line between the front and back notches. The shoulder pad should end 1.3 cm short of the neck seam. Draw a shoulder seam line on the shoulder pad pattern. Label the front and back halves (Figure A).
2. Cut out the base of the shoulder pad from adhesive canvas or trim according to the pattern. Cover the parts from padding polyester (or thin foam rubber) - four layers, cutting each layer along the rounded edge 2 cm narrower than the previous one. The thickness of the shoulder pad should be 1.3 cm. If a different thickness is required, then add or reduce the number of layers, cutting them accordingly.
3. Sweep away layers of padding polyester. While basting, hold the shoulder pad convexly (Fig. B).
4. Place a shoulder pad made of synthetic padding over the pad and glue your adhesive canvas to the top, widest one (or sew a border) (Fig. B).
The thickness of the shoulder pads can vary depending on fashion requirements and the structure of the shoulders. If the shoulders are very sloping, add an additional one or even several layers of padding polyester. If the shoulders are high and spicy, then the shoulder pads are made thinner, down to one layer, quilted with a border. If one shoulder is higher than the other, then the thickness of the shoulder pads should also be different so that the shoulders in the product are at the same level.
When making a product, the shoulder pads must be ready before the first fitting, since the product must be tried on with the shoulder pads that will be used in this product, otherwise you will not be able to find the correct fit, since it is determined by the shape of the shoulders.
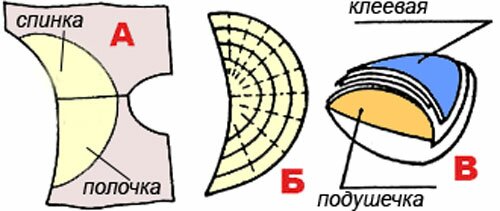
How to make a shoulder pad (raglan)

Raglan shoulder pads are cut to provide smooth transition from the shoulder line to the sleeve. This can be done by making shoulder pads on an elongated pattern ( oval shape) darts or by cutting them out of two parts and sewing along the shoulder line.
In cases where untested patterns are used for cutting expensive and easily damaged material (for example, leather), a preliminary mock-up of the model should be made. It is very convenient to use non-woven material for this purpose - not adhesive web or adhesive interlining. The details of the layout are connected with a machine basting stitch. They try on the layout, draw all the lines, but the cut will be changed. Next, the model is ripped apart and the main material is cut according to its details.
Making raglan shoulder pads.
In this case, it is more desirable to use non-adhesive web than, for example, old fabric. Because parts made of fabric, especially old, worn ones, will definitely be deformed during all the manipulations: joining, trying on, ripping. The cut based on these details may be incorrect.
Non-adhesive web (as well as non-adhesive interlining) retains its shape and does not stretch in certain directions, so parts from it can be used as patterns.


