How to use an electric sewing machine? Hand-held sewing machine Aliexpress Free Shipping Hot Sale Portable Hand-Held Sewing Machine Mini Clothes Fabric Portable Pocket PLFL - “I figured out how to sew with a hand-held sewing machine (photo of how to thread and
Description
Regardless of whether you like to sew, or this is your professional occupation, or you don’t like such a pastime at all - you simply must have a mini with you. sewing machine! Now you won’t have to take things to the tailor every now and then to have your trousers hemmed, for example, because with a manual sewing machine you can do it yourself! Even if this is your first time holding this device in your hands, in a couple of minutes you will be masterfully controlling it! Before use, you just need to stretch the thread, as in conventional sewing machines, then hold the device with one hand and hold the fabric with the other - perform the necessary operation (adjust pants, curtains, patch a hole, etc.). A manual sewing machine is very compact, and you can take it with you anywhere, and the quality of the work it does will not be inferior to a professional stationary machine!
You can do all this with a portable sewing machine:
1) hem trousers, skirt, shorts, etc.;
2) adjust the length of curtains and tulle without removing them from the curtain rods;
3) strengthen factory seams on clothes that are coming apart;
4) patch holes in clothes;
5) decorate the fabric with original embroidery;
6) and finally sew my own clothes!
The only thing you shouldn’t do when using a manual sewing machine is try to sew very thick fabrics (blankets, down jackets), because this is still a simplified version of a sewing machine. But it can handle thin and delicate fabrics – a mini sewing machine will carefully and carefully perform any operation on such material. One way or another, a manual sewing machine is a successful and necessary purchase for any home!
Characteristics of a manual sewing machine:
- Device weight: 350 g;
- Powered by 4 batteries (AA).
Handy stitch sewing machine equipment:
- Mini sewing machine;
- Threads + bobbins (3 pcs)
- Needles (2 pcs)
- Thread drawer;
- Mounting pulley.
Power supply is not included!
Handy stitch manual sewing machine: instructions for use
Note:
Always use the handwheel to move the needle. Never push or pull the needle directly with your hands to avoid damage to the inside of the device.
1.Correct way to hold the device
Hold the machine with your right hand while placing thumb on the switch on the top of the machine, use your other fingers to support the bottom.
2. How to work
First, raise the needle by turning the handwheel if the needle is not in the raised position.
2.1. Lift the fastening plate with the index finger of your right hand and place the fabric under it with your left hand.
Note: Once the mounting plate is lifted, the machine will automatically lock.
2.2. Hold the machine with your right hand and press the switch thumb right hand. The machine will feed the fabric to the left in the correct direction automatically. Use your left hand to hold the fabric and control the direction.
2.3. If you need a wide seam, pull the fabric to the left a little faster while you continue sewing. Keep the center line on the mounting plate to ensure a straight stitch.
3. End of seam
When you have finished sewing, raise the needle by turning the hand wheel if the needle is not in the raised position. Then use the blunt side of the scissors to pull out about 3 inches of thread and then cut it off.
3.1. Lift the fastening plate with the right finger of your right hand and move the fabric to the left.
3.2. Turn to the back of the fabric and thread a spare 3 inches of thread according to the following patterns to make a knot:
1. First pass the thread take-up through the last stitch.
2. Thread the thread take-up.
3. Pull out about 1 inch of thread.
4. Pull the thread through the resulting loop and tighten the knot to the end.
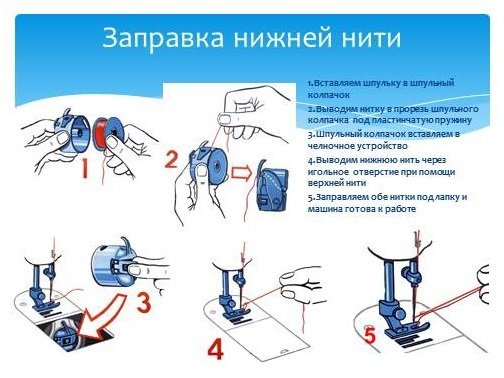
4. How to thread
Guide the thread according to the numbers 1-2-3 as shown in the figure.
Use a thread puller to pass the thread through the eye of the needle from the back to the front.
5. Adjustment of thread tension.
If the seam is too tight, turn the tension nut slightly to the left.
6. Installing the bobbin.
6.1. Loosen the nut and remove the bobbin.
6.2. Place the bobbin on the pin (a regular bobbin from a sewing machine can be used here)
6.3. Place the white cap on the pin to prevent the bobbin from flying off.
7. Replacing the needle
7.1. Loosen the screw with a screwdriver and remove the old needle.
7.2. #14 DHxl needles are recommended.
7.3. Adjust the direction and position of the needle.
Questions and answers
V.: If the machine does not sew...
A: 1. Please check whether the thread is correct.
2. The thread may be blocked in the loop, eye of the needle, or the thread may be tangled on the pin.
3. Check whether you have placed the fabric correctly (under the mounting plate).
4. Is the needle fixed in the correct position?
5. The thread may be too thick or too thin.
Q: If the stitches become too loose after a while...
A: Check if the thread may have jumped out of the tension regulating disks.
Q: If the thread breaks while sewing...
A: The thread may be blocked in the loop, the eye of the needle, or the thread may be tangled on the pin.
Q: If the stitches look normal from above, but do not connect on the back side...
A: Please refer to step 2 (2-3), the device should move from left to right.
Q: If the bobbin falls while sewing...
A: 1. Please check whether the white cap is on.
2. . Please check whether you have secured the bobbin and case tightly enough.
Q: If the device does not work after switching on...
A: 1. Please check whether the power is connected.
2. Please check whether the batteries are inserted correctly.
Q: If the device sews too slowly...
A: 1. Check if the battery charge is too low.
2. If you are using a bobbin large sizes, perhaps the cap pressed it too tightly.
3. If you sew on thick fabric, the machine will work slower.
Q: If the fabric cannot be pulled out after sewing is finished...
A: Perhaps the needle is still lowered into the fabric. Cut the thread and press start again.
Let's move on to the tension regulator, which is a small wheel with a set of numbers. Thanks to this device, you can control the tension of the thread during operation. If the tension is strong, the needle will deviate slightly to the side. If the tension is insufficient, the thread will gather and tangle on the reverse side of the fabric being processed.

Let's start looking for the needle holder screw that securely holds the needle during operation. Usually it is located under the sleeve of the machine.

Next you should find a foot that looks like small skis. Thanks to the foot, the fabric is securely attached to the machine and moves in a given direction. 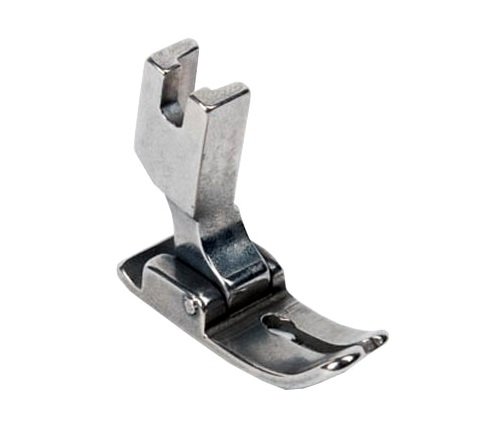 Using a special lever located behind or to the right of the needle, you can raise and lower the presser foot onto the fabric.
At the bottom of the sewing machine there is a small bobbin that feeds the second thread to the needle. You can find it under the metal plate under the needle. The bobbin is released using a lever or button. It is needed to thread the second thread.

So we figured out the simple structure of a sewing machine. Now you need to learn in detail how to properly use a sewing machine.
Setting up the sewing machine before starting work
The machine must be placed on a flat, stable surface so that the needle is on your left side. First, you'll need to check a few basic settings. No network connection required yet.
- Insert the needle into the machine: The flat side of the needle should face backwards and has a groove on the front to hold the thread while sewing. Insert the needle into the machine and tighten the special screw to hold it in place.
- Installing the coil. All machines use upper and lower thread. The threads in the spool must be placed on the upper spool seat, then the thread passes through the thread guide to the foot and is finally inserted into the needle. The lower thread must be placed inside the bobbin at the bottom of the machine: the thread is wound from the main spool using a thread take-up onto the bobbin. To wind the thread, you need to start the winding mechanism; when the process is completed, it will automatically turn off. The bobbin, ready for use, should be placed in the space under the needle, and the tip of the thread should be left outside.
- Connect the pedal and place it in a location convenient for you.
- Now you can turn on the device and try to make a few lines.
Learning to sew on a sewing machine
Before you start sewing on a new machine for the first time, you need to adjust the speed and learn how to start and stop the device.
- First you need to put the electric machine to idle.
- Try to move the device with lung help pressing the ballast pedal with your foot.
- Increase the sewing speed by pressing the pedal harder.
- If you remove your foot from the pedal, the machine will stop working.
It is best to repeat the above steps 2-3 more times.
Now you can start working directly.
- We prepare the fabric: fold it in half, stitch it on our hands, and then use chalk to draw various broken and curved lines.
- We put the machine in the workplace and refuel it.
- Sew the fabric along the marked lines.
If you succeeded, congratulations! Now you can try to sew something more serious.
In order for equipment to serve properly for many years, it needs to be looked after and used correctly. Here are the basic rules for caring for electric machine for sewing:
- The machine should be stored in a cool, dry place. Dampness spoils the mechanism.
- Hide the device from dust, which causes the oil to harden and run poorly.
- If the machine has not been used for a long time, it must be thoroughly cleaned of dust and dirt, and then the rubbing parts must be treated with oil.
- After a long period of “downtime”, you must definitely change the needle with a new one, as it may become rusty and begin to tear the thread.
Video instructions
Using the machine is easy if you follow the instructions and our recommendations. To more accurately understand the threading process, watch the video instructions.
What you will learn from the video:
- Removing the bobbin case from under the bottom panel of the machine for threading.
- Winding thread onto a bobbin.
- Installing the bobbin into the bobbin case.
- Installing the bobbin case into the bottom of the sewing machine.
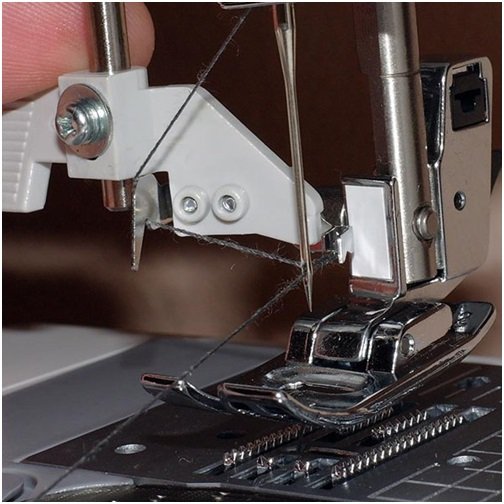
- Threading the upper thread through the first thread guide, thread tensioner, second thread guide to the needle.
- Pulling out the lower thread and preparing for work.
The old mechanical sewing machine broke down, and I wanted to replace it with a new, electric one from China. And without knowing it, I took “the one from the TV store on the sofa” for review.
Read the review to see what came of it.
At first I wanted to take the most sophisticated one with 7 types of stitches, but the manager replied that it was not available and offered the simplest one. Following the proverb “from a thin sheep there is at least a tuft of wool” - he agreed.
I bragged to my brother about my upcoming purchase, and then for the first time I heard about an advertisement for a car from the Telemagazine. This sounded quite alarming to me.
Sent quite quickly. After 20 days I received the parcel by Dutch post.
The box is quite ordinary. A little wrinkled on the way.
Dimensions 23x21x13.5 cm. 

The kit includes: a spare needle, a needle threader, two empty bobbins and two with thread - black and white. 
The machine also comes with extensive instructions in English. 


It is possible to control it using a foot pedal.
The pedal itself is quite small, length 88 mm, width 57 mm.
The cable length is 150 cm, the plug is very similar to an ordinary 3.5 mm minijack.

Powered by either four AA batteries or mains power.
Power adapter with European plug.
Cable length 110 cm.

Declared characteristics.

Both adapters are connected to the corresponding ports on the rear of the machine.

The photo above immediately shows my first disappointment. We take the cars out of the box and it’s immediately clear that they are cheap. Flimsy plastic. Gaps between parts, etc.
The length of the machine is approximately 19 cm, the height is also 19 cm. It weighs only 640 g without batteries.


Width 97 mm.


At the bottom there is a compartment for batteries.


Now let's get acquainted with the controls of the machine.
Power button.

To the left of it is the operating speed switch, Low-High, respectively.

The flywheel is located on top of the rear part.

In the middle there is a peg for winding thread onto a bobbin.
The pin is put on the pin, and the reel is put on this retractable rod.


Then, having thrown the thread through your finger or pencil, you need to run the machine idle and you can wind the thread.
There is a bobbin holder on the front.

From it the thread goes to the upper thread tension regulator.

On the back of the machine there is a lever for lifting the presser foot. Made of plastic and quite thin, there are serious doubts about its reliability.

On top of the front of the machine there is a small light bulb.

And also a small blade for cutting thread.

The hole in the needle plate is small, oval in shape.

The bottom bobbin is hidden under the semi-transparent cover.

It is held in the recess by a weak magnet.

I was unable to disassemble the machine, since the screws are located at the bottom of deep “wells” and I needed a long screwdriver.
After receiving and inspecting the machine, I decided to read the instructions, but I didn’t want to translate it from English.
I started searching for information on the Internet.
I couldn't find any instructions in Russian. But I discovered that this machine is sold under many different names - Tailor, Sinbo, Irit, Fanghua FHSM-203, etc. And almost all reviews from users were negative.
Then I went to Youtube in search of instructions. The program “Smashing a sewing machine from a TV store - Advice from Everything will be good - Issue 407” left no stone unturned in hopes for high-quality sewing. And the last nail in the coffin is the video “ROSTOV. The whole truth about Mini Sewing Machines” from a repairman for these products.
The information that everything inside is plastic and cannot be repaired was frankly not encouraging.
But still, the opinion of strangers is one thing, and your own is another.
Let's check the machine in action.
I don’t see the point of inserting batteries inside, so I connected it to the network. Used to control the pedal. It’s quite normal, but it’s too small – I literally had to press with my big toe.
The backlight is not very good.

Let's start with a simple thin fabric. I found an old sleeve from a cotton shirt.

Looks good. Only the seam pulls the fabric, you need to adjust the thread tension.
Face.

Reverse

Stitched fine.

I tried stitching the cuff. The machine stopped and the thread flew out of the needle.
Now a piece of knitted T-shirt. Look at the lighting at the same time.

WITH front side just a loose seam. Please note that the fabric does not stretch.

But the reverse is a complete failure.


It is necessary to adjust the tension of the lower thread, but the device does not have such an option. Absent.
And finally - a control shot. Two layers of thick denim.

The front seam is small and looks good.

But on the reverse side the thread is simply straight, it cannot even be called a seam.

Thus, the machine can sew, but it needs adjustment, and this is not possible. Thin fabric pulls. When sewing on thick fabric, there are problems with the bottom thread, and sometimes the machine just stops and cannot sew.
As they called it in the program - a machine for handkerchiefs.
It could be recommended for very undemanding users, if not for the price. For this money, the machine will not be suitable either for handkerchiefs or for pampering a child.
Once again, goods from TV stores have shown their unsuitability for use. Avoid them.
That's all.
Thank you for your attention.
Update. It turned out that my top pin and thread were installed the other way around.
I turned it over and tried to adjust the thread tension. It only got worse. Now the thread keeps flying out of the needle. The machine doesn't sew.
The product was provided for writing a review by the store. The review was published in accordance with clause 18 of the Site Rules.
I'm planning to buy +9 Add to favorites I liked the review +67 +99Complete set of mini sewing machine - mini stitcher.
Mini sewing machine.
4 bobbins with thread.
2 spare needles.
Device for winding bobbins.
Opening the box, we see that the machine is carefully packed, the plastic packaging protects it from moisture, which means the machine will not rust, the instructions are in Russian, the text is well translated, the text is clear, there are explanatory drawings, which means it won’t be difficult to figure out how to thread the thread.
Length about 25cm.
Height - about 7cm.
Width about 4cm.
This machine is ideal for long journeys, in the country or in household, it is so simple and unpretentious. With it you can hem trousers, sew on a patch, shorten curtains, sew a bedspread, make an embroidery design on fabric and much more.
Minimum sizes - maximum results! The mini stitcher runs on both batteries and mains power.
The machine readily sewed fabrics; among the main advantages, I would like to note the very small lower part of the machine, thanks to which you can sew things that cannot be sewn on a regular sewing machine, cuffs, thin sleeves, etc.
The mini stitcher will be a great helper at home and in the country; you can easily take it with you by putting it in a woman’s handbag.
The mini sewing machine is perfect for mending clothes of various difficulty levels without leaving home! Contents: sewing machine, adapter, foot pedal, four bobbins, needle, threader, instructions for use.
On the top of the mini stitcher body is a power button or sewing button. The button does not have a lock, which is generally convenient, since you won’t have to sew too long lines on such a sewing machine; other models of machines are better suited for this. The button can be locked from accidental pressing, which prevents accidental pressing of the button during transportation, which means the batteries will not accidentally run out.
On the left is the scroll wheel of the sewing machine, you can use it to raise the needle for threading thread or fabric, as well as a connector for connecting an external power supply, I remind you that the kit does not include a power supply.
Instructions for use mini sewing machine manual mini stitcher.
Dear visitors of our website, this page is dedicated to - Instructions for use of a mini manual sewing machine mini stitcher. Read also related articles:
Instructions for use mini sewing machine manual mini stitcher
Dear visitors to our website, this page is dedicated to - Instructions for use of the mini manual sewing machine and mini stitcher. Read also related articles:
Operating instructions for the mini sewing machine FHSM-203 (pdf, 3.7 MB) The mini sewing machine has two speed modes, the ability to choose a control method: manual or using a foot pedal. A manual sewing machine will replace your thread and needle when you need decorative finishing with a chain stitch. A portable manual machine does not require qualifications or special skills; you just need to carefully read the instructions.
There was no need to thread the thread, since the factory took care of this, as well as a small test piece of fabric, on which I found about 1 centimeter of stitching, which was done at the factory for testing.
I insert 4 AA 1.5 V batteries (standard AA batteries, the most common). The first preparations have been completed, now let's talk a little about the main controls.
The connector indicates the characteristics of the power supply: 6V and 800 MA - this means that almost any universal power supply is suitable; for the test I used the Robiton universal power supply 1.5 - 12 Volt; practice has shown that universal power supplies from 300 work perfectly with the mini sticher up to 1000 MA - 6 V, that is, almost all universal power supplies.
The battery compartment is located at the bottom of the ministitcher, there are polarity indicators, and lastly, the needles used are standard, and even if you use all 3 needles that come with the mini sewing machine, you should not have any problems buying new ones.
The mini sticker fits easily in the palm of your hand and, despite its small size, fits perfectly in the hand; the machine controls are in the right places and do not cause any inconvenience.
Now let's move on directly to using the sewing machine - I press the start button and the machine willingly sews a test piece of fabric, at the bottom, under the presser foot, there are teeth feeding the fabric, pushing the fabric forward, but when sewing it is advisable to set the direction of the stitch yourself, the engine power is easily enough to sew duvet covers and pillowcases , trousers and cuffs.
The user must study the basic principles of operation of a sewing machine before mastering the basics of tailoring. Depending on the type and features of the device, some details of use may differ. A manual sewing machine is a machine that has been around for many years, but not everyone knows how to use it correctly.
Preparing a sewing machine for work consists of several stages:
- study the instructions for the device;
- needle installation;
- threading;
- selecting the desired sewing mode.
Even in the process of choosing a suitable device, it is worth asking whether there are instructions for the sewing machine model you like in Russian. The presence of such a document in the kit is especially important for those who have never dealt with such devices. This also applies to purchasing a used car through message boards. As a last resort, before purchasing, you should take care to search for instructions on the Internet.
Of course, if you purchase a model of an old-style manual sewing machine, for example, “ Podolsk" or "Singer"", it is unlikely that you will be able to get original rules of use for it. Sometimes this is not required, since such devices are easy to set up and operate. It is easy to refill and maintain. Such devices are reliable, which is why they are still valued. Another advantage of old hand sewing machines is Possibility of sewing thick fabrics- this is beyond the capabilities of most modern household models.
Needle installation
Only after studying the safety rules when working on sewing machine, you can start using it directly. The first thing to do is to install the needle correctly. This applies to all models, be it manual or foot operated.
The thickness of the needle is selected depending on the material that will be used for sewing. It is best to purchase a set of needles along with the sewing machine - this will allow you to work with fabrics different types and thickness.

Sometimes such sets provide comments on needle numbers and what fabrics they are suitable for.
To install the needle, you must perform the following steps.
- Put needle holder to the highest position by turning the flywheel.
- The sewing machine needle has a special structure, after studying which you can easily install it correctly. The flat side of the flask is inserted outward, and the long groove is inserted inward (to the base of the sleeve).
- The needle is inserted all the way into the holder provided for it and secured with a screw.
Correct needle placement is very important. Otherwise, loops will not be created during operation, which will lead to omissions.
How to thread a sewing machine
Refilling modern devices is easy: as a rule, all steps are shown in the instructions. schematic drawings. The body of modern devices has digital markings or arrows to help with threading. But if the document and drawings are missing, then you will have to cope on your own.

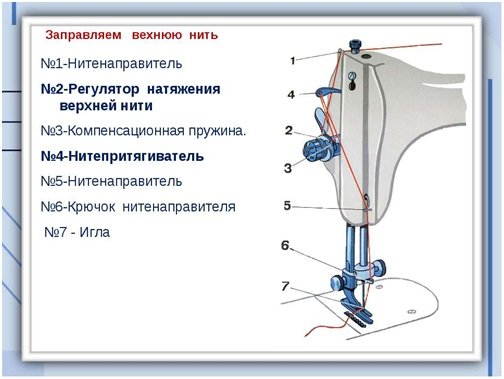
Upper threading instructions
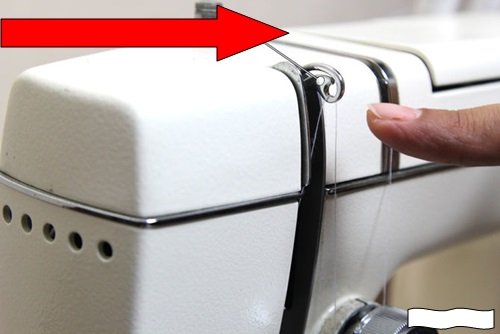
You should always start from the top. Having grabbed the end of the thread, it is threaded through a small window on the back panel of the device, taken to the tension regulator, threaded through the corresponding loops and brought out onto the needle.
If threading is incorrect, there is a risk of thread chafing during sewing or malfunction of the unit.
Also carried out in accordance with certain rules. Regardless of the type and model, threading the hook (installing the bobbin) is done in such a way that the thread comes out clockwise. When threading, you should pay special attention to the thickness of the thread (its number) - it should be the same. The rules for operating a sewing machine require that you wind the thread onto the bobbin from the same spool that will be installed for the upper thread.

Instructions for threading the bobbin thread
How to thread a sewing machine
To pull out the bobbin thread:
- take the end of the upper thread (without pulling it), which is already inserted into the needle;
- lower the needle into the needle plate using the handwheel;
- the needle will grab the shuttle thread, all that remains is to pull it out.
Mode selection
Before work, you should study the location of the mode switches, thread tension, and reverse. Modern models provide a graphic representation of the types of stitches on the body of the device (straight stitch, zigzag, overcasting, etc.); on older machines, the choice of stitches is not so large. For reverse(to secure the thread at the end of work) all models provide a small lever.
After all the preparatory measures, the material is placed under the foot, which is then lowered onto it, and you can start sewing directly.
Mini sewing machines
The modern market for sewing equipment is quite diverse. Today, manufacturers produce miniature manual sewing machines that fit in the hand. Their main advantages:
- compact dimensions;
- absence of complex threading mechanisms;
- ease of operation;
- stitch length can be adjusted.

The features and rules for using a compact manual sewing machine are very simple. Simply insert one thread, select the stitch length, and you can start sewing right away. They can be easily take with you on the road. They are suitable for making urgent clothing repairs or adjusting the length of curtains without removing them from the curtain.
General rules for operating manual sewing machines
Operating a manual sewing machine must be carried out in strict compliance with safety regulations.
- It is permissible to rotate the flywheel in only one direction - on yourself. Rotating in the opposite direction will cause the bobbin thread to become tangled.
- When the machine is not being used, the clamping foot must be in the raised position.
- You cannot operate a machine without fabric. This will cause the lower teeth of the foot to become dull.
- During operation, tensioning of the material is not allowed; you only need to adjust its direction. The machine does all the movement itself.
- During work shuttle cover on the body must be closed.
- While working, do not bring your fingers close to the needle or try to adjust the thread of a working device.
- Do not sew on pins holding the thread together - this will cause the needle to break.
Learning how to operate a sewing machine is not difficult. The main thing is to act according to the instructions and strictly follow safety precautions.


