What is the best way to glue dry leaves? Crafts from leaves: new photo ideas, tips, instructions. Beautiful appliques from maple leaves
We make applications from leaves. I draw part of the image, and the Chief Reader glues the leaves onto a glue stick. This is how a hedgehog gets needles
And the butterfly has wings 
It can also be the other way around. First, the Chief Reader glues the leaves, and then I finish drawing the details 
Stamping rowan berries with red gouache 
We make rowan beads for grandma. I am not attaching a photo with a needle, because... the item is not safe, although it can be controlled quite well under supervision 
Let's "print" the leaves. To do this, we place them under thin paper and shade them flat with wax chalk. I glue the sheet to the table with tape so that it does not move and the outline is not smudged 
Get super-fast postcards 
We leave white traces of leaves. We glue the leaves to the paper with double-sided tape, go to the bathroom and spray everything with paint using a toothbrush. Then we wash and peel off the leaves 
We make plasticine applications: rain, birds and fly agaric dots 
needles for a hedgehog 
leaf fall 
rowan 
We feed the birds with grains, store nuts for the squirrel for the winter, hang a harvest on the apple tree 
We make strips on the birch tree, identifying the birch trunk by the leaves 
Let's draw a tree. We blow ink out of a tube - we get a barrel, we stamp leaves with a cotton swab 
The first tree is with me, the second is entirely of the Main Reader 
After each craft, we usually paint with our fingers on an arbitrary topic. 
We paint the picture “The Rain is Crying” on a wet sheet of watercolors. It is better to moisten the sheet under a tap or a soft sponge, write at an angle, and use a flat and wide brush 
Another option for rain is in the night sky. Painting the sheet different colors If you painted it with paint, wait until it dries. We rub it with paraffin (any candle will do) and cover it with mascara (the Chief Reader simply adores this part). Drying 
We take a wooden stick and scratch out the rain. I just can’t tear my Reader away from this activity) 
Coloring the leaves 
At the same time we repeat warm and cold colors - a bouquet for Autumn and Winter 
We are collecting a herbarium. For the children's herbarium, we use a photo album with film, and it’s quick, and the exposure is changeable, and tree cards can be matched to leaves/fruits 
Making a crown for the autumn princess. We glue the leaves with tape 
We plant chestnut mushrooms (dad cut them out) in a plasticine clearing 
We make cards for friends. Glue the leaves onto the paper with a glue stick, glue a stencil of a maple leaf on top, and you're done! 
Stencils can be anything, for example, oak 
or just an oval frame (here combined with a fragment of the painting “the rain is crying”) 
We seal the outline of the tree with autumn natural materials. We have acorn caps with plasticine inside and crumbs of dry leaves for glue, but anything will do - seeds, rowan, snubs 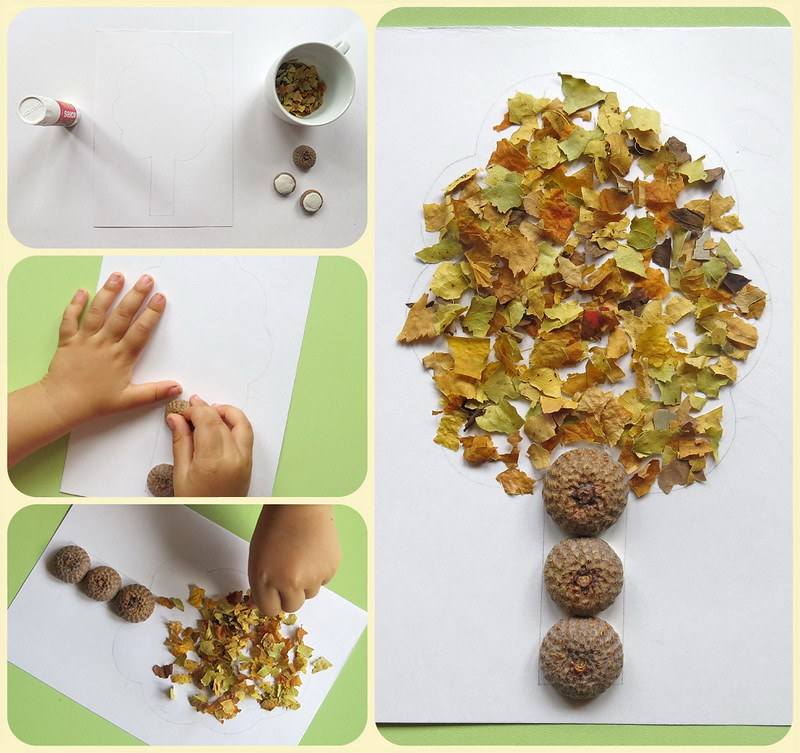
Making apple stamps. From the chaos on a huge sheet, you can then selectively cut small, cute cards 
Making autumn stained glass. We glue the leaves onto the glass with double-sided tape; before this we lined the glass on the door with black stained glass paint 
Drawing "paper batik". We make an autumn pattern on paper with hot wax, and then let the child paint the sheet. The pattern appears 
Cut from leaves autumn garlands. Main Reader so far only cuts out circles and fringe, the rest is mine) 
Making leaf prints. We paint the leaves from the side of the veins (with fingers or a brush), and print them on paper 
One sheet can be printed several times 
And of course we read
1. Small or medium-sized leaves are more suitable for crafts. As well as all kinds of berries (for example, rowan), dried flowers, seeds and herbs, spices that any housewife has in her kitchen (peppercorns, allspice and cloves). To highlight the details of the application and its background, you can use pencils, felt-tip pens and paints.
2. Before you do leaf applique, prepare materials for crafts. Leaves collected from a forest or park must be thoroughly dried. To do this, simply iron them with a warm iron, having previously lined them with paper on both sides. After this, remove the top layer of paper and let the leaves dry completely.
True, this method of preparing leaves is not suitable if you are making an application with a small child. Still, such fragile material as dry leaves is more suitable for older children. The little ones will literally crumble the leaves in their hands. In this case, it is better to make the application from undried leaves, and then dry the finished composition.
3. Before gluing the leaves onto cardboard or a sheet of paper, make a barely noticeable pencil sketch of the future application on it. This way, the child will better imagine the future composition and more carefully glue the appliqué details to the paper.
4. As for glue, ordinary stationery glue will do, which needs to be applied to the piece of paper in a very thin layer or dripped with liquid glue in several places on the piece of paper.
5. You can start making the simplest applications with a one and a half year old baby, gradually complicating the plot.
How to make an applique from leaves
1. Outline with a simple pencil location of the future application.
2. Take the prepared leaves. They must be taken with caution. Teach your baby to do this using tweezers or one finger dipped in water.
3. Now you need to glue the leaves to the cardboard. If the leaves are not too dry, then apply glue directly to them, and if they are dried, then cover the surface of the cardboard with glue.
4. After the application is completely ready, cover it with a napkin and place it under a load (for example, under a stack of books) for a day.
Leaf applications: ideas
For kids
Simple stories are suitable for the little ones. Ask your child to use leaves to build everything he saw during his walk, for example, trees. Help him glue small leaves (birch or aspen) to a landscape sheet or cardboard, and draw the branches and trunk with paints or felt-tip pens.
Children 3-4 years old
For older children, you can complicate the task - think about what or who this or that leaf looks like. You can not only make some kind of animal or bird, but also create a whole plot, for example, a bird sitting on a branch or a cute hedgehog with mushrooms on its back.
For preschoolers
With preschoolers you can make up leaf appliques several trees at once (aspen, birch, maple, rowan). These can be simple compositions of one figure, or more complex ones, consisting of several figures. From colorful leaves you can make beautiful postcard, and a bookmark or something else useful.
Create beautiful appliqués with your child - you can later turn them into a whole art gallery.
Useful tips
In autumn, nature provides a huge selection of materials from which you can make various crafts, paintings and applications.
In this article you will learn how beautifully you can make flowers from leaves, a vase from yellow autumn leaves, as well as many other crafts, including crafts you can do with your kids.
On our website you will also find:
- Beautiful and simple applications for those who love autumn
- Beautiful DIY crafts made from natural materials
Crafts from autumn leaves: bowl

You will need:
Colorful leaves
PVA glue
Sponge or sponge brush
Scissors.

1. Inflate the balloon.
2. Mix water and PVA glue in a 1:1 ratio.
3. Use a sponge to apply PVA glue to the ball.

4. Carefully begin gluing the leaves to the ball one by one.
* Trim if necessaryscissorsleaves or twigs attached to them.
5. Apply glue over the glued leaves to secure them in place.

6. Continue gluing leaves until the entire bottom half of the balloon is covered.
*You may need to glue more leaves to the bottom of the ball to ensure the bottom of the future vase is strong.

7. Leave to dry for 24 hours, after which you can pop the balloon and you're done!
Table decoration made from maple leaves

You will need:
Multi-colored leaves (if you use artificial ones, the decoration will last a long time)
Strong thread or fishing line
Scissors
Superglue or hot glue
Baking paper
Masking tape
Centimeter.
1. Using a centimeter, measure the distance between the chandelier and the table so that you know how long to cut the thread and baking paper.
2. Cut the paper to the desired length.


3. Cut the thread, the length of which should be 15-20 cm longer than the baking paper.
4. Using masking tape, secure the thread at the top and bottom of the paper, leaving 15-20 cm hanging from one end of the paper. You will use this end of the thread to tie the craft to the chandelier above the table.


5. Starting with the top piece of masking tape, begin laying out the leaves (face down and from largest to smallest), leaving a few centimeters (5-7cm) between them. Continue adding leaves all the way to the bottom.
6. Once you have everything laid out and are happy with how the piece looks, use glue to glue the leaves to the string.
7. Make several of these strips with leaves and tie them to the chandelier above the table.
Roses from autumn leaves

You will need:
10 leaves of different sizes (for one flower)
Short branches
Scissors
Duct tape or floral tape.

1. Take a small leaf, place it face down and bend the ends. After this, start rolling the leaf on one side to create a bud.


2. Take the second sheet, turn it face down and fold the top end towards the center.
3. Place the first leaf in the center of the second leaf, fold the outer ends of the second leaf and wrap both ends around the first bud.


4. Continue adding leaves, getting larger and larger leaves.
5. Once you've added all the leaves (or not all of them, but you've got the flower to the desired size), hold the bottom of the flower and begin wrapping it with duct tape while securing the flower around the branch. Trim off any excess parts.


6. Make several similar flowers for a bouquet.

Bouquet of roses from leaves (photo instructions)

Bouquet of roses from leaves (video)
DIY Leaf Crafts for Kids: Turkey

You will need:
Cardboard (for 5-6 circles)
Stapler
Scissors
Leaves (about 20 pieces)
Toy (plastic) eyes.

1. Cut out 5-6 circles of different sizes from cardboard. You can use cups, saucers, plates and other small round objects as auxiliary tools.
2. Remove stems from leaves. Leave two leaves with stems, because... these stems will act as turkey legs.
3. Glue each piece of paper to its own cardboard circle.
4. Stack the circles one on top of the other. They can be attached with glue or a stapler. If you use a stapler, it is better to attach each circle separately to the adjacent circle.
5. Glue a large brown leaf to the back of the large circle.
*If necessaryscissorstrimextra parts.
6. Take one loose sheet and cut out a small triangle from it - this will be the turkey's beak. Glue it to the center of the first leaf.
7. All you have to do is glue on the eyes and the turkey is ready!
Children's crafts from leaves (photo)
Here are a few interesting examples How to make beautiful children's crafts from simple leaves:
Applications from autumn leaves: animals


Leaf Crafts for Kids: Alphabet
You can make an alphabet from autumn leaves.


Crafts from dry leaves: paintings
Very beautiful paintings can be made from fallen leaves. These paintings can decorate any interior.

Autumn compositions from leaves
Being in the forest you can do it on the ground beautiful patterns from leaves and photograph them as a souvenir.

Crafts from maple leaves: large autumn leaf

You will need:
Plywood or thick cardboard
Simple pencil
Lots of leaves
PVA glue
Sponge or sponge brush
1. On a large piece of plywood or cardboard, draw a large maple leaf with a pencil.

2. Find fallen leaves in a park or forest and dry them on baking paper.
3. Lay out the leaves in a pattern on the plywood, take a brush and PVA glue, apply glue to all the leaves and leave to dry.

After the glue dries, all the leaves will harden. You can trim off excess parts if necessary.

4. Glue the leaf blank to plywood or cardboard. For better adhesion, use superglue.
5. Use a straight branch as the trunk of your large leaf. It can also be glued with superglue.

Ready!
DIY crafts from autumn leaves: mask

You will need:
Leaves of different sizes
Cardboard (from under a box of cereal, for example)
Scissors
Hot glue or PVA glue.
1. Draw on cardboard simple form mask and cut it out.
2. Check where on the mask you need to make holes for the eyes.

3. Make holes for the eyes and insert an elastic band into the sides of the mask so that the mask can be put on.
4. Using PVA glue or hot glue, begin gluing the leaves to the cardboard mask, starting from the outside and working towards the center.

Bouquet of flowers from leaves

You will need:
Autumn leaves of different colors (30-35 pieces)
Floral wire
Green adhesive tape (scotch tape) or floral tape
Scissors.

1. Place your leaves on a flat surface in order, from small to large. Clean them from dust and dry them.
2. Use scissors to cut off the leaf stems.

3. Take the wire and cut it into small pieces, about 10 cm long. Each piece will be used for a separate sheet.

4. Take floral tape or regular adhesive tape (scotch tape) and cut or tear off several 5 cm pieces.

5. Take the second largest sheet and wire make a hole in it 0.5 cm from the edge. After this, bend the wire and twist it. This must be done carefully so as not to tear the sheet.
Back view:

6. Use duct tape to wrap the wire. You need to attach the tape to the edge of the leaf and begin to carefully wrap the wire.


7. To attach the wire to the smallest sheet, you need to twist it and only then insert the lower part of the wire into it.

Make a stem out of wire to form the core of the flower.

Wrap the wire with duct tape.

The core and petals are ready and can be connected.
8. Wrap the second leaf around the core and add a second leaf, a third, etc.


Autumn, fallen leaves crunch underfoot... What a pity for this yellow-red fading beauty, crumbling and trampled into the mud. Here is a birch leaf - gently yellow, jagged, here is an alder leaf - ribbed, and here is a mountain ash - a family of long leaves on a thin stalk. Let's take them home and make beautiful autumn crafts and appliques. We will also need a piece of colored cardboard for the background and glue to glue the leaves.
How to make an applique of autumn leaves
Autumn leaves dried outside are not even and quite fragile, so first we’ll dry the leaves ourselves. We find freshly fallen, bright and beautiful, undamaged leaves, and put them between the sheets of some thick book. We put the book under a press (under something heavy). In a week or even earlier, the smooth autumn leaves for applique are ready; they can be easily glued to paper or cardboard with PVA glue.
Sequence of actions
A true artist sees living images in nature, so we can dream up our imaginations. Let’s lay out all our collected and dried wealth in front of us and see what it’s like. Take suitable leaves and place them on cardboard until you get a picture. You don't need to glue it yet, just lay it out first until you're happy with everything.
When the picture is perfect, you can glue it. We take one leaf at a time, remembering where it was, smear it on the back side, and glue it in place. If the application is multi-layered, first glue the lower leaves, then the top layer. The craft is ready! You can admire it!
But what if applique ideas just don’t come to mind, and the leaves only look like leaves, and not at all like bunnies and chanterelles? Then take advantage of our ideas.
Leaf craft ideas
Applications with animals
Owl made of leaves:


Red cat


Bird with chicks:


And even an eagle:

Landscapes of leaves
For a landscape, the background can be painted with watercolors.


Still lifes

Portraits


The finished application (if it is not voluminous) can be placed under a press so that after drying it remains flat. Store in a dry place, perhaps in a frame under glass.
People often wonder what is the best way to glue tree leaves onto paper. For this purpose, different compositions are used. Silicate glue, PVA, transparent or hot substance are highly effective. It is also permissible to use a glue stick or make a natural composition based on starch. To achieve good results, you should think through all the details of the craft in advance.
It is possible to glue tree leaves onto paper using different compositions. To achieve good results in this, you need to choose the right substance.
Starch paste
This substance is well suited for leaf applications. The adhesive composition is considered completely safe. It is allowed to be used by allergy sufferers. The substance has excellent adhesive characteristics and helps attach foliage to paper and cardboard.
The paste can be applied with a sponge or brush. To get rid of smudges, use a dry sponge or napkin. As the substance dries, it acquires a transparent consistency.
PVA glue for applications
This is a popular composition that can be used by children and adults. Using PVA you can create interesting compositions on paper, textiles or cardboard. After drying, the substance does not leave stains and does not acquire a yellow tint.
The substance can be thick or liquid.
Transparent glue for decoupage
This substance combines the properties of glue and varnish. It can be used for making volumetric crafts– vases, lamps and other items. After the substance dries, a protective layer appears on the craft. The composition fixes foliage well on glass or wood.
Hot glue
This product is used for large autumn crafts. It creates a certain danger during operation. Glue gun heats up to high temperatures and may cause burns. At the same time, it allows you to fix foliage on different materials. After hardening, the substance acquires a white-transparent tint. That’s why they hide it inside the structure.
Superglue
This substance is often used by adult craftsmen. However, it poses a danger to children. The product has a strong odor and causes allergies. If used carelessly, there is a risk of sticking your fingers. The composition dries quickly and sets easily.
Silicate
This substance has many advantages. It helps securely fix parts and is economical. The substance dries quickly and can be easily washed off with water. When choosing silicate glue, you should consider its consistency. The high-quality composition has a transparent texture and does not contain lumps or clots.
Glue stick
The most popular and affordable composition is considered to be glue in the form of a pencil. It is easy to use due to its compact capacity. The substance is characterized by a dense consistency, so it is used very sparingly. With the help of the product it is possible to glue paper and cardboard, as well as textiles.
How to prepare source material
Crafts can be made from fresh or dried leaves. To preserve the material for a long time, you can use different methods drying:
- Material can be inserted between the pages of books. It is recommended to lay it on each side with a paper napkin.
- An iron will help dry the material quickly. It should be borne in mind that leaves can stain the surface. Therefore, it is better to iron them on paper.
Performing skeletonization
An interesting technique is skeletonization. It is characterized by certain features.
What you will need
To achieve good results in this, it is important to prepare everything you need.
Fresh leaves
First of all, you should prepare fresh foliage. The material is chosen depending on your preferences.
Soda
This substance is used to prepare a solution.
Egg dye
Small capacity
To prepare the coloring solution, you will need a container of a suitable size.
Toothbrush
Paper napkins
By using paper napkins it is possible to remove excess moisture from the surface of the leaves.
How to perform the procedure
- Pour 1 tablespoon of soda into the pan and pour in 4 tablespoons of water.
- Mix thoroughly and place the leaves in a container.
- Boil for half an hour over low heat.
- Place the foliage with the glossy side up and blot with a napkin.
- Clean the pulp with a toothbrush.
- Make a dye solution.
- Dip the leaves into the liquid.
- Remove and dry the material.
Craft options
Today there are many options for crafts that have excellent decorative properties.
Topiary
Maple leaves are perfect for making topiary. To do this, it is recommended to fix a stick in the pot. This is done using gypsum mortar. Attach spherical foam rubber and stick leaves into it. Berries, beads, and ribbons are suitable as decoration. A hot glycerin solution will help make the leaves stronger.
Bouquet
For making beautiful bouquet It is worth bending the maple leaves in half and rolling them into a tight tube. Then make a rosebud out of it and secure its base with thick threads. Make the required number of roses and attach them to tree sticks.
Decorative autumn wreath
Bright fall leaves can be used to make a beautiful wreath. For this you will need flexible branches, dried foliage of various shades, and red berries.
It is worth making a frame from the branches and securely fixing it with threads. Glue leaves and berries to the branches.
It is permissible to use physalis or birds as decoration.
Vase of leaves
First you need to inflate the balloon and lubricate it with Vaseline. Fix the product motionless and glue the maple leaves. To make a vase durable, you should use several layers of material. Finally, coat the product with glue and leave to dry for 3 days. Pop the ball and get rid of the rest.
Photo frame
To begin with, you should cut out a frame from cardboard and leave a place in the center for the photo. Soak the leaves in hot water and glue them in the frame. Wait until it dries and insert the photo into the center. It can be secured with tape.
Applications from autumn leaves
To make a beautiful applique, you should use foliage of different sizes and shapes. A whole series of paintings looks interesting.
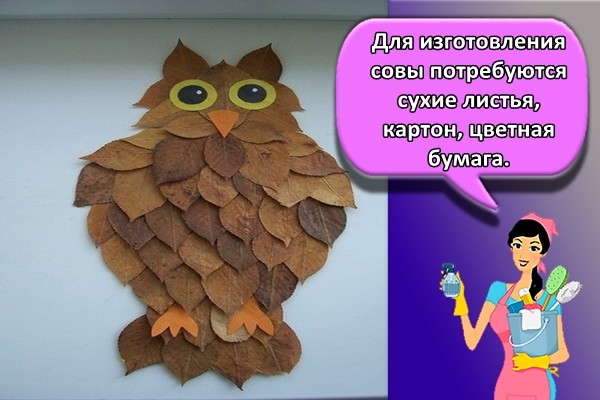
Owl
To make an owl you will need dry leaves, cardboard, colored paper. First you need to cut out a bird from cardboard. Then glue the leaves that will represent the ears and paws. Willow leaves are suitable for feathers. The eyes and beak should be cut out of colored paper.
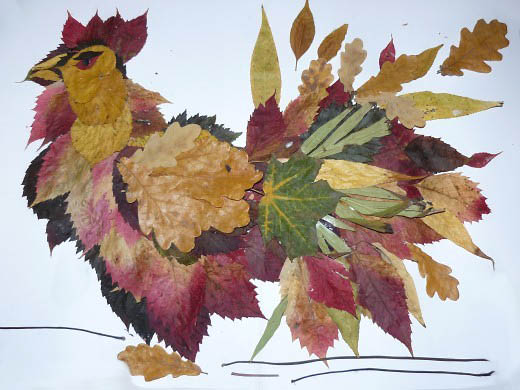
Firebird
To begin with, you should glue a linden leaf - it will represent the body. The head should be made from a birch leaf. To get a beautiful tail, you should glue rosehip leaves. Pumpkin seeds are used to make eyes and body decorations. A thuja branch is suitable for a tuft.
Lion
To begin with, you should draw the head of a lion on yellow paper. To make a mane, you should stick on linden leaves. Then draw the nose and glue the chestnut. Pine needles are used for the mustache, and ash seed is used for the tongue.
Fish
To begin with, you should put an image of a fish on blue paper and cut it out. Make scales from linden leaves and glue them to the body. Decorate the tail with brown quince leaves. Caps of acorns will help make the outline of the head.
Alphabet
For children who are just starting to learn letters, you can make an alphabet from autumn leaves. This will help your baby remember the alphabet faster.
Stained glass
To begin, cut off the required amount of self-adhesive tape and place it with the sticky side up. Then place the hoop and leaves. Place another piece of film on top, press and smooth. Insert the outer part of the hoop and tighten it. Get rid of excess film.
To hang the product on the wall, use twine.
Garland
To begin with, the leaves should be cleaned and dried, removing the cuttings. Place wax paper on the table and secure the ends of the fishing line with masking tape. Lay out the foliage and glue it to the fishing line. Once dry, the tape can be removed.
Ikebana
First you need to dry the aspen leaves. To create a blank, you need to inflate a ball, lubricate it with an aqueous solution of PVA and wrap it with thread. Then the ball should be deflated and pulled out. After this, make roses from aspen leaves and attach them to a ball of thread. Use rowan and dried flowers as decoration.
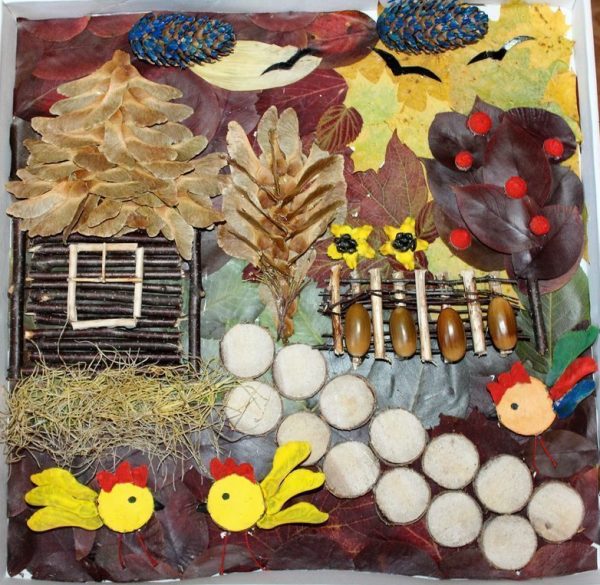
Panel
This composition will require autumn leaves. It's also worth taking a board, marker and glue. The foliage should be dried. Draw a maple leaf on the board and lay it out using dried material.
Collage
To do this, you should chop up the foliage, apply a tree trunk to the cardboard and paint it. Then treat the trunk and branches with glue and sprinkle with leaf crumbs.
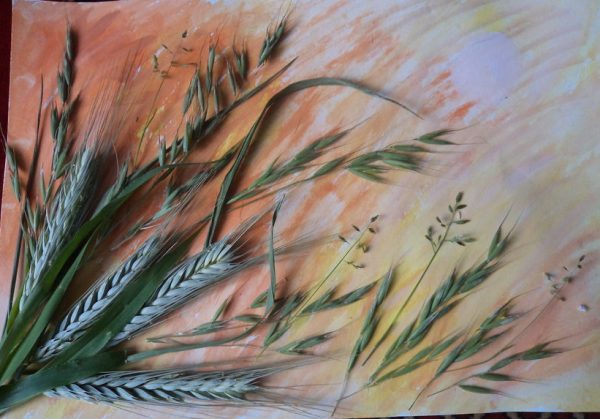
Landscapes
To create an interesting landscape, you can take cardboard and make a picture using dry foliage. The background can be painted with watercolors.
Interesting ideas and examples of work
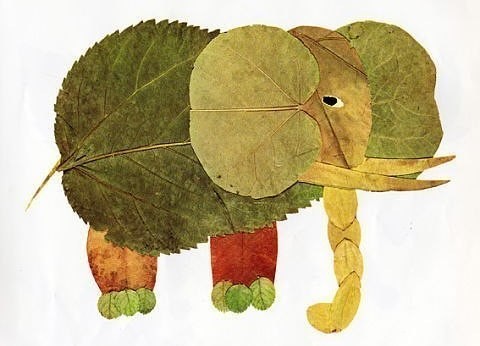
Interesting solutions include creating a rooster or a peacock. This material can also be used to create vases with flowers, trees, and fruit baskets. Different animals look interesting - donkey, elephant, fox.
A simple option for kids would be to make an aquarium. To do this, you should take blue cardboard and small leaves that are shaped like fish. A mixture of buckwheat and peas will help to depict pebbles.
To fix leaves on paper you can use different materials. To achieve good results, you should strictly follow the technique of making crafts.