Original potholders crocheted in the shape of a rooster. How to crochet a rooster: master class and video tutorial. What you need for work
Crochet rooster- a bright and original toy that you can knit as a gift for a godson or child close friend, and maybe directly for a friend. will definitely bring good luck and protect throughout the year, because the Cockerel symbolizes courage and bravery.
Crochet rooster
We will use a master class on creating “Catherine the Hen” - a popular toy among knitters who are fond of amigurumi, only we will succeed crochet rooster, pattern It is quite complex and has its own subtleties, but anyone who has basic knitting skills can handle it. You need to learn how to do chain stitches and single crochets, and also be able to knit in the round, that’s all the skills needed to make knitted ones.
Crocheted rooster It is carried out in several stages, or more precisely - each of its parts is knitted separately, and then sewn into a solid toy that will stand firmly on its paws. It is necessary to knit the body (49 rows), the head (29 rows) with a jagged edge (30 r.), the tail (10 r.), two identical wings (19 r.). The legs are also knitted separately, with each toe of the foot first knitted separately, which are then joined together. The earrings, red comb and beak are miniature parts of our cockerel that will be crocheted and then sewn to the product.

As for the colors of the yarn: for the earrings and comb, red yarn is always used, for the beak and legs - orange or terracotta. For the head and body, you should take threads of contrasting bright color. The result will be very beautiful toy, which will become a holiday decoration and a memory for many years. The body of the cockerel will look beautiful if you decorate the knitted fabric with circles cut from felt and then glued to the fabric.
Separately, you need to prepare the eyes: buy eyes for dolls small size in the store or sew tiny black beads in their place.
Bulk amigurumi toys require filling: usually padding polyester is used as padding, but you can also use synthetic balls to create an interesting tactile toy.

When you finish knitting each detail of our craft, you should not cut the thread short; you will need the remaining long end to sew all the parts together. Each individual part must be densely stuffed with filler, leaving no empty spaces - the parts are stuffed before the last row is pulled together.
If you are familiar with, then you still have to familiarize yourself with the intricacies of creating amigurumi toys. The main difference is that for amigurumi you always use a hook whose size is slightly smaller than that required for a given yarn density. This allows you to achieve very tight knit and creating a smooth canvas through which synthetic fibers will not leak.

Crocheted rooster
As we have already said, to crochet a rooster you need to be able to perform a regular single crochet stitch - this is the main stitch, thanks to which a dense knitted fabric is created.
Knitting begins with the main thing - from the body, which consists of 49 rows. First, loops are added in each row according to the circle pattern - up to the 15th row. From 15 to 26 inclusive - straight fabric is knitted without any additions, and then the gradual decrease in loops in each row begins. There is a special pattern for decreasing: at 27, a decrease is made every 12 stitches, then two rows are knitted without decreasing - rows 28 and 29, and at 30, the stitches are removed again, this time after 11 sc, thus continuing until the 49th row - the last one.
The head is a little more difficult to knit, because it is not an even oval, so first you will perform a circle up to 6 r. - you should have 36 loops, after that up to 11 p. you will knit 36 stitches without changing their number. At 12, increase again after 5 sc - 42 loops. From 13 to 15 their number does not change. At 16 - added after 13 sc. At 17-18 - no additions. At 19 - after 14 sc. Up to 24 - we do not change the number of columns. In rows 25-29, loops are added gradually, starting from the diagram - after 7 sc. You will end up with a head piece that resembles a “bell”, and the bottom edge will be “jagged”, so the transition line between the head and body will be hidden under the frill.
When you knit the feet, you need to start with the toes: the central one will be larger than the rest. Then three fingers are tied together and stuffed with padding polyester, after which the foot is knitted, which is connected to the straight part of the leg.
So that you can easily understand the process, how to knit crochet rooster, description and we have prepared step-by-step photos, if you follow the diagram, you will get a beautiful and neat New Year's toy amigurumi.

There are others original options execution of this knitted craft, for example, in the form of a pillow from the “African Flower” motifs. This motif is used by needlewomen to create voluminous soft toys, and the Cockerel figurine can also be brought to life. It will be a three-dimensional triangle with decorative elements - a beak, a comb and earrings, and there will be wings on the sides.
It seems that crocheting a rooster is not at all an easy task. But, if you have help at hand in the form of a knitting pattern with detailed description, then this greatly simplifies the task. And having at hand a master class with a detailed description of the work and step by step photos, you can deal with it quickly and easily. We bring to your attention information on how to tie a cockerel: a master class and a description of the work done by Marina Anferova. Easy work!
How to crochet the symbol of 2017: necessary materials
To create a cockerel, we need the materials presented below:
- YarnArt Jeans yarn in different bright colors
- hook No. 1.75
- plastic eyes for toys
- holofiber
Legend :
KA – amigurumi ring
Sc – single crochet
Pr-ka - increase
Decrease - decrease
St-k - column
Crochet cockerel, knitting pattern. Head and torso
Let's start our knitting with the body and head, which are knitted in one piece.
In the 1st row - we knit 6 sc into an amigurumi ring.
2nd row: row x 6 times = 12p
3rd row: (sc, inc) x 6 times = 18 sts
4th row: (2 sc, inc) x 6 times = 24 sts
Row 5: (3 sc, inc) x 6 times = 30 p
6-11 row: 30 sc
Row 12: (3 sc, dec) x 6 times = 24 p
13-14 row: 24 sc
Row 15: (2 sc, dec) x 6 times = 18 p
16-17 row: 18 sc
Row 18: (2 sc, inc) x 6 times = 24 sts
Row 19: (3 sc, row) x 6 times = 30 p
20-24 row: 30 sc
Row 25: (3 sc, dec) x 6 times = 24 p
Row 26: (2 sc, dec) x 6 times = 18 p
Row 27: (sc, dec) x 6 times = 12 p
Row 28: dec x 6 times = 6 sts
Decrease to last stitch. Stuff the body with holofiber.
Rooster crochet pattern Scallop
For the scallop we cast on 20 chain stitches. We close the chain in
ring. In the second row we knit 20 sc.


In the 4th-5th row we knit 6 sc in a circle.
In the sixth row we do ub-ku 3 times. As a result, 3 loops remain, which we also reduce to one loop.
Second comb clove. Attach a thread and knit 4 sc, skip 6 sc, knit another 4 sc.
In the 2nd-3rd row we knit 8 sc.
4th row – make a decimation 4 times. 4 loops remain.
5 row – 4 sc.
Next we decrease until the last stitch. 

Third scallop.
From the remaining 6 loops we knit three rows of single crochet. Next we decrease to the last stitch.
We get a comb for the cockerel.

How to crochet a cockerel. Beard, beak, collar
Beard.
To knit a beard, knit 6 sc into a ring. From the second to the fourth row we knit single crochet. Next we decrease stitches until the last stitch. We get one part of the beard. We knit two such parts.
Beak
In KA we knit 3 sc. In the 2nd row we do the exercise 3 times. We knit the third row 6 sc. We knit the fourth row 2 sc, row x 3 times. We get 9 loops. In the last row we knit 9 sc. The beak is ready.

Collar
Now we will knit the collar for the cockerel.
We cast on 5 air loops and one lifting loop.


Next, attach a thread of a different color and again cast on 5 air loops. We repeat the knitting as in the first version of knitting a triangle. We knit so many triangles different colors so that the collar is the desired length 
Knitted cockerel master class and description. Wings and drumsticks
Wings
For the wings we knit three “feathers” of different colors. To do this, cast on 6 chain stitches in the KA and knit 3 rows of single crochet stitches.

Next, we connect the three “feathers” together in the following order: 2 sc, one single crochet of one “feather” and one single crochet of the second “feather” together with one loop. Next, we knit two sc and again make a ub-ku, knitting the third loop of the second “feather” and the first loop of the third feather together with one loop. Next in the circle 4 sc, last stitch the third “feather” and the 4th loop of the third stitch together with one loop, sc, knit the last loop of the second “feather” and the 4th loop of the first “feather” together with one loop and knit the last loop with a single crochet

We knit the next two rows with a single crochet.
In the next row we knit (5 sc, dec) x 2 times. We get 12 loops.
In the next row (2 sc, dec) x 3 times. There are 9 loops left.
In the last row we make a ub-ku to the last loop.
We knit two wings.

Shins.

DIY New Year's cockerels. Paws and tail
Paws
We knit the paws in the same way as the wings, before closing the loops we stuff them with holofiber

Tail.
For the tail in KA we knit 6 sc and knit the next 16 rows with single crochet. For the tail, we need to knit 5 of these multi-colored tubes and sew them together.

How to crochet the symbol of the year 2017. Assembly
We sew the comb on the top of the head.

Sew on the beak and beard.

Sew a collar around the neck.

We stuff the shins with holofiber and sew them to the paws.


We sew the assembled legs to the body.

We sew wings on both sides of the body 
We sew the tail together and sew it to the body from the back.


Glue plastic eyes for toys above the beak. The rooster is ready.

Friends! New Year theme is gaining momentum, and today we invite you to make New Year here's a souvenir - rooster potholder, which can also be used as a hot stand. Rooster potholder it turns out to be approximately 15 by 20 cm in size (depending on the thickness of the threads). It is better to take cotton threads rather than wool.
To create such a souvenir for the New Year 2017, you need to prepare:
- threads of brown, white, red and yellow flowers(density 125 meters per 50 g);
- 4 black buttons;
- hook with a diameter of 2.5 mm.
Rooster potholder - souvenir for the New Year 2017 description:
1 So, we will knit according to this pattern:

The description can only confuse and create the feeling that there is something similar to be associated with cockerel - crochet potholder difficult, so it is more convenient to explain the main points and guide you to the diagram.
2. We start knitting with brown thread. Cast on 12 chain stitches (one stitch for lifting) and knit 1 row (=11) with single crochets. Next, we perform increases - 4 on each side. To do this, first we knit 5 air loops, then, starting from the second loop from the hook, we knit 4 single crochets (increase in the second row on one side), then another 11 stitches (this is the number that was in the first row), then 4 more stitches are knitted from the vertical part of the last stitch.
So we knit everything according to the proposed pattern.
If the increases or decreases at the end of the row are one stitch at a time, we knit with standard and. If you need to add more than 1 loop at the beginning of the row, then knit the required number of air loops; at the end of the row, stitches (if you need to add more than two) are added by knitting from the vertical part of the last one.
When it comes to row 25, look at the diagram and knit a white collar.
 In this case, do not break the brown thread, but lead it with you.
From the 45th row we knit a comb Cockerel - souvenir for the New Year 2017. From row 59, the right and left parts of the ridge are knitted separately. It is better to tie the outline of the scallop with half-columns. Make a loop (a chain of 10 chain stitches tied with half-columns). 
3. Now, using the same half-columns, we decorate the edge of the potholder, frame the collar, and “draw” the wings.
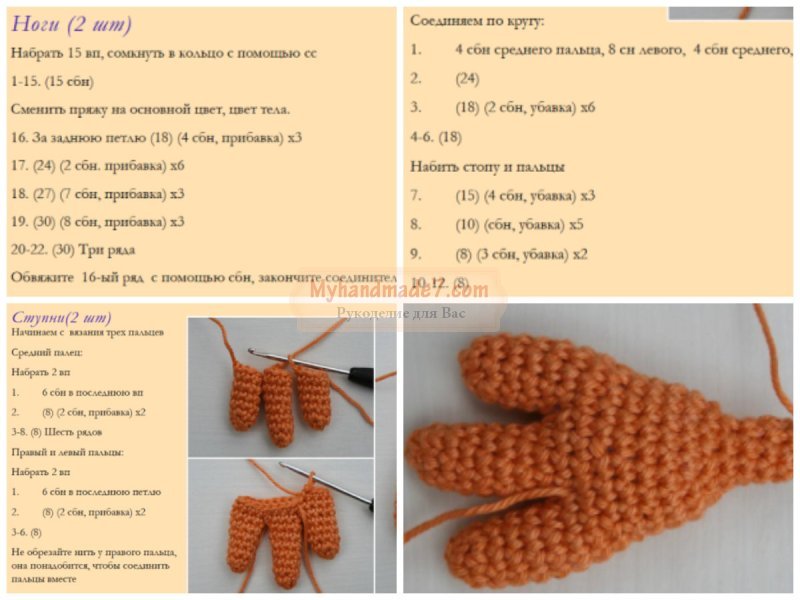
4. We knit the legs for our cockerel. 2 details.
Right finger: cast on 11 ch, skip 1 ch, from next. p. knit 1 single crochet, 6 single crochets and 3 single crochets.
Middle finger: * turn the work, skip 1 ch, knit 3 single crochets of the previous row with three half double crochets. Tie 8 chain stitches, turn. 1 v.p. skip, then knit 1 single crochet, 6 double crochets from 2-8 chain stitches. and 3 single crochets from three half double crochets of the previous row.
Left finger: Repeat from * 1 time. Tie the heel with 4 single crochets.
Sew on the paws.
5. Cast on 8 chain stitches using yellow thread. Skip one ch, from the next stitch knit 1 single crochet, 1 half double crochet, 2 double crochets, 1 half double crochet, 1 double crochet and 1 double crochet. Then 3 ch. return to the beginning of the set of loops, close with one half double crochet. Tie the beak with single crochets.
6. The beard remains. Tie 2 parts with red threads. Cast on 12 chain stitches, from the eighth stitch from the first chain stitch from the hook 2 half double crochets, 4 double crochets, 1 half double crochet and single crochet. The beard is sewn together with the beak.
7. Eyes - you can glue ready-made ones or sew on buttons.
Here's more cockerels that you can make with your own hands:


Symbol of the year 2017 knitted rooster
1:582Cute bright symbol of the year 2017 - rooster amigurumi you can knit it with your own hands if you wish, necessary materials and time. Amigurumi is the Japanese art of knitting or crocheting small, soft animals and humanoid creatures. Amigurumi are most often cute animals (such as bears, bunnies, cats, dogs, etc.), people, but they can also be inanimate objects endowed with human properties.
1:1422 1:1432Such a toy can decorate the interior of any room, bring pleasure to the baby, and some adults are unlikely to refuse such a gift. A singing cockerel heralds the beginning of the day; he sings a song to the sun, and, therefore, to joy. So I propose to make such “joy” with your own hands. At first glance, this is difficult, but if you have a little crochet skill, then it will be easier to cope with such a job.
1:21941:9

To tie a singing cockerel, we will need:
2:623- thread (mercerized cotton white, yellow, orange,
- green and peach flowers),
- hook No. 1,
- needle for sewing knitwear,
- padding polyester
Knitted amigurumi rooster: step-by-step master class
Paws
To begin with, the cockerel needs paws on which he can stand. Resistance in birds is achieved
2:1228four-fingered, i.e. four fingers. So we will tie four fingers. Two fingers pointing to the sides
2:1412one - back, one - forward.
2:1463 2:1473Middle finger.
2:1507We make an amicole and put 6 single crochets into it. (sc hereafter)
2:1451 row. 6 sc.
2:174 2:184
2nd row. 6 + 3 = 9 sc. Let's double every second column.
3:7853 - 8 rows. 9 sc.
3:820 3:830
Side finger
1 row. 6 sc.
4:14072nd row. 6 + 3 = 9 sc.
4:14383 - 6 rows. 9 sc.
4:1473You need to make four fingers of one and the other type, put a fairly tight filler in them,
4:1653This determines how stable the figure will be. Let's put our fingers together as they would be in our paw.
4:174 4:184
And tie them together by the sides
5:786 5:796
After this, you need to take a needle and sew the bottom surface so that there are no holes left, while giving the shape to the paw.
6:1515 6:9
Inserting the hook through the upper loops (2-3 on each finger), pull it out and make 9 sc.
7:684 7:694
While there is little connected, it is necessary to supplement with padding polyester where there is not enough.
8:1344We make 10 rows.
8:1381 8:1391
9:9
We take green threads, this is where the shin begins.
9:109 9:119How to tie a cockerel's body
1 row. 9 + 4 = 13 sc. We make increases in every second column.
9:2842nd row. 13 sc.
9:308Row 3. 13 + 3 = 16 sc. Double every fourth.
9:3854 - 5 rows. 16 sc.
9:4156th row. 16 + 4 = 20 sc. Double every fourth.
9:4937th row. 20 sc.
9:5178 row. 20 + 4 = 24 sc. Double every fifth.
9:5879 row. 24 sc. Turn and make 6 sc, 1 lifting loop (pp, or simple air loop) and so on
9:760repeat 2 more times. Let's do it on both legs.
9:850 9:860
We fold the legs and tie them.
10:1442 10:1452
11:9
10 - 15 rows. We tie the entire resulting circle together. 45 sc.
11:11916th row. At the back between the legs we will make 3 increases for the tail through 2 columns. 45 + 3 = 48.
11:26617th row. 48 sc.
11:29118th row. 48 + 2 = 50 sc. Increases there too.
11:35419 row. 50 sc.
11:37920 row. 50 - 2 = 48 sc. We subtract where we added. Gradually add the filler.
11:53521 row. 48 sc.
11:56022 row. 48 - 3 = 45 sc.
11:59423 row. 45 sc.
11:61924 row. 45 - 3 = 42 sc. We reduce it in the same zone.
11:69525 row. 42 sc. We begin to knit a zigzag, with the help of which we will move on to yellow color. (scheme)
11:8611 yellow, 5 green bars.
11:923 11:933
26 row. 42 sc. 3 yellow, 3 green
12:151227 row. 42 sc. 5 yellow, 1 green.
12:5828 row. 42 sc. The row is completely yellow.
12:129 12:139
29 - 33 rows. 42 sc.
13:68634 row. 42 sc. Again according to the scheme we add orange. 1 orange, 5 yellow, 1 orange, 5 yellow
13:866 13:885Row 35 42 sc. 3 orange, 3 yellow.
13:94836 row. 42 sc. 5 orange, 1 yellow.
13:101137 row. 42 sc. Completely orange.
13:1081 13:1091
38 row. 42 - 3 = 39 sc. We will distribute the reductions evenly.
14:10139 row. 39 sc. Don't forget the filler.
14:17240 row. 39 - 3 = 36 sc. Reductions from the chest.
14:25141 row. 36 sc.
14:27642 row. 36 sc. We begin the transition to white. 1 white, 5 yellow.
14:38043 row. 36 sc. 3 white, 3 yellow.
14:43544 row. 36 sc. 5 white, 1 yellow.
14:496 14:506
45 row. 36 - 3 = 33 sc. All white. Reductions from the chest.
15:112146 row. 33 sc.
15:115247 row. 33 - 3 = 30 sc.
15:118648 row. 30 - 3 = 27 sc.
15:122049 row. 27 sc.
15:124550 row. 27 - 3 = 24 sc.
15:127951 row. 24 sc.
15:130452 row. 24 - 3 = 21 sc.
15:133853 row. 21 sc.
15:136354 row. 21 - 3 = 18 row.
15:139755 row. 18 sc.
15:142256 row. 18 - 3 = 15 sc.
15:145657 row. 15 sc.
15:148158 row. 15 - 3 = 12 sc.
15:151559 - 61 rows. 12 sc.
15:37 15:47
Here we have the neck. We also place the filler tightly.
16:65862 row. 12 + 6 = 18 sc. Double every second column. Let's start making the head
16:79663 row. 18 + 6 = 24 sc. Let's double every third.
16:87064 - 66 rows. 24 sc.
16:90267 row. 24 - 6 = 18 sc.
16:93668 row. 18 - 6 = 12 sc. We put the filler.
16:100669 row. 12 - 6 = 6 sc.
16:103970 row. We close the knitting by knitting through a post, tighten the thread and hide the end of the thread inside the knitting.
16:1237 16:1247
17:9
Tail tying
We will make the tail with separate feathers of the same colors that were used to make the carcass.
17:2271 row. 5 sc.
17:2502nd row. 5 sc.
17:2733rd row. 5 + 3 = 8 sc.
17:3044 - 20 rows. 8 sc.
17:340 17:350
Goatee
1 row. 6 sc.
18:922 18:932
2nd row. 6 + 6 = 12 sc.
19:1485 19:1495
20:9
3 - 6 rows. 12 sc.
20:397th row. 12 - 3 = 9 sc.
20:718 row. 9 sc.
20:949 row. 9 - 3 = 6 sc.
20:12510 row. 6 sc.
20:14911 row. Let's close the knitting. Let's make another half.
20:245 20:255
Scallop
1 row. 5 sc.
21:8172nd row. 5 sc.
21:8403rd row. 5 + 2 = 7 sc.
21:8714 row. 7 sc.
21:8945 row. 7 + 2 = 9 sc.
21:9256th row. 9 sc. We will make 3 such teeth, they will be in the middle, we will tie them by the sides.
21:1063 21:1073
Smaller tooth.
22:431 - 2 rows. 5 sc.
22:723rd row. 5 + 2 = 7 sc.
22:1034 - 5 rows. 7 sc.
22:138The tooth is larger.
22:1721 - 2 rows. 5 sc.
22:2013rd row. 5 + 2 = 7 sc.
22:2324 row. 7 sc.
22:2555 row. 7 + 2 = 9 sc.
22:2866 - 7 rows. 9 + 2 = 11 sc.
22:330 22:340
1 row. We will fold all the cloves and tie them by the sides and tie them around the perimeter with columns
23:996without a crochet. 30 sc. The small clove is the last one in the comb.
23:11092nd row. In the second row we will reduce the binding. 30 - 6 = 24 sc.
23:11983rd row. 24 - 6 = 18 sc.
23:1237 23:1247
24:9
Beak
1 row. 4 sc.
24:482nd row. 4 + 2 = 6 sc.
24:793rd row. 6 + 2 = 8 sc.
24:1104 - 5 rows. 8 sc. This upper part beak.
24:1901 row. 4 sc.
24:2132nd row. 4 + 1 = 5 sc.
24:2443rd row. 5 sc. The lower part of the beak. Sew it together.
24:319 24:329
Sew on the beak, comb, beard, tail.
25:918 25:928

27:9
Our cockerel clearly lacks wings.
27:87 27:97Wings
1 row. 6 sbn.
27:1392nd row. 6 + 6 = 12 sc.
27:171 27:181
3 - 5 rows. 12 sc. We knit two more of these things for one wing, and in total for two wings - 6 parts.
28:877Let's tie them together on the sides.
28:937 28:947
6th row. We tie 28 sc around the perimeter.
29:15447th row. 28 - 4 = 24 sc.
29:328 row. 24 - 4 = 20 sc.
29:659 row. 20 - 6 = 14 sc.
29:9810 row. 14 - 4 = 10 sc.
29:13211 row. 10 - 4 = 6 sc. Both wings did this.
29:218 29:228
All that remains is to sew it on and our amigurumi rooster will sing his ode to the sun!
30:867 30:877

Amigurumi rooster. Photo

http://www.liveinternet.ru/users/belenaya/post393514922/
34:1132 34:1142 34:1152Here are more ideas for knitted cockerels
34:1223

35:9


38:9


41:9

In this master class we will offer you a diagram of individual knitted elements for creating a Fire Cockerel from a Kinder egg. We'll tell you how to combine the elements into one fun toy.
Such a crocheted rooster can not only serve as a toy, but also decorate a Christmas tree, a baby stroller, or serve as decor for Easter.
To work you will need:
- “Iris” threads in orange, yellow, red and white;
- needle and thread to match the yarn;
- 2 sequins for eyes;
- scissors;
- hook 0.6 mm;
- adhesive moment “Crystal”.
How to make a crochet cockerel from kinder:

The entire rooster consists of several elements:
- bottom straps;
- top straps;
- scallop;
- beak - 2 halves;
- beards;
- eye pads - 2 pcs;
- legs - 2 pcs;
- wings - 2 pcs;
- tail - of 7 feathers in 4 types.
Let's move on to a description of each element.

We tie the bottom of the rooster
1st row: Knit with orange threads. On a sliding loop we knit 10 st.b.n. and tighten it.
Row 4 and until the desired length is reached: knit 1 dc. in each column of the previous row. We try it on a Kinder egg and stop when the knitted body completely covers the lower half of the plastic box. Lastly we knit a half-column, make a knot and cut the thread.
We tie the top of the cockerel
1st row: Knit with yellow threads. On a sliding loop we knit 10 st.b.n. and tighten it.
2nd row: In each column of the previous row we knit 2 tbsp. In total there are 20 columns in a circle.
3rd row: In each odd column of the previous row we knit 2 tbsp, in each even column - 1 tbsp. In total there are 30 columns in a circle.
Row 4 and until the desired length is reached: knit 1 dc. in each column of the previous row. We try it on a kinder egg and stop when the knitted head completely covers the upper half of the plastic box.
Let's start knitting the collar. *We skip one column of the previous row, and in the next we knit 7 treble crochets, we skip one column of the previous row, we make a connecting loop in the next column.* Repeat from star to star until we complete the circle. The patterned neck is ready (see diagram).
Eyeliner
1st row: From white threads on a sliding loop, make 10 st.b.n. Tighten until there is no hole left in the middle. We connect the two outer columns with a connecting loop and give one air loop for lifting.
2nd row: In each odd column of the previous row we knit 2 double stitches, in each even column - 1 double stitch. In total there should be 15 columns in the row. We connect the two outer columns with a connecting loop, make a knot, and cut off the thread. (See diagram).
Cockerel leg
We knit 10 chain stitches from red threads. Skip the first ch. from the hook and further into each ch. we knit 1 st.b.n. - only 5 columns (this was the first finger). We make 5 ch. Skip 1 ch. open the hook and then into each ch. we knit 1 st.b.n. - only 8 columns (this is the second finger and paw). In the last chain stitch we knit 2 more chain stitches (there are 3 of them in total). This will turn us around to the other side of the chain of air loops. We do it in each next ch. 1 st.b.n. each - 4 times. We make 5 ch. Skip the first ch. and in each next we knit 1 st.b.n. (third finger). When the posts touch the middle toe of the chicken leg, make a connecting loop, tighten the knot and cut the thread. (See diagram).
Beak
The beak will consist of two halves, each of which is just one fluffy column of orange threads.
We make 7 ch, in the farthest loop from the hook we knit not completely (leaving 2 loops on the hook from each stitch) 6 treble crochets. With the last movement we knit the loops from the hook together. Tighten the knot and break the thread. Clarification: the chain of chain loops should not exceed the length of the double crochet stitch. Half of the beak is ready. (See diagram).
Goatee
Using red thread we make 8 ch. In the fourth loop from the hook we knit 5 treble crochets, 3 ch, connecting post in the same fourth loop, connecting stitch in the fifth loop, 5 dc. in the fifth loop, connecting stitch in the first loop of the beginning of knitting. Tighten the knot and cut the thread. The result was a solid beard made of two halves. (See diagram).
Wings
Make 10 ch, skip the first ch. from the hook and into each next we knit a st.b.n. - only 9 columns. 3 v.p. will turn us to the other side of the chain.
We knit a st.b.n. into each air loop. - only 7 columns (so we have not reached the end of the row).
1 ch, unroll the knitting, make 1 dc in each column of the previous row. - only 7 columns. In a chain of 3 vp. do 2 st.b.n., 3 v.p., 2 st.b.n. In each column of the previous row we knit 1 st.b.n. - only 7 tbsp.
1 ch, turn the knitting in the other direction. In each column of the previous row we knit 1 sc. - only 9 columns. In a chain of 3 vp. do 2 st.b.n., 3 v.p., 2 st.b.n. In each column of the previous row we knit 1 st.b.n. - only 7 tbsp.
1 ch, unroll the knitting, knit 1 dc in each column of the previous row. - only 7 tbsp. In a chain of 3 vp. do 2 st.b.n., 3 v.p., 2 st.b.n. In each column of the previous row we knit 1 sc. - only 9 columns. Tighten the knot and cut the thread.
Scallop
The comb is a round mini-napkin of 6 rays, which will be folded in half and connected along the edge with single crochets through all layers. This method allows you to give the cockerel comb greater density.
1st row: Close a chain of 6 chain stitches into a ring.

2nd row: 2 v.p. on the rise, 29 st.s1n. into a ring, connect the circle with a connecting loop.

3rd row: *2 v.p. to rise, st.s1n. in each column of the previous row - 5 columns, 2 ch, connecting loop between the last knitted and next unknitted column * - do it in a circle 6 times in total.

4th row: Fold the napkin in half, knit the top with single crochets, simultaneously grabbing the loops of two layers. At the end, make a knot and cut the thread.

Tail feathers
We knit 7 feathers in total:
- 1 long red;
- 2 orange;
- 2 yellow;
- 2 short red ones.
Red feather
Row 1: Cast on 21 ch.
Row 2: Skip first ch. from the hook, in each next loop we knit 1 treble. - 15 columns, in each next vp. knit 3 treble stitches. - 5 times - only 15 tbsp. At the end, tighten the knot and cut the thread.
orange feather
Row 1: Cast on 18 ch.
Row 2: Skip first ch. from the hook, in each next loop we knit 1 treble. - 12 columns, in each next vp. knit 3 treble stitches. - 5 times - only 15 tbsp. At the end, tighten the knot and cut the thread.
yellow feather
Row 1: Cast on 16 ch.
Row 2: Skip first ch. from the hook, in each next loop we knit 1 treble. - 10 columns, in each next vp. knit 3 treble stitches. - 5 times - only 15 tbsp. At the end, tighten the knot and cut the thread.
Red feather
Row 1: Cast on 13 ch.
Row 2: Skip first ch. from the hook, in each next loop we knit 1 treble. - 7 columns, in each next vp. knit 3 treble stitches. - 5 times - only 15 tbsp. At the end, tighten the knot and cut the thread.

Sew the cockerel
- We put the bottom and top on the kinder. They don't need to be sewn together if they fit well. Then you can put various little things in the cockerel like in a box or make a rattle out of it.
- We sew a comb on top of the head.
- We sew or glue two legs at the bottom.
- On the sides under the collar we sew or glue the wings.
- Under the comb, at the very edge of the collar, we sew a beard at the top edge - it should just hang down from below and from the sides.
- Above the beard we sew two halves of the beak.
- We sew eye pads between the beak and beard on both sides. We glue sequins-pupils onto the under-eyes. Depending on its location in the under-eye, the cockerel may have a different expression on its face.
- Separately, we sew the tail: on both sides of the large red feather we place two orange feathers at a slight angle, on them we put layers of yellow feathers and along the edge - red feathers. We stitch this sandwich with red threads at the base and along the upper perimeter of small red feathers. This will give the tail additional rigidity.
- If desired, the tail can be starched and dried so that the feathers stand strictly vertical.
- We sew or glue the tail to the cockerel. The toy is ready!
Shared master class
Anastasia Kononenko


