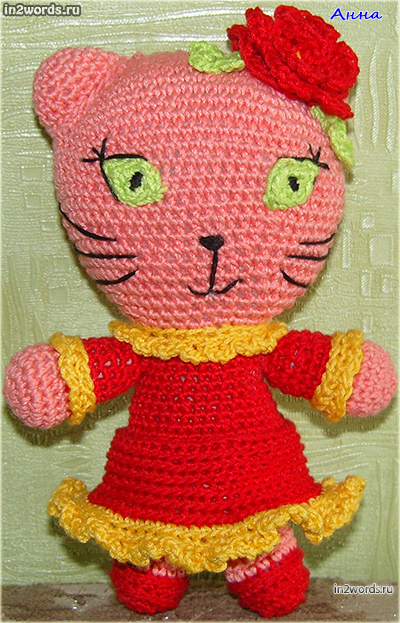
Amigurumi art. Hello Kitty handmade. Crochet. Amigurumi Art Crochet Kitty Description
The toy is ready (the process is in the article) and, of course, this is not the original Hello Kitty cat from the store for a considerable amount, but its close relative :)
Finally, I finished my work. It was not so much difficult as it was painstaking. This is my second experience in making a soft Amigurumi toy and will be a New Year's gift for my niece. I placed it a little unevenly and it looked like it was waving into the frame :)

I told you what Amigurumi is in the article Handmade crocheted bunny. Amigurumi art. In this article I will tell you how to crochet a stylized Hello Kitty amigurumi cat. With your own hands, according to a diagram with a description. What is important is that everything is in Russian and in Russian.

The main materials I used:
- white threads, slightly woolly in structure, smoother yellow, pink 50g/250m acrylic

Red and bright green 50g/275m acrylic for the flower and leaves behind the ear
- white threads with a little shine, a skein without identification marks on a large cardboard reel
- cotton threads red, yellow-orange, pale pink "Iris" produced by "K-t im. S.M. Kirov" skeins of 25g, length not specified
- padding polyester for stuffing

I sometimes used crochet hooks sizes 2 and 3, as well as thinner ones, to pull out threads in knots
- black thread for the mustache, preferably with glitter, and a thick long needle (we call this a gypsy needle)

Pieces of black leather to cut out the eyes and, if available, a piece of yellow felt for the nose (I knitted it, there was no felt)
- depending on the size, stuff ordinary coins (I have 2 of 5 rubles each) and stones into the legs so that it stands
I wanted to make the kitten larger, but I didn’t have thick threads, so I took a thread in 3 folds. In order not to sculpt any decorations on top (the toy is dense and compact), I made a kind of melange from threads of different colors. Initially, they were slightly different in thickness, but in total they turned out to be approximately equal working threads. I think the only important thing here is to maintain the thickness of the threads in order to get commensurate details, and the colors are what you like :)
The diagrams were taken and corrected by me (adapted for the Russian language) from some Japanese magazine, probably, a scan of which was found by Yandex without identification marks.
Knitting will take place in the round, without tearing off the thread until specifically instructed. Abbreviations will be used for abbreviation:
VP - air loop(on the diagram there is a white circle or more often an oval)
RLS - single crochet(on the diagram there is a cross or a plus sign)
СС - connecting post(in the diagram there is a black dot, usually knitted into the lifting air loop from which the row began)
+ or - adding or subtracting in the diagram it is an RLS with a bird/house on the outside. Those. on the diagram x and /\, and the table will indicate how many such elements are in the row in brackets. If you increase the sc, two pieces are knitted in one next position, if you decrease, one sc is knitted in 2 positions.
Perhaps I'm ranting too much, but in case it's useful to someone :)
Let's actually start knitting, starting our Kitty from the head. This is perhaps its largest part. I always rely on diagrams, so there will be a minimum of written explanations, and I post the diagrams in good quality.

For the white parts, I used 3 white threads (2 “woolen” and 1 on a large bobbin with glitter).
Head
In the diagram it is divided into 2 halves for easy viewing, but in reality it will be a single piece for the head. The contact points of the halves are shown by broken lines.
First we knit
10 chain stitches(horizontal line of ovals in the diagram)
1 air loop is added and we consider it as lifting (to bring the thread to the level of the next element)
These VPs are considered the zero row, the following rows according to the table (do not lose the lifting VPs and SS).
The first row of 22 RLS is formed by tying our chain of air loops in a circle, reminiscent of a pigtail, and in the first and last loops of the chain you need to knit not 1 RLS, but three.
The next rows are also further in the circle, starting the row with VP and ending with SS in this VP.
Always carefully count how many sc you get in each row so that the intended shape is preserved.
| series of accounts | number of sc |
| 24 | 24 (-4) |
| 23 | 28 (-6) |
| 22 | 34 (-6) |
| 21 | 40 (-6) |
| 20 | 46 (-6) |
| 19 | 52 |
| 18 | 52 (-6) |
| 17 | 58 |
| 16 | 58 (-6) |
| 15 | 64 |
| 14 | 64 |
| 13 | 64 |
| 12 | 64 |
| 11 | 64 |
| 10 | 64 |
| 9 | 64 |
| 8 | 64 (+6) |
| 7 | 58 (+6) |
| 6 | 52 (+6) |
| 5 | 46 (+6) |
| 4 | 40 (+6) |
| 3 | 34 (+6) |
| 2 | 28 (+6) |
| 1 | 22 (+12) |
| series of accounts | number of VPs |
| 0 | 10 + 1 |
We tear off a longer thread from the finished head part, because We will need it to sew the head to the body.
We stuff the part tightly with padding polyester, while trying to give the correct shape to the head, slightly oval, similar to the original Hello Kitty.
I got something like this taken from https://www.site

Ears (2 parts)
The next step was knitting the ears. They start with an amigurumi ring. To create it, we wrap a thread around the index finger and into the resulting ring we knit 1 VP of lifting 6 RLS (this will be the first row). There will be a free tip of the thread left, if everything is done correctly, pull it and the loop with 6 sc will be pulled into a tight ring without a hole (do not lose the SS at the end).

At the end of the 6th last row, we tear off a longer thread and sew the eyelet on it. You need 2 of these ears.
There is no need to stuff them. My ears for Kitty turned out like this

We also continue to work with white thread, but now there is 1 detail, perhaps the smallest and funniest.
Ponytail
The tail is a thimble-like detail. It starts similarly to the ears with an amigurumi ring (1st row).

At the end of the row we leave a long thread for further sewing. Fill with padding polyester and set aside.
The result is a small tail for a not-so-small cat.

Handles or feet (2 parts)
We start with white threads. Amigurumi ring with 6 sc (1st row) and then from the 2nd to the 6th row according to the pattern. We start the 6th row with a colored thread. I took 2 pink acrylic threads and 1 red cotton Iris.
On the last 13th row we should have a small hole left to stuff the handle, but if you are knitting a small copy of Kitty, it will be too small. In this case, we slow down the work after the 11th row and leave the thread long enough to knit 2 more rows and leave a long tip for sewing to the body (you can leave the thread that has not yet been torn off).

| series of accounts | number of sc |
| 13 | 6 (-3) |
| 12 | 9 (-3) |
| 11 | 12 |
| 10 | 12 (-3) |
| 9 | 15 |
| 8 | 15 |
| 7 | 15 |
| 6 | 15 |
| 5 | 15 (-3) |
| 4 | 18 |
| 3 | 18 (+6) |
| 2 | 12 (+6) |
| 1 | 6 |
Frill/sleeve
I took 2 yellow acrylic and 1 yellow-orange cotton thread.
We tie the frill to the 7th row of our handle. Let me remind you that the 7th row is the second color row (in my case, pink-red). The SBP icon with a hook in the diagram means that this RLS is knitted into the base of the RLS of another part (handle/foot).

I got some interesting ideas from Larisa’s blog. For example, in an article about the Hello Kitty bead (https://rosetka.blogspot.com/2009/09/hello-kitty-businka.html) Larisa suggested tying the frill additionally using the “crawfish step” method, I followed her advice, it turned out very cute .
So, to the last yellow row from the RLS we add a crab step. Master class on this issue.
We tear off, fix and hide the yellow thread. Let's return to the main part of the handle. We stuff it with padding polyester (this is convenient to do, for example, with the blunt side of a hook or needle) and knit the 12th and 13th rows, if you haven’t done this before, tear off the thread with a long tip. You can immediately sew up the hole in the ends of the handles (the shoulder area, so to speak) with a couple of stitches so that the padding polyester does not fall out.
The finished handles for the cat upside down are very reminiscent of ice cream :)

Torso (body with skirt)
You can take a break from small details on the torso, which rivals the head in size.
We also start with white threads from the amigurumi ring (aka 1st row 6 RLS) and then according to the pattern with additions in the indicated places we knit 10 rows.
Row 11 we already switch to colored threads (mine are pink-red), and we tear off the white one with the traditional long tip. At the end we also break off the colored thread. taken from https://www.site

| series of accounts | number of sc |
| 21 | 24 |
| 20 | 24 |
| 19 | 24 (-6) |
| 18 | 30 |
| 17 | 30 |
| 16 | 30 (-6) |
| 15 | 36 |
| 14 | 36 (-6) |
| 13 | 42 |
| 12 | 42 (-6) |
| 11 | 48 |
| 10 | 48 |
| 9 | 48 |
| 8 | 48 (+6) |
| 7 | 42 (+6) |
| 6 | 36 (+6) |
| 5 | 30 (+6) |
| 4 | 24 (+6) |
| 3 | 18 (+6) |
| 2 | 12 (+6) |
| 1 | 6 |
Skirt
The skirt is tied in colors (pink-red for me) to the 12th row of the body, this is the second color row. The method of tying is similar to the ruffle for the sleeves, for the columns themselves of the 12th row of the body and then continue circular knitting according to our own pattern. I made the last two rows of the skirt yellow-orange (like the frill of the sleeves) and also added another row using the crab step method.

We tear off all the threads, immediately fix all the threads from the skirt and hide them. We fill the resulting part with padding polyester. The body is ready taken from https://www.site

Legs/paws (2 parts)
For the colored part, where the knitting of the legs begins, I took yellow, pink acrylic and red cotton thread (Iris).

The RLS underlined in the diagram (4th and 6th rows) mean that they need to be knitted at the base of the columns of the previous row (behind the columns themselves, on the wrong side), and not in a traditional braid. Thus, the braid should remain outside, helping the boot/shoe to maintain the shape of the sole and transition to the foot itself, giving greater believability.
From the 7th row we return to the usual white thread (as we used for the head), and we break off the colored thread, fasten it and hide it inside the legs. We tear off the white thread after the 9th row and leave a long end for sewing.
You get two shod feet like this

We put a coin on the bottom of the legs and lay them on top with pebbles wrapped in synthetic padding.
Assembling the toy
taken from https://www.site
Sewing ears to head

Sewing the legs

Sewing on the tailtaken from https://www.site

Sewing the head and arms to the body
I sewed the head with white thread from the head, catching the top color row by the pigtail.
I pulled colored threads by hand through the body with a needle (for better fastening) in such a way that the thread of the right foot went to sewing the left one and vice versa from the left foot went to the right one.


Eyes

Roses (3 pieces, 2 medium and 1 large)
Bright green leaves, 2 parts
The process of making the elements of this bouquet is described in the article Flowers and leaves for Hello Kitty or decorating other items.

I thought for a long time about how to secure the flowers and leaves and decided that it would be easier to first tie them together using the ends of the threads. This is how the order of their location and the distance between them was preserved. taken from https://www.site

Spout You can sew it from yellow felt or knit an oval with yellow threads. For example, like this:
1st row - amigurumi ring with 6 RLS
2nd row - 10 sc, of which three into one sc from the previous row (3rd and 6th of the first row).
In general, the element is small and you can experiment, even embroider :)

Collar I made an Iris from light pink cotton threads, instead you could hang a ribbon, bow or beads.
For the collar, I collected a chain of air loops of such length that it was enough to exactly fit around the cat’s neck with a little tension. Then I knitted a series of single crochets and connected the ends of the resulting rope around the neck. I lightly fixed it on the hanger and hid the ends of the threads inside the toy.
I secured the flowers, prepared earlier, near the ear.

It was in such company that the ready-made Kitty was waiting for her mistress, until she was placed in a gift wrapper and under the Christmas tree.
The gift was received with joyful interest, demonstrated to everyone present to everyone’s surprise and was accompanied by praises addressed to me:)
In the process of playing and pampering, she is measured by the new mistress. The toy's height was approximately 17 centimeters. taken from https://www.site
Readers' works:
From Gadyak, the toy came out 30 centimeters tall! A playful and very attractive little animal with a red bow.


And Lesenok (Lesya) sent such a charming young lady in flowers. The cat was made from white Hawaii threads, 55% cotton/45% acrylic and cotton red Rose from Vita. It turned out a little smaller, about 13-14 centimeters.

Olesya sent me Kitty in a bright pink dress, I can’t even believe that this is my first experience, great job! According to the author, the threads used in the work were Iris, and the hook was 1.25, in finished form 11 centimeters.

Natalya from Nikolaev showed an elegant cat, which she knitted as a gift for a little girl. White parts - Yarn art violet plus kid mohair, colored parts - Himalaya yakamoz 100% wool, trim - grass. The entire product is crocheted No. 3. Height is 17 cm. Decoration with purchased ribbon flowers. The eyes and nose are embroidered with acrylic for embroidery.
For some reason I want to call it New Year's :)

Varvara shows Kitty in a delicate pink outfit, about 25-30 centimeters tall. The poor cat was captured in kindergarten :) Knitted from Egyptian cotton with crochet number 3.


A beauty played by Olga Erdnieva has also been invited to Kitty’s family. A classic fluffy dress and a big matching bow, you just want to send her to the ball :) Crocheted from acrylic yarn No. 2.

Another cat was demonstrated by Anna. The magical look of the green-eyed beauty is simply mesmerizing:)
Thank you, dear visitors, for the photos you provided! taken from https://www.site
You may be interested in other articles:
reply to: Lesenok - b*@mail.ru
from: Natalia - a*@site
Thank you for your feedback, I tried my best :) And thank you for your photo too!
from: Olesya - o*@yandex.ru
Wonderful and clear diagram, thank you very much, my Kitty turned out to be 11 cm tall. This is my first knitted toy.
I wanted to insert a photo of what happened, but I don’t know how (((
reply for: Olesya - o*@yandex.ru
from: Natalia - a*@site
Thanks for your feedback! I will be very glad to add your cat to the company. I'm waiting for her photo by email!
from: Svetlana
thank you very much, everything is perfectly visible to grandmothers like me, well done, good person
reply to: Svetlana
from: Natalia - a*@site
Hello, Svetlana! It’s very nice to “hear” kind words, thank you.
from: Anna - a*@mail.ru
Thanks for the diagram and detailed description, this is my first amigurimi :-)
http://s5.hostingkartinok.com/uploads/images/2013/08/236ae0e9ec1e34848c3f91922c486976.jpg
reply to: Anna - a*@mail.ru
from: Natalia - a*@site
Thank you very much, Anna! I added your photo to the family. You really surprised me with the design of your muzzle, it looks incredible!
from: Hristolyubova Galina
Thank you very much for your description of Ketty. It turned out funny. All the best to you
reply to: Hristolyubova Galina
from: Natalia - a*@site
Hello, Galina! I am very glad to receive such news, thank you! I wish you success in your creativity and not only :)
from: Marina - n*@mail.ru
And here is my kitty!!!
from: Alesya - g*@gmail.com
Thank you so much for the diagrams. I scoured almost the entire Internet to find them so clear! And for the detailed description of the work!!!
reply to: Alesya - g*@gmail.com
from: Natalia - a*@site
I am very glad that you liked my cat. Good luck and ease of work, send yours, we’ll move you into a family :)
from: Irina - n*@bk.ru
Natalya, thanks for the MK, I’m finishing up knitting my first kitty. But for some reason I ended up with an incredibly huge head)))... and if I knit the third row in the lower paws, then the sole of the paw is not flat, but convex. I tied it up, ignored the third row , I knitted the extra white one instead. And I’ll bandage my head.
reply for: Irina - n*@bk.ru
from: Natalia - a*@site
Hello, Irina. I cannot give any comments on the topic of your work, because... didn't see her. As you can see, my foot is practically flat and my head is suitable, and I drew the diagrams at the same time as I was working. Probably it all depends on the individual knitting density or possible reading errors. However, the final shape also largely depends on the stuffing, because with excessive zeal you can stretch and deform anything.
from: Someone - u*@mail.ru
Thank you very much for Kitty!
reply to: Someone - u*@mail.ru
from: Natalia - a*@site
Hello. Glad you liked it!
Please also report any problems you notice!
Only letters and numbers are allowed!
All fields are required!
(from the English “Hello, pussy”) - a Japanese pop culture character, a small white cat in a simplified drawing - was invented by Sanrio in 1974, and 2 years later the trademark of the same name was registered.
Kitty was invented in 1974 by Shintaro Tsuji, owner of the Japanese toy company Sanrio. One day he decided to come up with a new character that everyone would like. As a result of long work (Tsuji thought for a long time, drew different options, checking the reaction of customers), the ideal hero appeared. Today, the Hello Kitty brand generates about half a million dollars in revenue annually.
At first there were also doubts about the cat's name. Its creator tossed between versions of “Hello Kitty” and “Kitty White” - that was the name of one of Alice’s cats from the book “Alice in Wonderland.” But the latter option was ultimately rejected.
The first product to gain immense popularity among customers was a simple wallet with the image of Kitty. Before this, postcards and other similar little things with her image were issued, but they were not so successful.
Kitty's popularity grew steadily, but in the late eighties it peaked and sales began to slowly decline. Buyers did not like that Kitty was always the same and seemed to be lifeless. She was depicted in one pose - her muzzle looks at the viewer, and her body is turned sideways, she was dressed in a blue jumpsuit, and a thick black outline was drawn around the figure. Then the designer of the Sanrio company, Yuko Yamaguchi, decided to change this boring image. Now the black outline has been removed and Kitty appears in different clothes and with different objects in her paws.
A little later, it was decided to expand the scope of the brand’s influence to older people. In 1987, a number of white cat images were created to suit the tastes of older buyers.
Kitty also has a family - dad, mom, grandparents and sister Mimmi, who has a bow on her left ear, so as not to be confused with Kitty - and a hamster, Sugar.
There are now a huge variety of Kitty products coming out, from T-shirts and soft toys to toasters that bake toast with her image on them and machine guns.
based on materials from Wikipedia
Surprisingly, among such an assortment of products with the image of Kitty, I have never seen Kitty in the form of a soft toy.
I propose to fill this deficiency :-)
To crochet Kitty, we will need:
White and red yarn (you can use cotton or acrylic);
- remnants of thinner yarn in pink, orange, yellow and green colors - for roses;
- hook No. 3;
- filler (sintepon is best);
- cardboard circles or coins in the legs for stability;
- black and yellow felt for the eyes and nose.
Knitting description:
Description of knitting from the Japanese magazine "Knit Dolls og Goods No. 3. Hello Kitty" (to enlarge, click on the picture):


A very detailed and understandable master class on knitting such a Kitty cat was prepared by a craftswoman under the nickname Socket. Her real name is Larisa and she is a very talented knitter, as well as a very sympathetic and pleasant person to talk to.
By the way, on her blog there are also master classes on making Kitty a butterfly and Kitty in a dress with beads. Therefore, I highly recommend visiting her :-)
I also recommend taking a look at the topic “Kitty, knitting together” on the Technomagic website, where, in the company of many needlewomen, you can knit Kitty to your taste and color, and also get a lot of useful tips on assembling, stuffing and designing the face.
Kitty connected by site visitors:
 Hello Kitty knitted by craftswoman marishushulichka
 Knitted Kitty Olenyonok

 Kitty duckling and Kitty in a fancy dress, tied by Valentina
 Hello Kitty with fish from Svetlana Abramova

 Knitted toys from Demeter
So let's start...with Hello Kitty's head. We knit it, starting from the top of the head, according to the pattern, in a circle. We start each circular row with a VP (cable loop) lift and end with a SS (connecting post). The chain of air loops is the 0th row, we do not count it. The 1st row is the first row of sc (single crochet).

The finished, unfilled head piece looks like this. Don't be confused by some of the unevenness of this part - we made the increases in a spiral, when we fill it, it will take the correct shape of Hello Kitty's head.

We knit all other parts, with the exception of the legs, starting with the amigurumi ring. We wrap the thread around the index finger twice, remove the resulting ring from the finger and knit the first 6 sc into it.

Then we pull the short end of the thread and tighten the sc into a tight ring. Thanks to this method of starting knitting, we will not have a hole.
We knit the ears and tail, starting with this ring according to the pattern.

We start knitting the legs from the sole with red thread. We knit the 4th row with a sc, inserting the hook not into the braid of the previous row, but behind the sc itself, inserting the hook from the wrong side. This way, the braid that we didn't knit into will be on the outside, helping the shoe take shape.

We knit the 5th row in the usual way, and the 6th row in the same way as the 4th.
Starting from the 7th row, we knit the last three rows with a white thread. These are the details of the legs you should get.

We begin to knit the arms with 6 sc into an amigurumi ring with white thread. In the 6th row we introduce a red thread and continue knitting according to the pattern until the 12th row. Here we leave the knitting unfinished and begin tying the sleeve frill. We tie this part to the 7th row of the handle part (the second row with a red thread). The number of sc in the first row should be 15. The same number as in the 7th row of the handle parts. To do this, bend the part so that the 7th row becomes the fold line.
After the sleeve frill detail is completed, fill the detail with padding poly. This is where an ordinary pencil may come in handy.
When the part is filled, we finish it with the last two rows according to the pattern.
Then we start knitting the body. Using white thread we knit 10 rows of sc according to the pattern, making increases. In the 11th row we introduce a red thread. It is more convenient to immediately make a VP on a thread of a new color and insert it with a connecting column at the very end of the 10th row.

We continue knitting in a circle with a red thread, making decreases according to the pattern. It should look like this.

Now let's start knitting the skirt. This is important! We tie the skirt to the 12th row (this is the second red row), it is in this row that the number of sc is 42. To do this, we bend the body part so that the 12th row becomes the fold line. We begin to attach the skirt detail to this row.

We continue knitting in the round, making even increases according to the pattern.

So, we have all the details ready. Let's start filling and stitching.
Let's start again with the head. When filling it, we shape it with our hands, slightly flattening and pressing it on top so that it takes the shape of Hello Kitty's head, and not a ball.
Now we sew on the ears. We don't fill our ears. We try to place them so that already at this stage the shape of Hello Kitty’s head can be guessed. The top of the head can serve as a guide here - the beginning of knitting the head. Ears begin to grow right along the edges of it.
Then we fill the body and sew the head to it. We fill the legs and sew them from below to the body. Now that the legs are sewn, it will be easy for us to center the tail and place it in its rightful place.
The handles can simply be tightly sewn to the sides, or you can sew them using a hinge so that they move, spin...
We start by taking a double thread to match and tying a knot at the tip. We pass the thread through the handles so that the knot is on the side that will be adjacent to the body.
Now we thread the thread back through the body.
We thread the second handle with the same thread, continuing the maneuver. We, as it were, string our parts onto a thread - handle + body + handle.
Now we thread the thread back through all three parts. We repeat this procedure a couple more times, slightly pulling the parts together. We bring the thread under the skirt, where we cut the thread from the needle, tie a knot and use a hook to hide the knot inside.
Let's start finishing the muzzle. For the nose, I took hook No. 1, yellow floss threads in two layers and knitted it as follows:
0th row: 3VP + 1VP lifting, then we knit in a circle.
1st row: in the first two VPs, 1СБН each, in the third VP – 3СБН, in the next two VPs, 1СБН each, in the third VP – 2СБН, we finish the SS row.
2nd row: VP lifting, 2SC in the first loop, 1SC in the next loop, 2SC in the next three loops, then 1SC and in the last two loops 2SC, finishing the SS row.
Sew the nose to the muzzle.
It’s just that the sewn-on nose looks a little like a snout...because of its prominence or something...so I suggest putting satin stitches on top of it. If you want it not to be voluminous, you can embroider quite a bit. I like it to be more voluminous, so I make more stitches. At the end of the embroidery, I do not pass the stitches under the spout, but only over it, making small stitches on the sides. This results in smoother edges.
The eyes are knitted exactly the same as the nose. I used a thin wool thread, so I didn’t embroider with satin stitch on top...and the eyes didn’t need extra volume.
Advice. To correctly position the eyes and nose, you can first sketch out their location on paper and, when you are satisfied with the final version, i.e. you will see that Hello Kitty is looking at you, you can sew on the eyes and nose, correlating their location with the pattern.
After this, we embroider the antennae with wide stitches. One tendril - one stitch.
Decorate Hello Kitty's dress and head with roses.


Master class from Larisa (Rozetka).
This is a “translation” of the diagrams with some explanations. Because You can’t do detailed explanations on one piece of paper, but there are enough details here - it was decided to make a small master class on how to knit and assemble Hello Kitty.

So let's start...with Hello Kitty's head. We knit it, starting from the top of the head, according to the pattern, in a circle. We start each circular row with a VP (cable loop) lift and end with a SS (connecting post). The chain of air loops is the 0th row, we do not count it. The 1st row is the first row of sc (single crochet). Here he is in person.

The finished, unfilled head piece looks like this. Don't be confused by some of the unevenness of this part - we made the increases in a spiral, when we fill it, it will take the correct shape of Hello Kitty's head.

We knit all other parts, with the exception of the legs, starting with the amigurumi ring. We wrap the thread around the index finger twice, remove the resulting ring from the finger and knit the first 6 sc into it.

Then we pull the short end of the thread and tighten the sc into a tight ring. Thanks to this method of starting knitting, we will not have a hole. We knit the ears and tail, starting with this ring according to the pattern.

We start knitting the legs from the sole with red thread. We knit the 4th row with a sc, inserting the hook not into the braid of the previous row, but behind the sc itself, inserting the hook from the wrong side. This way, the braid that we didn't knit into will be on the outside, helping the shoe take shape.
We knit the 5th row in the usual way, and the 6th row in the same way as the 4th.
Starting from the 7th row, we knit the last three rows with a white thread. These are the details of the legs you should get.

We begin to knit the arms with 6 sc into an amigurumi ring with white thread. In the 6th row we introduce a red thread and continue to knit according to the pattern until the 12th row. Here we leave the knitting unfinished and begin tying the sleeve frill. We tie this part to the 7th row of the handle part (the second row with a red thread). The number of sc in the first row should be 15. The same number as in the 7th row of the handle parts. To do this, bend the part so that the 7th row becomes the fold line.

After the sleeve frill detail is completed, fill the detail with padding poly. This is where an ordinary pencil may come in handy.
When the part is filled, we finish it with the last two rows according to the pattern. Then we start knitting the body. Using a white thread we knit 10 rows of sc according to the pattern, making increases. In the 11th row we introduce a red thread. It is more convenient to immediately make a VP on a thread of a new color and insert it with a connecting column at the very end of the 10th row.

We continue knitting in the circle with a red thread, making decreases according to the pattern. It should look like this.

Now let's start knitting the skirt. This is important! We tie the skirt to the 12th row (this is the second red row), it is in this row that the number of sc is 42. To do this, we bend the body part so that the 12th row becomes the fold line. We begin to attach the skirt detail to this row. We continue knitting in the round, making even increases according to the pattern.

So, we have all the details ready. Let's start filling and stitching.

Let's start again with the head. When filling it, we shape it with our hands, slightly flattening and pressing it on top so that it takes the shape of Hello Kitty's head, and not a ball.

Then we fill the body and sew the head to it. We fill the legs and sew them from below to the body. Now that the legs are sewn, it will be easy for us to center the tail and place it in its rightful place.
The handles can simply be tightly sewn to the sides, or you can sew them using a hinge so that they move, spin...
We start by taking a double thread to match and tying a knot at the tip. We pass the thread through the handles so that the knot is on the side that will be adjacent to the body.
Now we thread the thread back through the body.

We thread the second handle with the same thread, continuing the maneuver. We, as it were, string our parts onto a thread - handle + body + handle.

Now we thread the thread back through all three parts. We repeat this procedure a couple more times, slightly pulling the parts together. We bring the thread under the skirt, where we cut the thread from the needle, tie a knot and use a hook to hide the knot inside. Let's start finishing the muzzle. The eyes and nose, of course, can be cut out and glued or sewn on from felt, but I couldn’t find one. Therefore, for the spout, I took hook No. 1, yellow floss threads in two layers and knitted it as follows:
0th row: 3VP + 1VP lifting, then we knit in a circle.
1st row: in the first two VPs, 1СБН each, in the third VP – 3СБН, in the next two VPs, 1СБН each, in the third VP – 2СБН, we finish the SS row.
2nd row: VP lifting, 2SC in the first loop, 1SC in the next loop, 2SC in the next three loops, then 1SC and in the last two loops 2SC, finishing the SS row.
Sew the nose to the muzzle.

It’s just that the sewn-on nose looks a little like a snout...because of its prominence or something...so I suggest putting satin stitches on top of it. If you want it not to be voluminous, you can embroider quite a bit. I like it to be more voluminous, so I make more stitches. At the end of the embroidery, I do not pass the stitches under the spout, but only over it, making small stitches on the sides. This results in smoother edges.
The eyes are knitted exactly the same as the nose. I used a thin wool thread, so I didn’t embroider with satin stitch on top...and the eyes didn’t need extra volume.
Advice. To correctly position the eyes and nose, you can first sketch out their location on paper and, when you are satisfied with the final version, i.e. you will see that Hello Kitty is looking at you, you can sew on the eyes and nose, correlating their location with the pattern.
After this, we embroider the antennae with wide stitches. One tendril - one stitch.
We decorate Hello Kitty's dress, shoes and head with roses.
We will need medium and small sized roses.
I suggest not stopping at the decoration with roses
The dress can be knitted in a different color and with a completely different trim. In general, there is plenty of space for your imagination to fly. My Hello Kitty, for example, now has a friend like this.

I decided to knit a toy for my daughter using the Amigurumi technique; she had been asking me for a Hello Kitty doll for a long time. But I ran into a problem: the diagrams on the Internet are all the same, but for some reason, even for me, as a no longer a beginner, they are too confusing. Without a clear description, it was difficult to knit the toy, although after I knitted a couple of parts, I already understood the essence. So I decided to describe the process in more detail, so that even not very experienced mothers could please their children with their favorite toy.
Head
The easiest way to start knitting is from the head, since its pattern is an example for all other parts.

Knitting pattern for this Amigurumi toy
We will start by casting on 10 air loops, from which we will continue knitting.

V. p. - 2 tbsp. b. n. in one loop - 8 tbsp. b n. - 3 times 2 tbsp. b n. in one loop - again 8 tbsp. b n. - 2 times 2 tbsp. b n. in one loop - close the row with a connecting loop.
We add up to the 8th row, then we knit according to the pattern up to the 15th row without adding.


Ears
We knit ears. We will start them and all other details by crocheting such an amigurumi ring: we will wind the thread around the finger 2 times and knit 6 loops.

Then we pull the outer thread and get a ring of loops without a hole inside.

Let's knit 2 ears according to the pattern.

Tail
The tail is also easy to knit. First we close the amigurumi ring, then in the second row we knit everything 2 tbsp. without a crochet. And 3 more rows without decreases or increases.

Hind legs
We knit the hind legs, they are also legs. According to the pattern, we knit up to the 6th row with pink yarn, then with white yarn. We knit the 4th and 6th rows not by the braid, but by the column itself.

This will create a pattern on the paws. Both left and right are exactly the same.

Torso
Let's start with the body. We knit it according to the pattern up to the 10th row with white thread, and then change it to pink.

First the body itself is knitted, and then we will tie the skirt.

The skirt is tied to the 12th row of the body, that is, to the second pink row. We touch the knitting to the posts. We knit a skirt using pink yarn according to the pattern. Then, if desired, you can add a white frill to the frill.

We knit the front legs, that is, the arms of our Hello Kitty, like this. We knit up to the 10th row according to the pattern, leave a little thread for the end of the foot (about 50 cm) and break it off. To the 2nd pink row we tie 2 rows of sleeve frills according to the pattern.


Then fill the pen with a pencil. Stuff tightly, sparing no filler.

After which you can knit the remaining rows.
Now we have all the parts of the Hello Kitty doll ready.

Assembling the toy
We fill everything in order. First the head.
How you stuff it will determine its shape, so try to make it as close to Hello Kitty as possible. To do this, fill more sides than length.

Then we will sew on the ears that do not need to be stuffed.

Make sure that they are on the same level; to do this, first attach them and mark the places where to sew.

We stuff the body and sew it to the head.

We also sew on the stuffed legs (hind legs), bringing the needle for the tail through the body.


Then thread the thread again and stick the body and the second leg onto it. Do this several times.

It is better to bring the thread down under the dress, secure it with a knot and hide it with a hook.


